
Dash is black, but couldn't say if someone didn't repaint it at some point. SN is 6217XXX. Based on the manual and parts that are there it appears to be the "improved" design.Is your 620 a black dash late model?
You are using an out of date browser. It may not display this or other websites correctly.
You should upgrade or use an alternative browser.
You should upgrade or use an alternative browser.
- Thread starter offroad23
- Start date
To me it seems like there is to much play in the actuating sleeve when everything is assembled and appears to only move the steering valve one direction when turned which is towards the rear when mounted on tractor whether it is turned left or right. Almost wondering if I need to tighten the adjusting bushing more to taken some of the play out, but I currently have it set at 12mm which is what it was when I took everything apart. That or I need to adjust the cam spring so it is stronger or I am not getting the cams aligned with the pins properly. I was hoping to test everything on the bench, but it is hard to spin the shaft and hold it from moving to see the steering valve move fwd and aft. Put it on the tractor and then I feel like I can't really see anything and once you put oil in it you get a mess everywhere when you open things up to try to see what is going on.
Guess I would like to see properly functioning one to better understand how much movement of the steering valve there should be, how much play (forward and aft movement) in the actuating sleeve is normal and how the cams and pins interact.
Guess I would like to see properly functioning one to better understand how much movement of the steering valve there should be, how much play (forward and aft movement) in the actuating sleeve is normal and how the cams and pins interact.
In the front of the worm gear there is a bushing that has an internal and external thread on it. There is a locking plug inside of it that is loosened with an Allen wrench to adjust the bushing. With the bushing removed pull the internal threaded piece forward. Start the bushing into the worm gear, but make sure the internal threads start before the external threads do. With the worm housing on the tractor and backlash set put a tapered punch in the roll pin hole at the rear of the sleeve. Using the punch begin to rotate the sleeve against the spring. When it stops moving let go of the punch and it should spring back to neutral by itself. Tighten the bushing in the front slowly till the punch won't spring back to neutral then loosen it just enough so it springs back to neutral from both directions of travel. Lock the bushing with the Allen plug. That should let the operating valve return to neutral so the system doesn't labor and over heat.
I was able to work with this a little yesterday and I can get it to spring back to center now. I made sure the bushing started on internal threads first and I could almost turn it in all the way before it would not spring back. While turning it, what I am seeing is the collar on the actuating sleeve that the power steering valve engages on only appears to move to the rear, it never really moves to the front while turning it either direction. Do I have a cam/pin or spring issue?In the front of the worm gear there is a bushing that has an internal and external thread on it. There is a locking plug inside of it that is loosened with an Allen wrench to adjust the bushing. With the bushing removed pull the internal threaded piece forward. Start the bushing into the worm gear, but make sure the internal threads start before the external threads do. With the worm housing on the tractor and backlash set put a tapered punch in the roll pin hole at the rear of the sleeve. Using the punch begin to rotate the sleeve against the spring. When it stops moving let go of the punch and it should spring back to neutral by itself. Tighten the bushing in the front slowly till the punch won't spring back to neutral then loosen it just enough so it springs back to neutral from both directions of travel. Lock the bushing with the Allen plug. That should let the operating valve return to neutral so the system doesn't labor and over heat.
I haven't gotten back to this project yet, still sitting on the bench, guess I am hoping it will fix itself. Ended up working on some other projects I had put on hold for this one. I will inspect the pins again for flat spots, but I thought they looked pretty good.
As far as the sleeve sliding easier, it seems to slide easier when it goes back versus forward.
I will pull it apart again, reinspect everything, do another quick test watching the sleeve slide and then bolt the steering valve back up, put oil back into it and try it again. If that doesn't work not sure where to go with it after that. I had really wanted to get this tractor back going a couple weeks ago to haul manure with it, but now I am just hoping it is functional again to put on the rake for haying season.
Rich Duane
Member
Read the front section of your power steering manual a few times and I think you will under stand how it works.I haven't gotten back to this project yet, still sitting on the bench, guess I am hoping it will fix itself. Ended up working on some other projects I had put on hold for this one. I will inspect the pins again for flat spots, but I thought they looked pretty good.
As far as the sleeve sliding easier, it seems to slide easier when it goes back versus forward.
I will pull it apart again, reinspect everything, do another quick test watching the sleeve slide and then bolt the steering valve back up, put oil back into it and try it again. If that doesn't work not sure where to go with it after that. I had really wanted to get this tractor back going a couple weeks ago to haul manure with it, but now I am just hoping it is functional again to put on the rake for haying season.
I have made progress today, will outline all I did in later post. Only issue we are having now is when you turn it all the way left it will catch and not want to come back. Stop moving and slowly work it back right and it is fine. That or back up and turn it right. Fight it and you get no where. To the right no issues. It does apeear to turn sharper to left.
Rich Duane
Member
You are going to need another Worm as yours is shot.I have made progress today, will outline all I did in later post. Only issue we are having now is when you turn it all the way left it will catch and not want to come back. Stop moving and slowly work it back right and it is fine. That or back up and turn it right. Fight it and you get no where. To the right no issues. It does apeear to turn sharper to left.
There are no new ones so you will need to find a good used one. ie: salvage
What makes you say it is worm gear?You are going to need another Worm as yours is shot.
There are no new ones so you will need to find a good used one. ie: salvage
wore out
Well-known Member
I'll say it again, you need to take a look at the "vane motor".I have made progress today, will outline all I did in later post. Only issue we are having now is when you turn it all the way left it will catch and not want to come back. Stop moving and slowly work it back right and it is fine. That or back up and turn it right. Fight it and you get no where. To the right no issues. It does apeear to turn sharper to left.
At the worst, you'll be out a couple of o-rings and some oil and time, if all is well down there. Should put new seals on the vanes, as well.
If the bolts holding the moveable vane are loose or broken the inside of the "cylinder" they operate in MAY be carved up, and there may be metal chunks and filings at the bottom.
If it's sticking or wedging down there no matter what you do up above with the worm and mechanism inside and the valve isn't going to solve the problem.
Rich Duane
Member
I work on the worm assembly and valves for customers and find that a helix broken like this one will jam.What makes you say it is worm gear?
It is a dangerous situation.
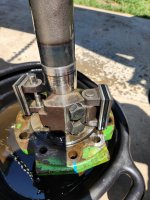
When you say damaged helix, is this what your talking about? Can I build it up and smooth it out?I work on the worm assembly and valves for customers and find that a helix broken like this one will jam.
It is a dangerous situation.
What parts do I need to get on order for this job? Not looking forwatd to pulling that all out.I'll say it again, you need to take a look at the "vane motor".
At the worst, you'll be out a couple of o-rings and some oil and time, if all is well down there. Should put new seals on the vanes, as well.
If the bolts holding the moveable vane are loose or broken the inside of the "cylinder" they operate in MAY be carved up, and there may be metal chunks and filings at the bottom.
If it's sticking or wedging down there no matter what you do up above with the worm and mechanism inside and the valve isn't going to solve the problem.
Rich Duane
Member
The part is R 20159. The worm is hardened and unrepairable. The job is not that hard but has to be done on the bench.What parts do I need to get on order for this job? Not looking forwatd to pulling that all out.
If you have any questions call me at 410-643-2899
I will have to give you a call when I get a chance. In my case if I understand the steering system properly the chipped off corner on my worm gear hex could potentially be an issue when I have it turned full right. I am not experiencing an issue there, but instead at full left where the hex is intact. Can I not build up "aka" weld up the chipped corner and then smooth it back out the way it should be if I am unable to find a good used one to replace it with?The part is R 20159. The worm is hardened and unrepairable. The job is not that hard but has to be done on the bench.
If you have any questions call me at 410-643-2899
I plan to pull the whole steering cylinder out, before I do that, what parts (seals) do I need to locate for this project, trying to get an idea of what parts to expect that will need replacing and cost associated with it.I'll say it again, you need to take a look at the "vane motor".
At the worst, you'll be out a couple of o-rings and some oil and time, if all is well down there. Should put new seals on the vanes, as well.
If the bolts holding the moveable vane are loose or broken the inside of the "cylinder" they operate in MAY be carved up, and there may be metal chunks and filings at the bottom.
If it's sticking or wedging down there no matter what you do up above with the worm and mechanism inside and the valve isn't going to solve the problem.
A quick update on the things I did do to get everything to start working again.
First I removed all the shims (I had tried various combinations here thick and thin, old shim literally fell apart when I took it apart originally) between the steering worm and the gear.
Second when the adjusting bushing threads on to the worm shaft, I made sure to pull the worm shaft as far out thru the worm as possible with a needle nose before threading the adjusting bushing on the work shaft, ensuring the internal threads were starting on the shaft before the external threads on the worm. Previously I thought I had the shaft out all the way and just started threading on the adjusting bushing. Had to experiment with it to make sure I had the shaft out as far as possible to start internal threads but yet get it to still thread on the external threads. This took the slop out between the cam and actuating sleeve and also left the adjusting bushing with proper spacing off the worm that I was not seeing before.
Third added an additional washer with the cam spring to make it stiffer.
Lastly, but equally as important I did not realize how moving the steering valve ever so slightly would take it from working to not working. Started the tractor and loosened the four bolts and then tapped it back and forth to where it finally steered both left and right.
Similar threads
We sell tractor parts! We have the parts you need to repair your tractor - the right parts. Our low prices and years of research make us your best choice when you need parts. Shop Online Today.
Copyright © 1997-2024 Yesterday's Tractor Co.
All Rights Reserved. Reproduction of any part of this website, including design and content, without written permission is strictly prohibited. Trade Marks and Trade Names contained and used in this Website are those of others, and are used in this Website in a descriptive sense to refer to the products of others. Use of this Web site constitutes acceptance of our User Agreement and Privacy Policy TRADEMARK DISCLAIMER: Tradenames and Trademarks referred to within Yesterday's Tractor Co. products and within the Yesterday's Tractor Co. websites are the property of their respective trademark holders. None of these trademark holders are affiliated with Yesterday's Tractor Co., our products, or our website nor are we sponsored by them. John Deere and its logos are the registered trademarks of the John Deere Corporation. Agco, Agco Allis, White, Massey Ferguson and their logos are the registered trademarks of AGCO Corporation. Case, Case-IH, Farmall, International Harvester, New Holland and their logos are registered trademarks of CNH Global N.V.
Yesterday's Tractors - Antique Tractor Headquarters
Website Accessibility Policy