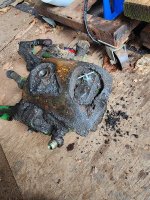
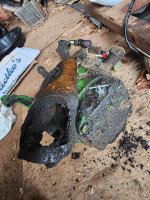
JD 3020 Hydraulic Pump Removal

ajhbike

Member
I changed the 4 pads in the coupler between the engine and the pump because of loud knocking and that quieted the pump down a lot. However, with the new pads I immediately got an annoying leak from the shaft seal so the seal must have slowly deformed over time to adjust the worn, rock hard pads and when I replaced them it caused a problem. So I need to replace the seal, o rings, etc.

My question is for jacking the front end up slightly to remove the front carriage. The videos I have seen show that they put a jackstand/lift under the oil pan to do the supporting of the front end. How solid is that pan? Or should I brace across from rail to rail and leave the pump bracket in place and remove the 4 bolts on the pump to connect it to the bracket?

Thanks
I'd set up some blocking/cribbing to support the frame rails, rather than put weight on the oil pan, just to err on the side of caution.

As I suspect you already know, the pump shaft leak starts INSIDE the pump, at the "quad ring" that wears on the shaft, it's the last thing to access when the pump is disassembled and the first part to go back in.

Also, the pump shaft runs in tapered roller bearings with only a thousandth or two of endplay, and working with the coupler parts shouldn't have affected the seal. It would be a good idea to check the pump endplay before you take it apart as a point of reference as to if the bearings may be worn
 
Last edited:
If have a wide front end to take off,support the front end of the tractor using the engine side rails. The front OTC stands used to support the front of the tractor to split the tractor for clutch would work great.. Take the four bolts out at the front of the engine, coupler apart, lower pump with its mounting bracket down to the floor, out the bottom. Leave both together.. Could make a tool to support all this to have two people lift this down..
 
Would you leave the pump frame on and take the pump off or drop them both together?
I've dropped them as a unit on 4020's and 30 and 40 series tractors, it's been a LONG time since I've done a 3020, so I can't comment on yours.
 
If have a wide front end to take off,support the front end of the tractor using the engine side rails. The front OTC stands used to support the front of the tractor to split the tractor for clutch would work great.. Take the four bolts out at the front of the engine, coupler apart, lower pump with its mounting bracket down to the floor, out the bottom. Leave both together.. Could make a tool to support all this to have two people lift this down..
They can be lowered with the careful use of a chain fall or strap from above.
 
Do you have any help? They are a hard to do alone. If I have help I let the wide front end on. Remove the rear bolts and place 2 longer bolts in the front holes. You can then jack the tractor up enough that the front end will pivot down allowing room to get the pump out. I jack at the very rear of the oil pan on the clutch housing. There is a flat spot there. I have a set of heavy duty stands I put under each side rail for safety. Following some pics from TimS I built a lift arm for my small hoist that works very good to help remove and install pumps. Tom
 
When I did our 3020 a few years ago I used a 2x8 plank and on one side of the tractor I set something that was about the same height as bottom of the hydraulic pump and held the other end of the plank myself and once the pump frame was free from the dowl pins i lowered the one side of the plank to the ground with the pump and frame sitting on the plank. Reversed the procedure for installing the pump except used a ratchet strap to hold the pump and bracket to the plank. Don't remember how I managed to get a bolt started to hold the pump up there. Ours is a narrow front so didn't have to take the front wheels off.

If I had to do it again I'd get someone to help. Especially since you got a wide front. At work I got the equipment to do it correctly but at home I improvise. Like Grandpa would say "Need someone with a strong back and a weak mind".
 
I haven't checked the line but I will.

Good advice and tips. I have another pump I recently got for parts ....which would be nice to just slap in as a replacement but I don't know how to test to see if it functional without putting it on and trying it. I might take that one apart and work on it first to at least become familiar with it.
 
Okay...so I have the front end on a stand, a tail wheel attached to the back of the wheel carriage, and the 4 bolts free on the carriage. Is the final step to the carriage being free to remove the 4 bolts up under on the steering motor/assembly?


20240407_112117 RSZ.jpg
20240407_112035 RSZ.jpg
 
Apparently the answer was yes....those 4 steering box had to come out. Then the fun started. Had an 1-1/8 wrench on one of the front bolts with a pipe on it, it slipped, hit me in the face and off to the ERoom to get the gash glued shut. I ended up using a crow foot to get the front ones, but got them out and freed up the carriage.

On to the next step...
 
Buickanddeere....the seal drain line isn't kinked or leaking (although it was a little loose)...is that something I should blow it back to the sump a bit to make sure it isn't blocked?
 
I changed the 4 pads in the coupler between the engine and the pump because of loud knocking and that quieted the pump down a lot. However, with the new pads I immediately got an annoying leak from the shaft seal so the seal must have slowly deformed over time to adjust the worn, rock hard pads and when I replaced them it caused a problem. So I need to replace the seal, o rings, etc.

My question is for jacking the front end up slightly to remove the front carriage. The videos I have seen show that they put a jackstand/lift under the oil pan to do the supporting of the front end. How solid is that pan? Or should I brace across from rail to rail and leave the pump bracket in place and remove the 4 bolts on the pump to connect it to the bracket?

Thanks
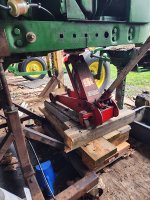
Same thing just happened to me when I replaced fan belt & coupler on 3010
 
So I successfully dropped the pump down (almost forgot about the banjo bolt on the top). I found that the PO had cut a 2 inch piece of foam cut out for padding over the top of the pump. Can anyone think of a reason that the PO might have done that????? The bracket doesn't seem to have anything wrong with it.
20240411_141217 RSZ.jpg20240411_145055 RSZ.jpg20240411_145112 RSZ.jpg
 
So I successfully dropped the pump down (almost forgot about the banjo bolt on the top). I found that the PO had cut a 2 inch piece of foam cut out for padding over the top of the pump. Can anyone think of a reason that the PO might have done that????? The bracket doesn't seem to have anything wrong with it.
View attachment 66723View attachment 66724View attachment 66725
Foam is OEM, keeps dirt, debris, or chaff from below from getting sucked upward and backwards into the radiator.
 
Also be sure the drain line has been updated to the larger size hose. The clear plastic line is not large enough and causes back pressure on the seal. Evidentially Deere either couldn't or figured it was easier to allow for seepage with this this drain than build a pump that didn't leak. Good Luck, John
 

We sell tractor parts! We have the parts you need to repair your tractor - the right parts. Our low prices and years of research make us your best choice when you need parts. Shop Online Today.

Back
Top