Distributor housing turned 180 degrees??

Hi All,

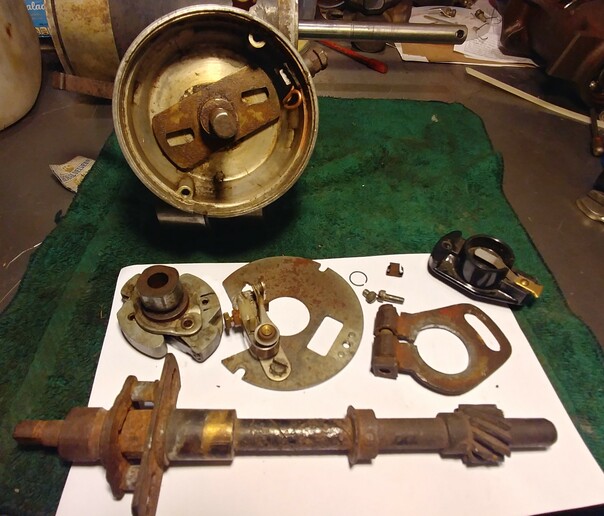
Last week, my husband went out to start our 1952 Ford 8N with sidemount distributor. Hadn't been run in about a month. Wouldn't start. After fiddling with the distributor for a few minutes, he said we needed new points and condenser. He had me pick them up at the tractor dealership. Then, in the process of changing them out, he dropped a screw into the hole in the distributor plate.

It's my understanding that some distributor plates can be removed. Evidently, this particular one is not that type, and we couldn't see the loose screw to get it out of the hole. Foolishly, we tried to start the tractor anyway. Bad idea. The entire distributor housing, which was firmly bolted in place, pivoted 180 degrees.

I started looking online for what to do.

First, I loosened the nut that holds the distributor housing in place. Turned the housing until the loose screw rolled into view through the hole in the plate. Removed the screw. Rotated the housing so that it was more or less in its original position and tightened the nut. Put the the distributor cap back on. Wouldn't start--just backfired a couple of times.

After reading some more online forum posts, I opened the little "window" so I could see the flywheel and turned it with a screwdriver until I could see the timing marks on the flywheel. Set that to 4 degrees. Also re-loosened the nut so I could turn the distributor housing (again) so that the rotor position would roughly correspond to the position of the first spark plug wire on the distributor cap. Put the cap on. Tried to start it. It fired briefly. Tried once more to start it, and the whole distributor housing turned 180 degrees again. Ugh!

What in the world is going on?!? I noticed some powdery dust/dirt has accumulated under the plate. Is that all it takes to bring a tractor to its knees? I can't clean it properly or check the condition of the weights with the plate in the way. That means I will have to pull the distributor, right? And even if I do that, how would I check the condition of the weights, or replace them if necessary if the plate's in the way?

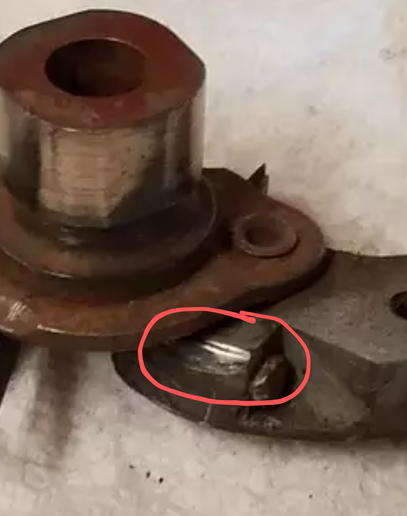
I read on another forum where somebody with similar issues pulled their distributor and found that the roll pin on the distributor shaft had sheared. Not sure what that means, but maybe that's our problem?

I'm starting to think the thing is such a mess now, I don't have much to lose by pulling the distributor myself to look for obvious problems and to remove the additional debris under the (fixed) plate.

Thing is, this procedure would be uncharted territory for me. And my husband, who is pushing 70 years old and is not well, has always despised working on the tractor. He wants me to just call somebody to come out and fix it.

Three years ago, we had a guy come out to fix the distributor. It took him 20 minutes. He charged $240, wrecked our satellite dish with his side mirror (and lied about it), and, as he was leaving, grazed half the bark off of a redbud tree that has since died. Still, he fixed the tractor well enough that it's been running fine ever since--until now.

Being too intimidated to even [i:792ec557fc]try[/i:792ec557fc] to fix it myself is a poor reason to shell out hundreds of dollars to somebody else to do it. It's not an engine rebuild--it's only a distributor, right? In past years, I've replaced the carb, the spark plugs and plug wires, and the sediment bowl. Obviously, pulling the distributor is a more complex operation.

I'm wondering if someone here can walk me through the process of removing, troubleshooting, and reinstalling the distributor--and then help me get the thing timed correctly. If not--or if I can't follow the instructions y'all give me--I can still always resort to calling someone to fix it.

What do you think, folks? Are you game? Should I give it a shot, or am I biting off more than I can chew?
 

I first would buy the manual

. Found this w a Google search.

mvphoto67300.jpg


Sounds like the same issue.
 
i will go out on a limb here and based on what you have said, and the way you have said it, you are capable of troubleshooting the problem, with help from the forum.

First do not attempt to start or turn over the engine anymore until the distributor is fixed.

I am not that familiar with the 8n distributor, but I find it hard to believe the breaker plate is not removeable. I would take another hard look at it. Hopefully others will jump in here and help you out with that.

Next I suspect the lost screw got jammed against the weights and bent them to the point to where they now hit the distributor housing when turned. This means you have to get a look at those weights by removing that plate.

Hopefully others will help with getting a look at those weights. I would not pull the distributor out just yet.
 

have no fear, you've come to the right place. welcome to YT :)

i've had my distributor off and apart lately, and i'd be happy to talk u thru it - but mine is a front mount, not side mount. plenty of others here can help u with it, tho. and i'll second a32 - u sound like u can handle this.
 
You've got this! And we can help! Where abouts are you located?
One of us that are close may even have parts if needed.
 
I have a used side mount distributor off of
a 51 if you need parts. The only problem
with it is the advance bracket for the
weights is worn and won't let the weights
advance like it should.
 
What a great forum!

Thank you, 1Rustic1. Based on what I can glean from the quoted text (broken distributor, shattered timing cover, remove hood and front axle to pull the pulley) repairing the damage is off the table for a novice with a hodge-podge of tools. I really hope there's another explanation for our tractor's symptoms.

Thanks, a32vickyhotrod, HFJ, and Royce. Pessimism was beginning to set in when I received your encouraging posts. I'll take another look at the plate, from which I earlier removed two screws whose only purpose appeared to be to secure the plate. Still, I couldn't budge it, though I didn't try brute force. On a different thread (maybe a different forum) another 8N owner was baffled by what he, too, believed to be a fixed plate, and nobody told him different, so I thought there could be such a thing. But you're right, there must be some way to take it apart. I forget that these tractors were made to be worked on, unlike so much that's manufactured nowadays.

I'm located in mid-Missouri. (Need to edit my profile.)

J Hamilton, I'm not sure what I need yet, LOL. It's good to know you have a distributor that may be perfect for the job. I will def keep that in mind and get back to you after diagnosis. Thank you!

I'm so grateful for all of your all's input, advice, and support! And yes, I'll resist trying to start the tractor until you say it's safe. :)
 
I don't have a side distributor 8n but on
my other tractors I have to remove 2
screws and the stud that goes through the
distributor to remove the plate.
 
Sorry to hear of your dilema.

This pic showes a 8n, side mount,ford
dist, and its parts. Since you've
removed the two screws holding the point
plate down, it just needs a gentle pry
with a screwdriver to lift up. They fit
in tightly.


cvphoto68985.jpg


(The copper wire on the primary is not a
factory part, but works-- )
 
Hi soaked! I appreciate the photo. Prying the plate up gently with a screwdriver didn't work for me. I'll try to snap a clear image and post it tomorrow so you guys can see what I'm talking about. It's weird.
 
Hopefully there isn't any rust holding the plate, and it is just crud and dirt. Pry on it from different sides, it will come out seeing you have removed the two outside screws that hold it in.

I am thinking the white powder of which you mentioned in the above post is a broken or bent part, caused by the lost screw, which is now rubbing on the distributor housing when it turns.

Most likely you are going to need parts, but for now you want to find the problem, then you can fix that problem before spending money and throwing parts at it.

If you find you have to pull the distributor it is no big deal, but you have to follow a procedure, so when installing it back in it goes in correctly.
 
Here are a couple of photos of the distributor with everything removed from the plate.

mvphoto67328.jpg


mvphoto67329.jpg


And..tah-dahhhhh...a photo with the plate removed! Don't know why I couldn't budge it yesterday. It came right out today.

mvphoto67330.jpg


You can see here the fine dust in the bottom of the housing.
[/img:5a2ce2a410]
 
(quoted from post at 13:08:09 12/28/20) Here are a couple of photos of the distributor with everything removed from the plate.

mvphoto67328.jpg


mvphoto67329.jpg


And..tah-dahhhhh...a photo with the plate removed! Don't know why I couldn't budge it yesterday. It came right out today.

mvphoto67330.jpg


You can see here the fine dust in the bottom of the housing.
[/img:7b981928fb]
emove the two clips off the shaft and then lift the advance weights assembly off the shaft & you will be able to see/examine more.
 
I don't really see anything wrong with the weights. Hard to tell without taking the distributor apart, which will be easiest if I pull it out first.

Do I just loosen the front and back fixtures of the clamp and pull? Judging by the shaft photo sent by "soaked", I assume it needs to be turned slightly in a counterclockwise direction while pulling, due to the diagonal gear configuration at the base of the shaft. (Probably not the correct terminology, but hopefully you know what I mean.)

Maybe it will be obvious what's wrong with the distributor immediately after pulling it. If not, I'm guessing I'll need to find a low-traffic place to lay everything out in order of removal, maybe on a paper feed sack, and clean everything up with gasoline (?) and/or fine-grit steel wool(?) or...? I don't see a lot of rust, so I doubt electrolysis will be necessary. And during/after cleaning everything, I'll inspect for wear.

Anything else I need to keep in mind or know about before I get started?
 
The weights don't look too bad, will be able to tell more once the weights are removed.
Question for others. can the bushings go dry enough to have the shaft seize up? Thus turning the base distributor.
 
Dumb question: What's the best way to remove the lower (C-shaped) clip without ruining it? Is this another "pry up gently with a screwdriver" situations? :)
 
(quoted from post at 14:42:14 12/28/20) Dumb question: What's the best way to remove the lower (C-shaped) clip without ruining it? Is this another "pry up gently with a screwdriver" situations? :)
ot pry up , but sideways. I would not be too quick to remove distributor from engine. No need to complicate things, yet.
 
Before you pull the distributor out, put the rotor back and and make a chock mark as to which direction it is pointing. It needs to go back in that way.
 
Before going further, are you sure the distributor was clamped down tight by trying to move it by hand? If so, I don't see anything there that would prevent the shaft from turning in the base.

So if it was me, I would mark the direction that the rotor is facing, plus take a picture of it and then pull the distributor out.

I am now wondering if the distributor ran dry and siezed the bushings.
 
Don't see anything broken on that assy, just some normal wear. What does it look like in distributor? Can you turn the shaftby hand? Should not be able to. Without ignition on, run starter & see if shaft rotates? It should.
 
mvphoto67335.jpg

mvphoto67336.jpg


The housing interior's a little dirty but nothing looks really amiss. No, I cannot turn the shaft by hand, but hitting the starter turns it just fine.

I put the rotor back on and marked the place on the engine block where the rotor was pointing. After doing so, I noticed there's quite a bit of play in the rotor. I probably should have done the marking before I took the clip off--if the clip reduces that play? If it does, I'll put the clip back on and make sure the mark is precise.

a32, you might be right about the distributor running dry. I don't know what the mechanical symptoms of that would be, but I'm pretty sure I've never seen anyone put oil in that port.
 
Other than a little 'dusting & cleaning' & light lube, I would re-assemble & set timing and start it up. Probably just the misplaced screw locked it up. When #1 (toward radiator) cylinder is a TDC-compression stroke, the rotor should point to #1 wire in distributor cap. Rotate distributor body to achieve this. If you have TDC-exhaust stroke, then rotor will be pointing to #4.. Order is 1-2-4-3 CCW
 
Thanks, JMOR, I'm pretty sure I can do all that. I know about the firing order.

The timing mark at 4 degrees before zero (TDC) shows tiny circles punched into the metal. I assume that's the compression stroke TDC. (And maybe I was hallucinating, but I think I remember seeing exhaust stroke markings as well, 180 degrees from the compression markings. If I'm not mistaken, those markings start at 0 degrees instead of 20 degrees.)

At any rate, when the timing window pointer is sitting on that set of circular marks at 4 degrees, the rotor points nowhere near the #1 spark plug wire on the distributor cap. This is probably because the housing has been turned from it's usual position. Consequently, the clips that secure the distributor cap (and, thus, the distributor cap and wires, as well), are also turned from their ideal position. So when I tried to set the timing yesterday, I had to position both the rotor and the housing so as to achieve contact at the right time and place. Dealing with more than one variable at a time decreased my chance of success, and indeed I failed.

Then, too, I really have no idea if those timing marks are right.
This tractor has been worked on by at least half a dozen people in the course of my husband's 25-30 years of ownership. That includes replacement of a PTO shaft that was sheared off years ago. So who knows?

I need to go into town today. Would you recommend I pick up a meter? I'd rather not have to take the hood off in order to check for TDC in the #1 spark plug hole (though learning how to check compression is on my bucket list).

mvphoto67338.jpg
 
Probably don't need a meter. Just something else to learn. I hope you have not removed wires from distributor cap, because potential changes over the years could very well mean that #1 on cap is NOT the connection tower marked #1. And you want wire back the way they were when it was running last.
 
I am still somewhat concerned you have not found the reason for the distributor turning 180 * a second time after you had already removed the screw that fell into the weights.

As rusty and dry as the inside of the housing looks, I am concerned the shaft has siezed and scored the bushing which could again sieze up again, after you get it running and cause further damage to the gears.

JMOR, others, [u:1b827e0015]what do you think about this theory[/u:1b827e0015]. I know what I would do, I'd be pulling that distributor and investigate that bushing and shaft. Better safe than sorry.
 
(quoted from post at 16:33:14 12/28/20) Probably don't need a meter. Just something else to learn. I hope you have not removed wires from distributor cap, because potential changes over the years could very well mean that #1 on cap is NOT the connection tower marked #1. And you want wire back the way they were when it was running last.

No, the wires have all stayed put.
 
(quoted from post at 18:15:10 12/28/20) I am still somewhat concerned you have not found the reason for the distributor turning 180 * a second time after you had already removed the screw that fell into the weights.

As rusty and dry as the inside of the housing looks, I am concerned the shaft has siezed and scored the bushing which could again sieze up again, after you get it running and cause further damage to the gears.

JMOR, others, [u:d95a7ee8b1]what do you think about this theory[/u:d95a7ee8b1]. I know what I would do, I'd be pulling that distributor and investigate that bushing and shaft. Better safe than sorry.
, too, can do "what ifs" all day long, and she might eventually end up there, but for now, I am trying to help her along the least disturbing, shortest path possible. You or I may have no problem removing and replacing a distributor, but the lady is not you nor myself. If there are other matters, they will surface in due time.
 
(quoted from post at 15:24:45 12/28/20) Thanks, JMOR, I'm pretty sure I can do all that. I know about the firing order.

The timing mark at 4 degrees before zero (TDC) shows tiny circles punched into the metal. I assume that's the compression stroke TDC. (And maybe I was hallucinating, but I think I remember seeing exhaust stroke markings as well, 180 degrees from the compression markings. If I'm not mistaken, those markings start at 0 degrees instead of 20 degrees.)

At any rate, when the timing window pointer is sitting on that set of circular marks at 4 degrees, the rotor points nowhere near the #1 spark plug wire on the distributor cap. This is probably because the housing has been turned from it's usual position. Consequently, the clips that secure the distributor cap (and, thus, the distributor cap and wires, as well), are also turned from their ideal position. So when I tried to set the timing yesterday, I had to position both the rotor and the housing so as to achieve contact at the right time and place. Dealing with more than one variable at a time decreased my chance of success, and indeed I failed.

Then, too, I really have no idea if those timing marks are right.
This tractor has been worked on by at least half a dozen people in the course of my husband's 25-30 years of ownership. That includes replacement of a PTO shaft that was sheared off years ago. So who knows?

I need to go into town today. Would you recommend I pick up a meter? I'd rather not have to take the hood off in order to check for TDC in the #1 spark plug hole (though learning how to check compression is on my bucket list).

mvphoto67338.jpg
On an original flywheel, there are two sets of timing marks, make sure you are at the set of marks for when #1 is at Top Dead Center. if in doubt, mark the set you see with chalk or something and rotate until you see marks again and see if you see the same set of marks or not.
 
a32, I share your concerns.

You asked earlier if I was sure the housing was secured tightly enough. The first time it happened (presumably due to the errant screw), nobody had touched the clamp in at least 3 years, and we had no problem in the interim.

After the screw was recovered, I tightened everything down snugly and verified that it could not be moved by hand. It all seemed fine as we first tried to start it. But on the second attempt, the housing pivoted again. So I suspect there's more going on here than just a timing problem.
 
(quoted from post at 18:40:17 12/28/20)
(quoted from post at 15:24:45 12/28/20) Thanks, JMOR, I'm pretty sure I can do all that. I know about the firing order.

The timing mark at 4 degrees before zero (TDC) shows tiny circles punched into the metal. I assume that's the compression stroke TDC. (And maybe I was hallucinating, but I think I remember seeing exhaust stroke markings as well, 180 degrees from the compression markings. If I'm not mistaken, those markings start at 0 degrees instead of 20 degrees.)

At any rate, when the timing window pointer is sitting on that set of circular marks at 4 degrees, the rotor points nowhere near the #1 spark plug wire on the distributor cap. This is probably because the housing has been turned from it's usual position. Consequently, the clips that secure the distributor cap (and, thus, the distributor cap and wires, as well), are also turned from their ideal position. So when I tried to set the timing yesterday, I had to position both the rotor and the housing so as to achieve contact at the right time and place. Dealing with more than one variable at a time decreased my chance of success, and indeed I failed.

Then, too, I really have no idea if those timing marks are right.
This tractor has been worked on by at least half a dozen people in the course of my husband's 25-30 years of ownership. That includes replacement of a PTO shaft that was sheared off years ago. So who knows?

I need to go into town today. Would you recommend I pick up a meter? I'd rather not have to take the hood off in order to check for TDC in the #1 spark plug hole (though learning how to check compression is on my bucket list).

mvphoto67338.jpg
On an original flywheel, there are two sets of timing marks, make sure you are at the set of marks for when #1 is at Top Dead Center. if in doubt, mark the set you see with chalk or something and rotate until you see marks again and see if you see the same set of marks or not.
here are only two sets of flywheel marks....if one doesn't work, try the other. However, as I said before, either one of the two will see rotor pointing to #1 or #4 and if distributor has not been removed (or parts broken/sheared/etc., then all is well.
 
It's possible that, when I tried to time it, I used the wrong set of marks, not realizing at the time that it would make a difference. Even if that were the case, I don't see how it would cause the housing to pivot. Seems like the worst that would happen is that it wouldn't start. Wouldn't you say?

I confess I'm nervous about reinstalling the distributor if i take it out. I'm willing to try, but I understand it takes some finessing--starting out slightly offset from where you eventually want the thing to end up, due to the slant of the gears. This would add a third variable to the other two (housing and rotor positions), which could put me father from the goal.

The downside to leaving the distributor where it is, reassembling the top part, and trying again to time it is that I haven't really done anything to fix it since the last time it swiveled. All I've done is to remove the plate, clips and weights. I can clean the dust out of the housing and put oil in the inlet. Maybe that's all it needs?
 
Good suggestion, R Geiger. I now realize there's a difference, but as with everything else on this project, I should have been asking these questions before making mistakes instead of afterwards.
 
(quoted from post at 19:32:14 12/28/20) It's possible that, when I tried to time it, I used the wrong set of marks, not realizing at the time that it would make a difference. Even if that were the case, I don't see how it would cause the housing to pivot. Seems like the worst that would happen is that it wouldn't start. Wouldn't you say?

I confess I'm nervous about reinstalling the distributor if i take it out. I'm willing to try, but I understand it takes some finessing--starting out slightly offset from where you eventually want the thing to end up, due to the slant of the gears. This would add a third variable to the other two (housing and rotor positions), which could put me father from the goal.

The downside to leaving the distributor where it is, reassembling the top part, and trying again to time it is that I haven't really done anything to fix it since the last time it swiveled. All I've done is to remove the plate, clips and weights. I can clean the dust out of the housing and put oil in the inlet. Maybe that's all it needs?
id you have it tightened down when it swiveled the last time?
 
"I am still somewhat concerned you have not found the reason for the distributor turning 180 * a second time after you had already removed the screw that fell into the weights.

As rusty and dry as the inside of the housing looks, I am concerned the shaft has siezed and scored the bushing which could again sieze up again, after you get it running and cause further damage to the gears.

JMOR, others, what do you think about this theory. I know what I would do, I'd be pulling that distributor and investigate that bushing and shaft. Better safe than sorry."

Being that is an Oilite (sintered bronze) bushing that when run dry they tend to wear the bushing and the shaft and the shaft gets sloppy. Points gap varies. Unless the tractor sat up a long time so it could rust and/or gunk turn to glue my opinion is that running dry would not likely result in seizure. A slightly bent distributor shaft I could see causing binding with the housing and bushing.
 

I did, and tried to turn it by hand. It seemed good and firm. It certainly would not have drifted like it did due to simple vibration or minor, intermittent friction.
 
Thanks for weighing in, deanostoybox. Would a tiny screw dropped into the housing be enough to bend the shaft? And is there a way to tell that the shaft is bent without pulling the distributor? For example, would the top of the shaft visibly wobble when the starter is pushed?
 
you said that shaft turned just fine with starter. If that didnt swivel distributor than forget about shaft/bushing binding. When re assembling, use starter to spin it as before just prior to installing cap. Thinking possible rotor to cap interference.
 

Good grief, seems like the plastic rotor would bust before the whole thing would turn. But when, at a32's suggestion, I put the rotor on the bare shaft in order to mark the distributor position in anticipation of pulling it, I noticed a lot of play in the rotor. Upon inspection, the rotor didn't look damaged, and I asked in my post if all of that play was a function of having removed the top clip from the shaft. Unless someone knows the answer to that offhand, I will go out now and see if reinstalling the clip stabilizes the rotor.
 
(quoted from post at 20:19:16 12/28/20)
Good grief, seems like the plastic rotor would bust before the whole thing would turn. But when, at a32's suggestion, I put the rotor on the bare shaft in order to mark the distributor position in anticipation of pulling it, I noticed a lot of play in the rotor. Upon inspection, the rotor didn't look damaged, and I asked in my post if all of that play was a function of having removed the top clip from the shaft. Unless someone knows the answer to that offhand, I will go out now and see if reinstalling the clip stabilizes the rotor.
urpose of clip is to stabilize/make rotor to shaft a good snug fit. I concur with jameson comments.
 
Sorry to be late to the party. I've been at work all day.
The rotor cap will break before it turns the housing. Done it.
The spring does take up the slack in the rotor cap.
I also agree that if it turns with the starter when disassembled,
it should turn when reassembled.
JMOR's line of thinking makes sense to me.
What will it cost to try it? Maybe a little time?
 
I wrote "The rotor cap will break before it turns the housing."
That assumes the housing is actually tight.
Mine was and it broke the rotor.
 
"Thanks for weighing in, deanostoybox. Would a tiny screw dropped into the housing be enough to bend the shaft?"

Yes. The engine is turning, the distributor stops. The gears wedge apart and something has to give. If the force turning the motor is great enough it will push the gear out through the front timing gear cover. An errant loose screw or too long of a screw in the points or condenser will do the same thing.

"And is there a way to tell that the shaft is bent without pulling the distributor? For example, would the top of the shaft visibly wobble when the starter is pushed?"

It might. If you loosen the distributor housing enough so you can just turn it with your hand, then hold it with your hand while cranking you will feel if there is any binding. Ignition off of course:)
 
Ok, so even with the clip in place, the rotor does wiggle some--maybe as much as 1/4" at the distal end. For whatever that's worth.

Hi Royse! I have more time than money, so I'm game to try reassembling and go from there it if you think it's safe to do so. I still don't know why the housing turned after the loose screw was retrieved, so I'm nervous about possibly breaking something I can't get at...but I'm also nervous about the potential consequences of pulling/reinstalling the distributor.

Worst case scenario, scrap iron prices are at close to 10 year highs. :)
 
"Yes. The engine is turning, the distributor stops. The gears wedge apart and something has to give. If the force turning the motor is great enough it will push the gear out through the front timing gear cover. "

This brings us full circle to 1Rustic1's response--the very first one I received. The one that mentioned a broken distributor, shattered timing cover, and the necessity of removing the hood and front axle to pull the pulley. The one that made me sick to my stomach. The one that makes me think I should pull the distributor after all.

"If you loosen the distributor housing enough so you can just turn it with your hand, then hold it with your hand while cranking you will feel if there is any binding. Ignition off of course:)"

I'll try this tomorrow morning.
 
Make sure you have the rotor fully seated on the shaft.
Mine does not move that much. Maybe the rotor is wallowed out?
 
"Make sure you have the rotor fully seated on the shaft.
Mine does not move that much. Maybe the rotor is wallowed out?"

I tried our previous rotor--not in the best shape, but it hadn't experienced the kind of trauma that our present one may have
undergone. It wiggled about the same amount. Maybe it's the shaft, not the rotor, that's at issue.
 
well, I have to ask your meaning of wiggle. If you mean side to side perpendicular to shaft, that is very different to a rotational wiggle Some free rotation is a normal motion of the centrifugal advance. Set point gap and push shaft side to side Without rotation to see if gap changes. Positive answer.
 
(quoted from post at 20:22:07 12/28/20) well, I have to ask your meaning of wiggle. If you mean side to side perpendicular to shaft, that is very different to a rotational wiggle Some free rotation is a normal motion of the centrifugal advance. Set point gap and push shaft side to side Without rotation to see if gap changes. Positive answer.

Sorry, I didn't express myself very clearly. I just mean that, on a completely static shaft, I can manually move the rotor such that the distal end moves side to side as much as a quarter inch.
 
(quoted from post at 17:47:47 12/28/20) "Thanks for weighing in, deanostoybox. Would a tiny screw dropped into the housing be enough to bend the shaft?"

Yes. The engine is turning, the distributor stops. The gears wedge apart and something has to give. If the force turning the motor is great enough it will push the gear out through the front timing gear cover. An errant loose screw or too long of a screw in the points or condenser will do the same thing.

"And is there a way to tell that the shaft is bent without pulling the distributor? For example, would the top of the shaft visibly wobble when the starter is pushed?"

It might. If you loosen the distributor housing enough so you can just turn it with your hand, then hold it with your hand while cranking you will feel if there is any binding. Ignition off of course:)

This is what you should try if you don't want to remove the distributor. It will tell you if there is any bind in the shaft. Also make sure you add a good couple of drops of oil to the access tube.
 
This is what you should try if you don't want to remove the distributor. It will tell you if there is any bind in the shaft. Also make sure you add a good couple of drops of oil to the access tube.

Thanks so much, I'll do it first chance I get tomorrow. Forgive my ignorance, but what oil should I use for the distributor, and do you mean literally "a good couple of drops"? If not, how much? As I said, it hasn't been oiled in at least three years, and probably not in 5 or more. Small wonder it's struggling.
 
(quoted from post at 00:23:55 12/29/20)
This is what you should try if you don't want to remove the distributor. It will tell you if there is any bind in the shaft. Also make sure you add a good couple of drops of oil to the access tube.

Thanks so much, I'll do it first chance I get tomorrow. Forgive my ignorance, but what oil should I use for the distributor, and do you mean literally "a good couple of drops"? If not, how much? As I said, it hasn't been oiled in at least three years, and probably not in 5 or more. Small wonder it's struggling.
ood night.
 

I may have missed this in the thread but has the screw that clamps the adjusting plate to the distributer been tightened? I can imagine after the first time the distributer twisted that this clamp is probably loose so the distributer may turn again even if the errant screw was removed! There is a procedure in the shop manual to tighten this clamp in the correct position so that the adjusting bolt can be used to set timing correctly....
 
Hi, Btzj02, I did tighten it to the extent that it was immobile when I tried to move it by hand. But my thinking is that it shouldn't turn like that even when the clamp is not super tight--otherwise, every time someone uses the clamp to adjust the timing, their distributor would be moving on its own.
 
"Unless somebody tells me different, I'll use a few drops of 3-in-1 for the sake of convenience, and will sparingly oil the weights, too."

Scratch that. A 2009 thread says that the manual recommends 30W or 40W.
 

Here is the clamp screw I am referring too. Once this is tightened and set correctly it does not move. Timing is then adjusted using the bolt that passes through the elongated slot.
mvphoto67381.png
 
Thanks for explaining that. Unfortunately, I had to loosen that screw in order to return the housing to its approximate original position. So I'll ensure that it's good and tight before I try to time and start.
 
Thanks, Btzj02! Though barely legible, it's more helpful than the one I found last night.
http://vieux.tracteurs.free.fr/pdf/Ford_shop_manual_2N_8N_9N.pdf
 
On a somewhat unrelated note, the tractor has been cranking mighty slowly, so I'm charging it now with a charger. I hooked negative to negative, positive to positive, and plugged it in. I know I'm supposed to ground to the chassis, but I don't know what's a safe place, with such short charger cables and the gas tank right there. The hood is really the only "clampable" thing within reach. Would that be safer? FWIW, the tractor is in a large garage with the overhead door and windows wide open and sheet metal missing from the far end of the roof, and the weather is breezy, so there plenty of ventilation.
 
(quoted from post at 12:30:21 12/29/20) On a somewhat unrelated note, the tractor has been cranking mighty slowly, so I'm charging it now with a charger. I hooked negative to negative, positive to positive, and plugged it in. I know I'm supposed to ground to the chassis, but I don't know what's a safe place, with such short charger cables and the gas tank right there. The hood is really the only "clampable" thing within reach. Would that be safer? FWIW, the tractor is in a large garage with the overhead door and windows wide open and sheet metal missing from the far end of the roof, and the weather is breezy, so there plenty of ventilation.
he hood would be a very poor place to use as a ground.
 
Difficulty posting link as url, so maybe just copy & paste?

http://www.external_link.com/ford-8n-9n-2n-online-service-manual/index.htm
 
(quoted from post at 12:11:46 12/29/20) I figured.

A thought on your rotor being way off (180 degrees?) from no 1 on timing mark. Engine has to be on no 1 [u:501eb2b69a]compression stroke[/u:501eb2b69a] for rotor to line up with no 1 dist terminal. If you turn the engine by hand with the plugs out, you can feel the compression with your finger over the plug hole

Once you get things back together, with points gapped correctly, put it on compression stroke timing no 1 mark.

Put a rolling paper in the points and slowly turn the distributor until the paper just slips as the points open. Tighten down the dist bolt. Timing will be within about 1 degree of correct timing. Points need to be new or without pits.

You can do the same with an ohm meter. One lead on the points wire connection the other to ground. When the points open, the meter will show an open circuit. This is a little more accurate than the rolling paper method.
 
Mad Farmer, thanks for the helpful post!

Today was too cold to spend much time in the garage. I cleaned the dust out of the housing, added a few drops of 30W oil to the oil port (though it didn't seem to drain to where it's needed), and sparingly oiled the weights. Also charged the battery for a couple of hours, but the charger never read "charged", and the tractor still cranks as slowly as before. Hmm.

In the morning I'll tighten the distributor clamps and, as a couple of people suggested, hold the distributor with one hand while pushing the starter with the other and see if I can feel the shaft binding up. I'll also try to see/feel if the shaft wobbles. If those things seem ok, I'll hold off pulling the distributor.

After a ton of help from folks here and a few days of online research, I understand better how to reassemble the distributor and time the tractor. What follows is my best guess at step-by-step instructions. Some of this is probably wrong and I want to avoid making more mistakes. (For instance, I just now discovered that the weights are supposed to be installed as described in Step 2--or at least I think they are.) So everyone is invited to idiot-proof what I wrote. Help with terminology is welcome, too.

[i:4a4b5a7e60]1) Verify ignition is off and gear shift is in neutral.

2) Screw point set (distributor breaker) and condenser onto breaker plate. Reinstall weights (advance assembly), being sure to seat the two buttons on the underside of the weights into the corresponding slots in the shaft crossbar in base of housing. Reinstall clips, assembled plate, and rotor onto shaft.

3) Remove #1 spark plug. Put finger over hole and turn (the fan?) by hand to identify compression stroke TDC.

4) Mark spot on timing wheel where compression was detected. If already aligned with timing marks, record position relative to TDC.

5) Note rotor position. With front and back of clamp loosened, turn housing so that, when distributor cap is later installed, rotor will point toward #1 spark plug wire on cap. Oil port should be accessible. Tighten rear clamp screw. Remove rotor.

6) Set point gap by first loosening the two screws securing distributor breaker to plate. Adjust position of point-end of breaker so that points open and close as shaft turns. Points should be no more than a dime's width apart when fully open. Tighten both point screws and re-check gap, using starter &/or by hand-turning fan or timing wheel. Repeat step if necessary.

7) To refine timing, move distributor body in incremental steps along front clamp groove just until a rolling paper placed between the points falls out as they open. Tighten front of clamp. Repeat paper test using starter button or by hand-turning fan or timing wheel. Adjust if needed.

8) Rotate shaft to return rotor to #1 wire position. Install distributor cap.

9) Try to start engine. Timing can be advanced (sped up) or retarded (slowed down) by loosening front of clamp and moving distributor clockwise or counterclockwise, respectively, in the front clamp groove until tractor idles as desired. Tighten front of clamp.

10) Mark #1 position of rotor relative to housing and engine block, and take photos.[/i:4a4b5a7e60]
 
This shiny spot is under one of the
points hold down holes. When the screw
was lost, how long was it's replacement?
If the screw was too long----
cvphoto69342.png

Also see a shiny spot on the opposite
weight leading edge that lines up too.
 
Astute observation.

After I loosened and turned the housing so that the lost screw rolled out from under the plate and into view, I fished it out of the hole. Then I removed the breaker and saw that the screw my husband substituted was too long. I reinstalled the breaker using the screw I retrieved before trying to restart, at which point the housing turned again. With the lost screw out of the way and swapped for the long screw, there should have been nothing left to impede movement of the weights. So as others have suggested, maybe I just needed to tighten the back of the clamp more than I did. Either that or the fact that the shaft has not been oiled is causing it to seize.

I need to have replacement screws on hand for when they get lost. Last I checked, the dealership didn't have any, nor did Ace Hardware. I haven't tried Lowes or Home Depot yet.
 
I just talked to my husband, and he said that long screw was in there from a previous lost screw. He said the tractor has been running with that screw in place for a long time. Ugh.
 
(quoted from post at 13:36:53 12/30/20) I just talked to my husband, and he said that long screw was in there from a previous lost screw. He said the tractor has been running with that screw in place for a long time. Ugh.
ave you thrown in the towel?
 
(quoted from post at 01:18:39 01/03/21)
(quoted from post at 13:36:53 12/30/20) I just talked to my husband, and he said that long screw was in there from a previous lost screw. He said the tractor has been running with that screw in place for a long time. Ugh.
ave you thrown in the towel?
I certainly hope not. I believe you had them headed down the right path.
 
It's been too cold out to do much. As advised previously, I did tighten both sides of the clamp and spun the distributor to see if the housing would turn. It didn't, nor could I detect any wobble or binding as the shaft rotated.

Today's high will be in the 40s. I plan to follow the step-by-step instructions at the bottom of page 5, unless somebody suggests otherwise. Will keep you posted re the outcome.
 

We sell tractor parts! We have the parts you need to repair your tractor - the right parts. Our low prices and years of research make us your best choice when you need parts. Shop Online Today.

Back
Top