'66 Powershift PTO won't stop at 1900 RPM Continued

Dweitzel

Member
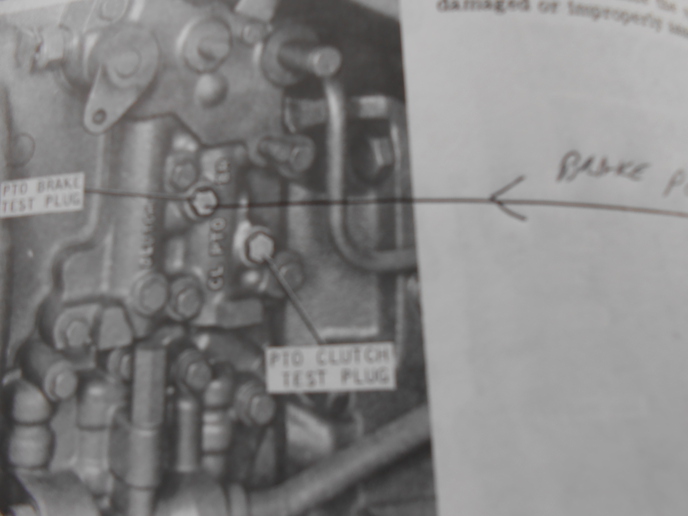
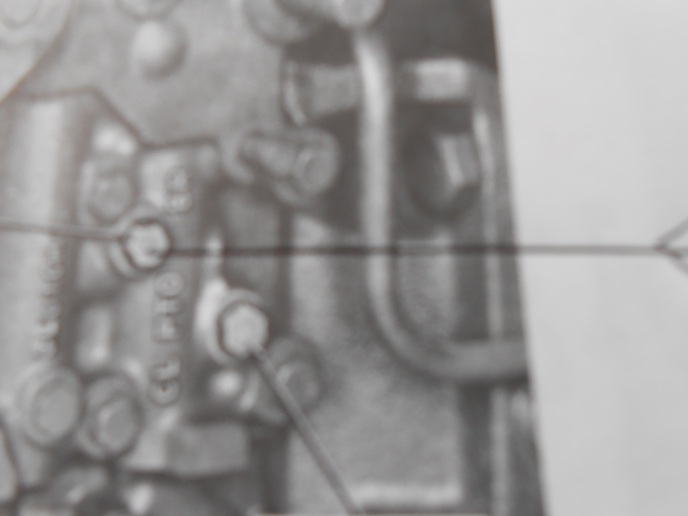
Ok, my '66 - 4020 does not have a "BR" port on the PTO valve to test the PTO brake pressure? Yes I'm sure. It only has a "Clutch" and a "PTO" port. I physically removed the inching pedal and there is not a "BR" port.

To resolve the problem of the PTO not shutting off at 1900 RPM, I shimmed the oil pressure to 185 PSI. PTO worked great however, the book says it needs to be 150psi. Worried about the pump longevity, additional oil seals and why do I need 35 psi extra?

Called a JD dealer and spoke to them. We checked the pto with tractor off, and the PTO will turn by hand. Said that's good, PTO clutches should not be warped.

He looked in his service manual and asked about the shifting, 3-point operation, rear remotes, PTO and "CL" ports on the side of the PTO valve and all that checked out ok.

Basically sounds like the PTO brake lining is toast. Sounds like the increased pressure on the oil regulator was enough to overcome the lining failure and possibly metal to metal on the PTO brake in the transmission.

Sounds like the thing requires 2 splits to get the PTO brake out for inspection.

I did ask him about the PTO free wheeling when it's shut off with an implement on the PTO. He said it's suppose to freewheel to a stop. My question is how much freewheeling does the PTO shaft do normally when NOTHING is attached to it? I would assume it SHOULD stop pretty quickly?

If the PTO shaft is stopped and the tractor is running, I cannot turn the PTO shaft by hand.

Does the PTO brake only have sufficient braking ability to stop the shaft quickly when no attachments are on the PTO? Is this a balancing act between hydraulic pressures, brake lining, etc so the implement stops, but does not grind up the PTO brake lining?

My final question is why if the brake lining is bad, do I still have pressure on the PTO that will grind up a 2x4 pushed up against it when the PTO lever is turned off at 1900 RPM? Sounds like to me I have pressure leaking past a seal and placing pressure on the clutch pack. This sounds like a faulty valve/o-ring, seal etc. Are there any check valves to the PTO clutches that could stick? Just talking out loud.

Any ideas or observations would be of great help.

Thanks.
 
Your asking a lot of good questions,and I'll try to answer them,,Yes it will take 2 splits to get to the PTO brake, and yes when the brake/PTO clutch are in top shape the PTO will only stop quickly with no implement on it, the equipment will keep it spinning for a bit, that is why it's always best to idle the tractor down before disengaging the PTO.And yes I think you have some thing going on in the clutch/brake area, it could be warped disc, even though you can still turn the shaft with the engine off, the warpage will sorta 'grow' when the disc are spinning. On the early 4020PS's there were some upgrades on the PTO brake, I remember on the early one's the brake assembly would work forward some how and not work out, I think a stub shaft is what worked out and on the newer (1967 I think) they drilled and threaded a hole from the out side and made a groove in the stub shaft so that a ball bearing would meet it and 2 Allen screws would hold it in place, locking the stub shaft in the housing, I did drill and tap a couple years ago with success.
 
Thanks Tim. I did talk to the mechanic that split the tractor. He said he did visually inspect the brake lining on the PTO brake and said it had at least 1/8" or more left on the lining? He thinks there may be an "o" ring or gasket around the PTO brake cone that may be worn or nicked and that's letting the pressure by and that's why when I bumped up the pressure to 185 psi it sealed or was able to overcome the leakage/deficiency? I guess I'm not sure why there is still pressure on the PTO shaft at 1900 rpm. It's like fluid pressure is still being applied to the clutch even when the PTO lever is off? I'm still hoping it's the PTO valve on the side of the tractor. Mechanic is digging into the service book a bit more today and will let me know what he finds out.
 
I forgot to mention the possibility of the nut being loose on the PTO lever, down inside of the dash area, I have seen that small nut (1/4" I think) back off and not let the action work out, also dirt build up in that area too can be a problem, check that angle out too ..
 

That little hidden nut(parts key #32) slipped my mind also.
14394.jpg
14395.jpg
 
Yes it would be great if he could fix this one with a 7/16" wrench...I have seen it happen,,really puts a smile on a customers face when it does...
 
Yup, already had cleaned the dirt/debris from inside the console. The nut was also good and tight. Sure hope I can find the PTO brake port somewhere to test the pressure. Would be really great if the problem is a stuck valve in the PTO valve on the side near the inching pedal. Will post more later. Thanks for all the ideas. Keep em coming if you think of anything else.
 
Well I guess you crapped out on the loose nut then,,and I'm near sure the valve is not the problem..here are some pics showing the test port, and the brake idler stub that has been known to work out on the early models
a99918.jpg

a99919.jpg

a99920.jpg
 
Weird thing is the "BR" port is not on my valve. The bolt to the left is there, but no "BR" port?

Looks like another split is in the works. I'll be sure to ask about the idler stub when the mechanic calls back. Is it the snap ring that comes loose on the idler or is the spring in the middle the problem?
 
No the stub shaft that the idler is on just works forward about 3/4" and kinda keeps the brake from hitting right, on the newer (before 1969 but later than 1965) they added a set screw to help hold it in place. I remember the first one that I had that trouble with I drove it back in with some lock tite and in a year or so it worked back forward again,,so the next time I drilled and taped a threaded hole and made a groove in the stub shaft to meet it,,that took care of it,,just some more things to think about as you continue your battle with it...Darn it
a100011.jpg
 
Tim, that is sure something I need to look at. Sure is nice to find someone that really seems to know the '66 and its quirks. When I have this split, it looks like there is maybe a 1/8" shoulder that is proud on the brake idler. Does this sound correct? Did you drill through the outside of the transmission case to install the set screw? Hard to tell from the pic. I assume you drilled into the brake idler? How far? Did you tap and thread the hole in the idler? What dimensions on the set screw and is there a hardness to the set screw material or just normal "number 2" type fastener material? A picture of the outside of your case if it shows the drill location would sure help. Thanks.
 
It has been a long time since I did that, I drilled in from the out side of course, I think I threaded it 5/16", I didn't have a way to thread that deep so I drilled 1/4" into the socket area, marked the stub shaft and had a groove turned into it with a lathe to receive a 1/4" ball bearing, I stacked a couple of them in the hole to where the set screws would tighten up on them. I copied the idea from the newer design. The 1/4" ball went into the stub almost half way..locking into the side of it and the case. I'm not sure this is what is happening to yours but it's possible,,I'll look up the serial number break on it.
 
serial # 144,195> is when Deere started to use the set screw to anchor the stub shaft.
 
I'm at SN 108146. Sounds like I'm pre-set screw. Wonder if a new idler can be purchased from JD with the groove already in the idler? I'm sure they are pretty proud of the part, but would help me time wise if that is the problem. Guess I need to try and find a part number. If you can let me know where the serial numbers break, that would help if I decide to go that route. Thanks.
 
I think this is the part Tim was referring to but it been many,many years since I peered inside a PS trans case. So Tim if I'm incorrect correct me please.
parts key #23 R41745 SN 144195 - SHAFT PS IDLER GEAR,LOWER ADD 435.51 USD
14462.jpg
 
Yes, that"s the stub shaft I was talking about, for some reason it would work out of the case on the older ones and would keep the PTO brake piston shoe from matching up in the gear. It it a drive in tight fit, and I remember putting loc-tite on to help hold them,but they would still work out, that is why Deere went to the set screw system at the 144,195 serial #.
 
Jim and Tim, I see an "O" ring on the end of that assembly, would it make any sense that when I increased the oil pressure to 185 psi that the increased pressure would work on this idler to "re-seat" it or the pressure may have an effect on this part? I'm looking at the pressure diagrams and I'm not really sure as it looks like the pressure mostly affects the clutch plates and the diaphragms that push/pull the clutches apart. If the increased pressure does not affect this part, give me your best guesses. Cold I have 2 problems? If it were you, would you both address this deficiency while this tractor is split? It seems cheaper to me to replace the part even at $400+ than to need to re-split the tractor in the future. Is it the kind of problem that it's not IF is loosens, but WHEN?
 
Tim is more qualified to answer your question but if I understand you correctly I think raising pressure to 185 psi will not adversely affect the o-ring(parts key #15).
 
#15 is the brake piston o-ring,,#8 is the old style stub,,#23 is the newer version, if you have # 8 and it has worked out you will need to alter it for a set screw,, these ideas are only possible scenarios, that could be happening,,or not,,you will just need to go back through it and see what is actually going on... Darn it
 
Will parts number 18-25 fit and interchange exactly with the lower serial number tractors and fix this or can I only use the original idler part and modify it IF this is a problem?

Looking at the original idler. Where does the indent need to be placed, before the gear, (left side), or after the gear, (right side looking at the diagram). I'm assuming the set screw would not be drilled through the gear.
 
Are parts #19-22 the same on serial numbers prior to the set screw being put in? If parts #13-18 are ordered, would they be an exact fit for parts #7-12? (Without the case being drilled and the set screw used).
 
I don"t think they will inter change,,and be sure this is your problem....do you have it split now??
 

We sell tractor parts! We have the parts you need to repair your tractor - the right parts. Our low prices and years of research make us your best choice when you need parts. Shop Online Today.

Back
Top