Coolant flush

vezult

Member
OK, so more noob questions.

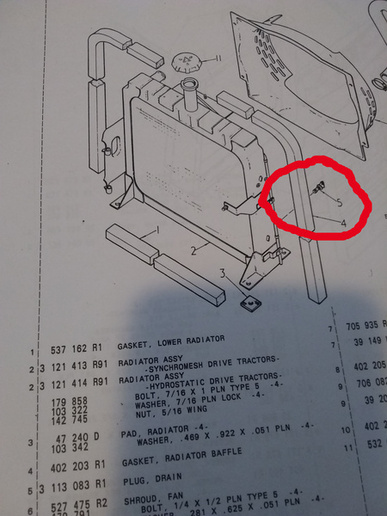
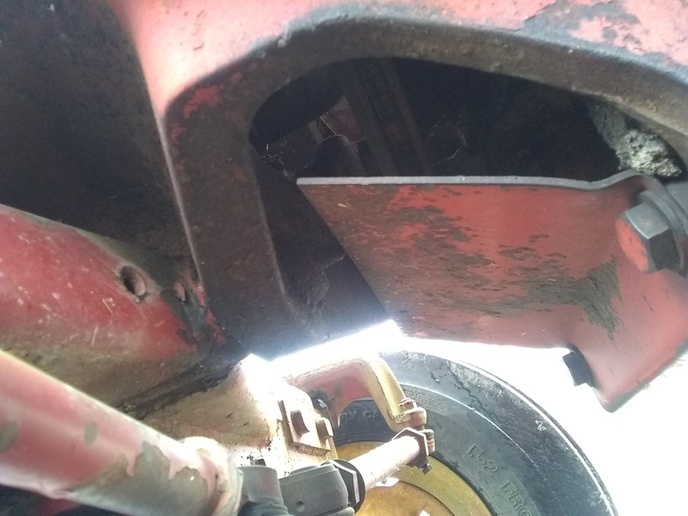
I'm planning to flush/replace my coolant on my IH 684. The manual shows only the crank-case coolant plug, but also says to remove the radiator drain plug. Looking at the parts manual, the plug appears to be on engine facing side of the radiator, to the operator's left hand side, but I can't put eyes on it. The lower hose, the fan housing, and the rail supporting my loader prevents me from getting my hand in to feel around for it. The alternator is in my way on the other side. There is an angled metal plate on the front of the underside of the chassis that prevents me from seeing/reaching from the bottom.

Will I have to remove that plate, and/or take the top and side panels off in order to get this done, or am I missing something obvious?

Manual:
cvphoto77186.jpg


Part:
cvphoto77187.jpg


Left side:
cvphoto77188.jpg


Underneath:
cvphoto77189.jpg

 
Found it! I was able to get my phone down in there and take a picture. It was on the alternator side. I think I made some bad assumptions based on the arrangement in the parts manual.

Now to see if I can get my hands on it...

cvphoto77202.jpg
 
*sigh*

So, I can't remove the side panel because the bottom bolt is inserted from the outside in, and its removal is blocked by the support rail for my loader. I can't even cut the bolt off and push it out - there's just insufficient room for the head to move. Maybe I could take the nut off and push it out far enough to the a hacksaw blade in between the head and the panel...but I'd rather not chew up my panel, if I can avoid it.

I don't want to mess with the alternator - I don't want to have to re-tension that belt afterward. I don't want to take off the loader an its support rail...I don't think that's really a one-man job.

The metal plate on the bottom is held on by very large bolts, which seem like maybe they serve some structural purpose, like maybe connecting the front-end to the center part of the chassis (attaching that plate being only a secondary function), so I'm a little reluctant to mess with them.

This just seems stupidly difficult, probably only because of the loader. Am I missing something painfully obvious?
 
Aside from the homemade tool Jim B. is suggesting, which very well may work fine, they also make sockets for those drain cocks. The one in the link does not show it, but the one I have has a 3/8 in. square drive in the back. Check your local auto parts store they may have one on hand.
Rad drain socket example
 
The bolts on the sloped plate can be removed without any structural problem. IT will not be of much use for the rad drain though. The nut on that side sheet is welded to the side sheet I believe. It is on our 574 same tractor just newer model. It is about as easy to pull the bottom radhoes loose to drain and retighten. While in there might as well put a lower hose heater in there for cold starting in winter if it is a diesel. We have used them for 40plus years on ours. It will start all winter even down in the -20 range. Can't say about colder since that is about as cold as it gets here ever so far in the last 50 years. While flushing might just as well blow out the radiator so it is clean for spring. Clean out the trash in front of the radiator on the bottom of the opening. Our 574 has a 2050 series A loader on it so know just what you're talking about with the no room to work in there.
 
oooh. That could be helpful. Now that I know where it is, I think could probably reach with this adapter and an extension, if my socket handle is long enough. I'll see if I can track one down. If not for this time, then the next.
 
I think in my case, the fuel pump may block a long/shallow angle too. I'll see. I like this kind of tool though, and want it to work :-)
 
OK. Yeah, I may try just using the lower hose. Seems like maybe if I move the hose, I may be able to reach across and get the drain plug as well, with a socket wrench+adapter that someone else suggested. Looks like I'm not going to avoid a coolant mess any way I do it. I suppose I'll need two buckets to cover drainage all around the bottom opening.

Do you normally flush with a garden hose after draining, or just run it with distilled water for a bit and drain again? My water has some calcium and iron in it. Is that problematic as long as I flush with distilled water before filling it with coolant?

The nut for my side panel isn't welded on, thankfully. I'm reserving the right to cut the bolt head off, if I get desperate :-)

I've got a heater connected to the crank-case drain plug, and it has worked fine so far, though I've not seen weather much below zero here.
 

Your notched PVC pipe reminds me of the petcock tool I made. I started with a spark plug socket supplied in some car's toolkit, which is a steel tube with a hex pressed into one end. I notched the hex end to fit the petcock ears and brazed an old 3/8" socket into the other end.

I have appreciated using my socket drivers and extensions to reach petcocks in "hidden" places and have some leverage to open recalcitrant valves.

Getting back to the original post, I can see myself making the effort to take things apart once in order to put a strategic hole in a panel to make reaching the petcock easier next time. Rubber plugs are available to cover the hole for dust-proofing.
 
......... but I can't put eyes on it
The lower hose, the fan housing, and the rail supporting my loader prevents me from getting my hand in to feel around for it
The alternator is in my way on the other side.
There is an angled metal plate on the front of the underside of the chassis that prevents me from seeing/reaching from the bottom

So, I can't remove the side panel because.....
and its removal is blocked by the support rail for my loader......
I can't even cut the bolt off and push it out - there's just insufficient room.....
I don't want to mess with the alternator .....
I don't want to take off the loader an its support rail .....

Welcome to mechanicing :)
 
Yesterday's Tractor Forums

We sell tractor parts! We have the parts you need to repair your tractor - the right parts. Our low prices and years of research make us your best choice when you need parts. Shop Online Today.

Back
Top