
Well I messed up. Long story short after changing points and condenser I mounted the distributor back on the tractor and thought I had done so correctly. Apparently I didn't and it broke the casting around the bushing and pushed the insides forward breaking the rotor button. Just bought a whole new set up that should be here in a few days. My question is will the timing of the tractor be affected now? I don't see why I would be? And there's only one way I hear these go on. I don't want to mess up the new one. Any advice?
You are using an out of date browser. It may not display this or other websites correctly.
You should upgrade or use an alternative browser.
You should upgrade or use an alternative browser.
- Thread starter Dcos84
- Start date
Just ne sure that the tang on the back of the distrib. drops into the slot
on the engine--If it drops in right there will be no space betweem the base
of the distrib and the face of the engine--has to be flat against the
engine--NO Space or u will break the new one like you did the old one..
on the engine--If it drops in right there will be no space betweem the base
of the distrib and the face of the engine--has to be flat against the
engine--NO Space or u will break the new one like you did the old one..
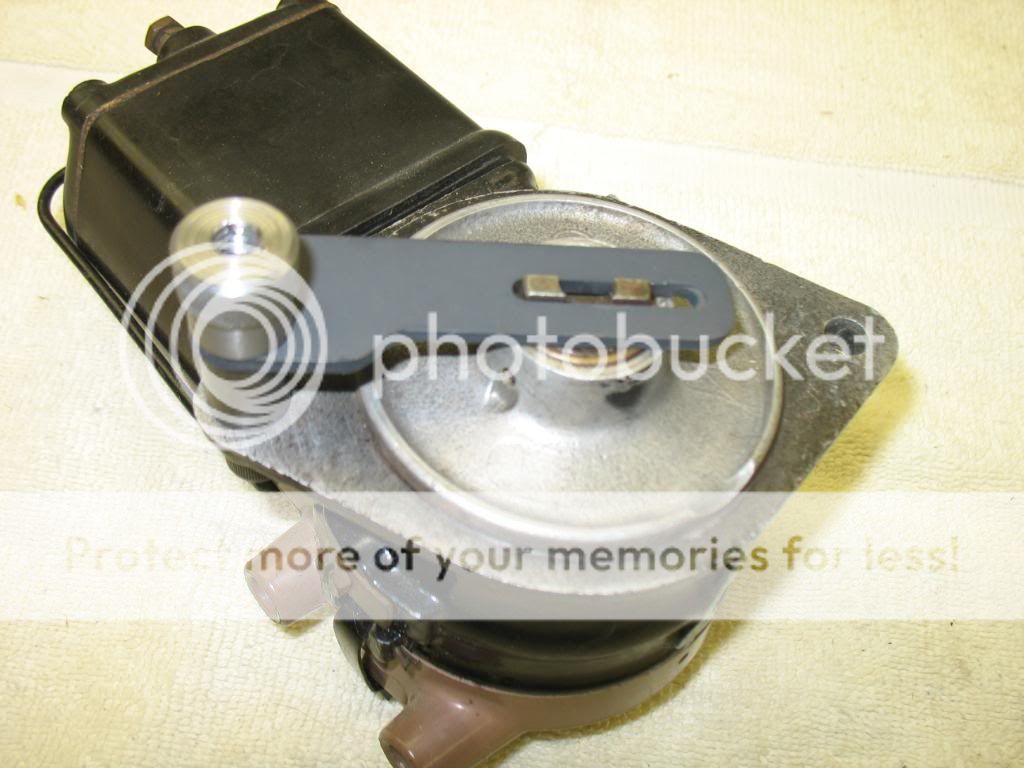
Look at the slot on the end of the cam shaft. What ever angle it happens to be, turn the distributor tang to match it. Make sure you can tell the wide side from the narrow side on both the cam & distributor! (close counts)
Then place the distributor on the front of the engine, gently push it in place & slowly turn the distributor body until you feel the tang slip into the slot. Rotate the distributor body until the bolt holes line up. Then, hand tighten the two bolts until the distributor body is flush w/ the timing gear cover.
You're getting a new distributor. Are you going to trust the Chinese guy who assembled it to set the points & timing correctly? I wouldn't. Set the gap at .015 & then check the timing. Then do a continuity check on it before you install it.
75 Tips
Thanks a lot guys I planned on checking on the points and timing.. new to this old girl.. seems this is how I've learned, break it the fix what I was attempting in the beginning and learning along the way.. I gratley appreciate the advise as I have no where else to ask these questions.. new one comes I will do what you said
" Making sure cylinder #1 is at the top "
That has nothing to do with timing. And I've already told you how to put the distributor back on the tractor (line up the tang & slot) And that has nothing to do with timing either.
Get a meter or test light, a 21/64? drill bit (See the note below) & a metal straight edge. Put the distributor face down w/ the condenser on the left & the timing plate lock screw on the bottom. Look at the end of the shaft: it has a narrow side & a wide side. Make sure you can tell the difference. Now, place the drill bit in the bottom mounting hole (this will be your reference point for measuring). Next, place a straight edge on the wide side of the tang on the shaft as shown in fig. FO83 in the picture. Rotate the shaft CCW (as viewed from rotor side OR CW as viewed from back/tang side) until the straight edge is ?" beyond the outside edge of the drill bit you stuck in the distributor mounting hole. At this distance, the distributor points should start to open (get your meter/light out now & check). If not, loosen the timing plate lock screw and turn to advance or retard the timing (move the plate down to advance timing, up to retard). Remember, each one of those little hash marks represents about 4? of timing. Keep adjusting until you get the proper ?" setting. (if the plate won?t move, you might need to remove the big C clip to loosen it a bit) As you?re adjusting, eliminate backlash by turning the shaft backwards (CW as viewed from the front) and bring the shaft forward (CCW as viewed from the front) to measure your setting. This ?" setting will get you static timing at top dead center.
After you set the points & timing, do a continuity check before you put the distributor back on the tractor. Do not skip this step! Before you start, make sure your meter/light works.
With the distributor still off the tractor, follow these steps:
1. Coil off, cap off, points open. One probe on the brass screw & the other on both sides of the open points. On the side closest to the cam, you should have continuity. Not on the other side! If you do, you will also have continuity everywhere because the points are grounded.
2. Coil off, cap off, points open. One probe on the brass screw & the other anywhere on the body of the distributor. You should have no continuity! Now, rotate the tang on the distributor....as the points open & close, you have continuity (closed) and lose it when they open.
3. Put the coil on the distributor, cap off, points open. One probe on the lead on the top of the coil, the other on the cam side of the open points. You should have continuity!
4. Coil on, cap off, points open. One probe on the lead on the top of the coil, the other anywhere on the body of the distributor. You should have no continuity!
At this point, I just put the distributor, coil & cap all back on the tractor as a unit. The reason I do this is because it is real easy to get the cap or coil misaligned trying to put it back together, one piece at a time. The result is something gets broken or you get a ?no spark? problem.
Double-check your firing order & plug wires. It?s 1-2-4-3, counterclockwise. It?s very easy to cross 3 & 4 both at the cap and on the head.
And finally, do not forget to remove the distributor on at least an annual basis (more often, depending on use) to check the point gap and re-lube the cam.
Note : Rather than the drill bit, a jig made by Dan Allen (The Old Hokie) will make this task quicker & more accurate.
http://windyridgefarm.us/
75 Tips
Tim PloughNman Daley RIP
Well-known Member
Here is the front mount distributor timing jig TOH used to make, but in a recent post he said he is out of stock and he doesn't plan on making any more soon...looks like it's back to the original method of setting the points/timing. But there is another fella, Farmer Dan on the 'other' site who will make them for ya...

Tim Daley(MI)
Tim Daley(MI)
I, huh? So, how do you propose to time that?(quoted from post at 22:02:04 06/26/17) well that jig looks pretty handy and full proof for sure . I think now I should be able to handle the task at hand however in the near future I'm going with the electronic ignition.
Dcos watch this--some folks on here will trip out and have a stroke when
I tell u to set the adjustment on the side of the distributor to the
middle mark--now set your points on .015--install the distributor--fire
it up and go to work..My Dad had a 2N for 50 yrs and never knew it had a
timing adjustment--has never cchanged the timing--still has the tractor
and it cranks before the starter turns it over a full revolution..runs
like a dream and is worked hard on 20 acres with a 5 ft bush hog.You
decide---hint--No, all the fancy dancy timing fixtures and timing one
everytime you air up the right front tire is not necessary..Do as I say
and put it together-if it don't run right I'll bet you it won't be
because of timing.............go figure.......
I've got one like that. I've also got 2 others that most certainly run better with the timing advanced about 8*.
The fact that you have one that runs ok w/ the timing set in the center & I do as well does not mean that all other frontmounts will run like that. There is a reason that the timing is adjustable.
75 Tips
The fact that you have one that runs ok w/ the timing set in the center & I do as well does not mean that all other frontmounts will run like that. There is a reason that the timing is adjustable.
75 Tips
Bruce (VA)
Well-known Member
That wasn't a trick question from JMOR. He was asking how you plan to adjust the timing w/ EI.
well fellas got the new distributor in and its running..however I set up the timing as my it manual said but it threw my carb settings off. It idles fine but has a delay when I pull the throttle and I can't compensate by adjusting the carb. I'm thinking the timing needs to be advanced a little,Does this sound correct? However thanks so much for the help so far couldn't have done it with out you
orry, but timing does not 'throw carb settings off'. You set according to factory specifications. Or you just ignore the engineers & decades of proper operation & fly by the seat of your pants.(quoted from post at 23:42:51 06/30/17) well fellas got the new distributor in and its running..however I set up the timing as my it manual said but it threw my carb settings off. It idles fine but has a delay when I pull the throttle and I can't compensate by adjusting the carb. I'm thinking the timing needs to be advanced a little,Does this sound correct? However thanks so much for the help so far couldn't have done it with out you
ummm? It sets the point in the rotational position of the crankshaft the the spark occurs. Simple, huh?(quoted from post at 00:01:23 07/01/17) Then what does the timing adjustment do
know, but for that simple question, no smarts needed, it is just as I said, simple. But thanks anyway,(quoted from post at 00:22:03 07/01/17) Your so smart jmor
ey, Bud, you asked a simple question and I responded, accurately! I asked you a question and you dodged! " people" say. "People" would be you.(quoted from post at 08:43:41 07/01/17) Do me a favor and skip over my post and dont respond. You have replied to my post several times and not tried to help. Wonder why people say that you troll.
'm 'here' to help and I can 'hear' too.(quoted from post at 09:35:41 07/01/17) ive read posts of other people calling you a troll im only one of the people, anyway this is not what im hear for so I'll get my info elsewhere
")
TheOldHokie
Well-known Member
- Location
- Myersville, MD
(quoted from post at 08:43:41 07/01/17) Do me a favor and skip over my post and dont respond. You have replied to my post several times and not tried to help. Wonder why people say that you troll.
My guess is that after hundreds (thousands??) of attempts to wade through rubbish descriptions and help people who can't pose a reliable statement of the problem and then argue about his answers he is getting a tad impatient. Can't say I blame him. The level of pure blather posted here has reached an all time high.
TOH
ok I'm not gonna argue.. not what I'm here for. If I was a tractor mechanic I wouldn't need help so if for some reason you think it's a stupid or bad question DONT ANSWER.. simple... now what does the advance or retarding of the timing do exactly...why move it?? Why would the tractor idle fine but lag when you pull the throttle. It was right before and I only changed the distributor.
ok I'm not gonna argue.. not what I'm here for. If I was a tractor mechanic I wouldn't need help so if for some reason you think it's a stupid or bad question DONT ANSWER.. simple... now what does the advance or retarding of the timing do exactly...why move it?? Why would the tractor idle fine but lag when you pull the throttle. It was right before and I only changed the distributor.
TheOldHokie
Well-known Member
- Location
- Myersville, MD
(quoted from post at 11:36:26 07/01/17) ok I'm not gonna argue.. not what I'm here for. If I was a tractor mechanic I wouldn't need help so if for some reason you think it's a stupid or bad question DONT ANSWER.. simple... .why move it?? Why would the tractor idle fine but lag when you pull the throttle. It was right before and I only changed the distributor.
Fair enough. Let's just answer your simple question and leave the discussion of why YOUR tractor isn't running properly for another time.
Q: [i:868834b899]now what does the advance or retarding of the timing do exactly..[/i:868834b899]
A: Changing the [u:868834b899]ignition[/u:868834b899] timing alters the point in the compression stroke at which combustion is initiated. It can be initiated at the exact top dead center of the compression stroke (TDC), before the piston reaches top dead center (BTDC), or after it has passed over top dead center (ATDC).
Why is that important? Here is s simple explanation (Wikipedia) that explains why that is important:
[i:868834b899]The need for advancing the timing of the spark is because fuel does not completely burn the instant the spark fires, the combustion gases take a period of time to expand, and the angular or rotational speed of the engine can lengthen or shorten the time frame in which the burning and expansion should occur. In a vast majority of cases, the angle will be described as a certain angle advanced before top dead center (BTDC). Advancing the spark BTDC means that the spark is energized prior to the point where the combustion chamber reaches its minimum size, since the purpose of the power stroke in the engine is to force the combustion chamber to expand. Sparks occurring after top dead center (ATDC) are usually counter-productive (producing wasted spark, back-fire, engine knock, etc.) unless there is need for a supplemental or continuing spark prior to the exhaust stroke.[/i:868834b899]
The length of time it takes for the compressed air/fuel misture to burn does not change with engine speed so as the engine speed increases the spark timing needs to be advanced to compensate for the increased angular velocity of the crankshaft that is compressing the charge. In these simple tractors that is done by a mechanical centrifugal advance mechanism that advances the spark from a known "static" position measured when the engine is not rotating. As engine speed increases the spark is advanced so that combustion completes at or very near TDC. If it is too early or too late erratic running and poor performance can result. So the question for you is:
[i:868834b899]"Have you verified the static ignition timing on the new distributor is set to the factory specified advance position as shown in the shop manual?"[/i:868834b899]
TOH
TheOldHokie
Well-known Member
- Location
- Myersville, MD
(quoted from post at 12:43:59 07/01/17) Thanks hookie that's a great description I checked the point gap and timing before I installed also checked all the continuity checks that I believe Bruce suggested..from what I have said the tractor is doing any ideas?
Going back and reading the thread it seems you decided to adjust the carburetor. I would suggest you revisit that. If you are positive the timing and ignition continuity are correct, the spark at ALL plugs has been verified with a good spark tester, and it was running OK before you changed the distributor there was no reason to mess with the carburetor adjustment. By doing so you have now introduced two variables into the mix complicating the troubleshooting process.
TOH
Hobo,NC
Well-known Member
- Location
- Sanford, NC
(quoted from post at 19:42:03 07/01/17)'m 'here' to help and I can 'hear' too.(quoted from post at 09:35:41 07/01/17) ive read posts of other people calling you a troll im only one of the people, anyway this is not what im hear for so I'll get my info elsewhere
Sometimes its just best to say...

Hobo,NC
Well-known Member
- Location
- Sanford, NC
(quoted from post at 19:35:41 07/01/17) ive read posts of other people calling you a troll im only one of the people, anyway this is not what im hear for so I'll get my info elsewhere
Go fer'it BY... I can see you are looking for the complete book on how to get my chit going the EZ way and not willing to answer a few questions..
WILLIAM4536
New User
On my 9n or 2n I don't really know, I installed a electronic coil. Match up off set to off set, right at this time the engine is trying to start, but just back fires. What do think is happening. what do I try needs.(quoted from post at 07:58:40 06/26/17) Thanks a lot guys I planned on checking on the points and timing.. new to this old girl.. seems this is how I've learned, break it the fix what I was attempting in the beginning and learning along the way.. I gratley appreciate the advise as I have no where else to ask these questions.. new one comes I will do what you said
Similar threads
- Replies
- 7
- Views
- 499
- Replies
- 2
- Views
- 192
We sell tractor parts! We have the parts you need to repair your tractor - the right parts. Our low prices and years of research make us your best choice when you need parts. Shop Online Today.
Copyright © 1997-2024 Yesterday's Tractor Co.
All Rights Reserved. Reproduction of any part of this website, including design and content, without written permission is strictly prohibited. Trade Marks and Trade Names contained and used in this Website are those of others, and are used in this Website in a descriptive sense to refer to the products of others. Use of this Web site constitutes acceptance of our User Agreement and Privacy Policy TRADEMARK DISCLAIMER: Tradenames and Trademarks referred to within Yesterday's Tractor Co. products and within the Yesterday's Tractor Co. websites are the property of their respective trademark holders. None of these trademark holders are affiliated with Yesterday's Tractor Co., our products, or our website nor are we sponsored by them. John Deere and its logos are the registered trademarks of the John Deere Corporation. Agco, Agco Allis, White, Massey Ferguson and their logos are the registered trademarks of AGCO Corporation. Case, Case-IH, Farmall, International Harvester, New Holland and their logos are registered trademarks of CNH Global N.V.
Yesterday's Tractors - Antique Tractor Headquarters
Website Accessibility Policy