


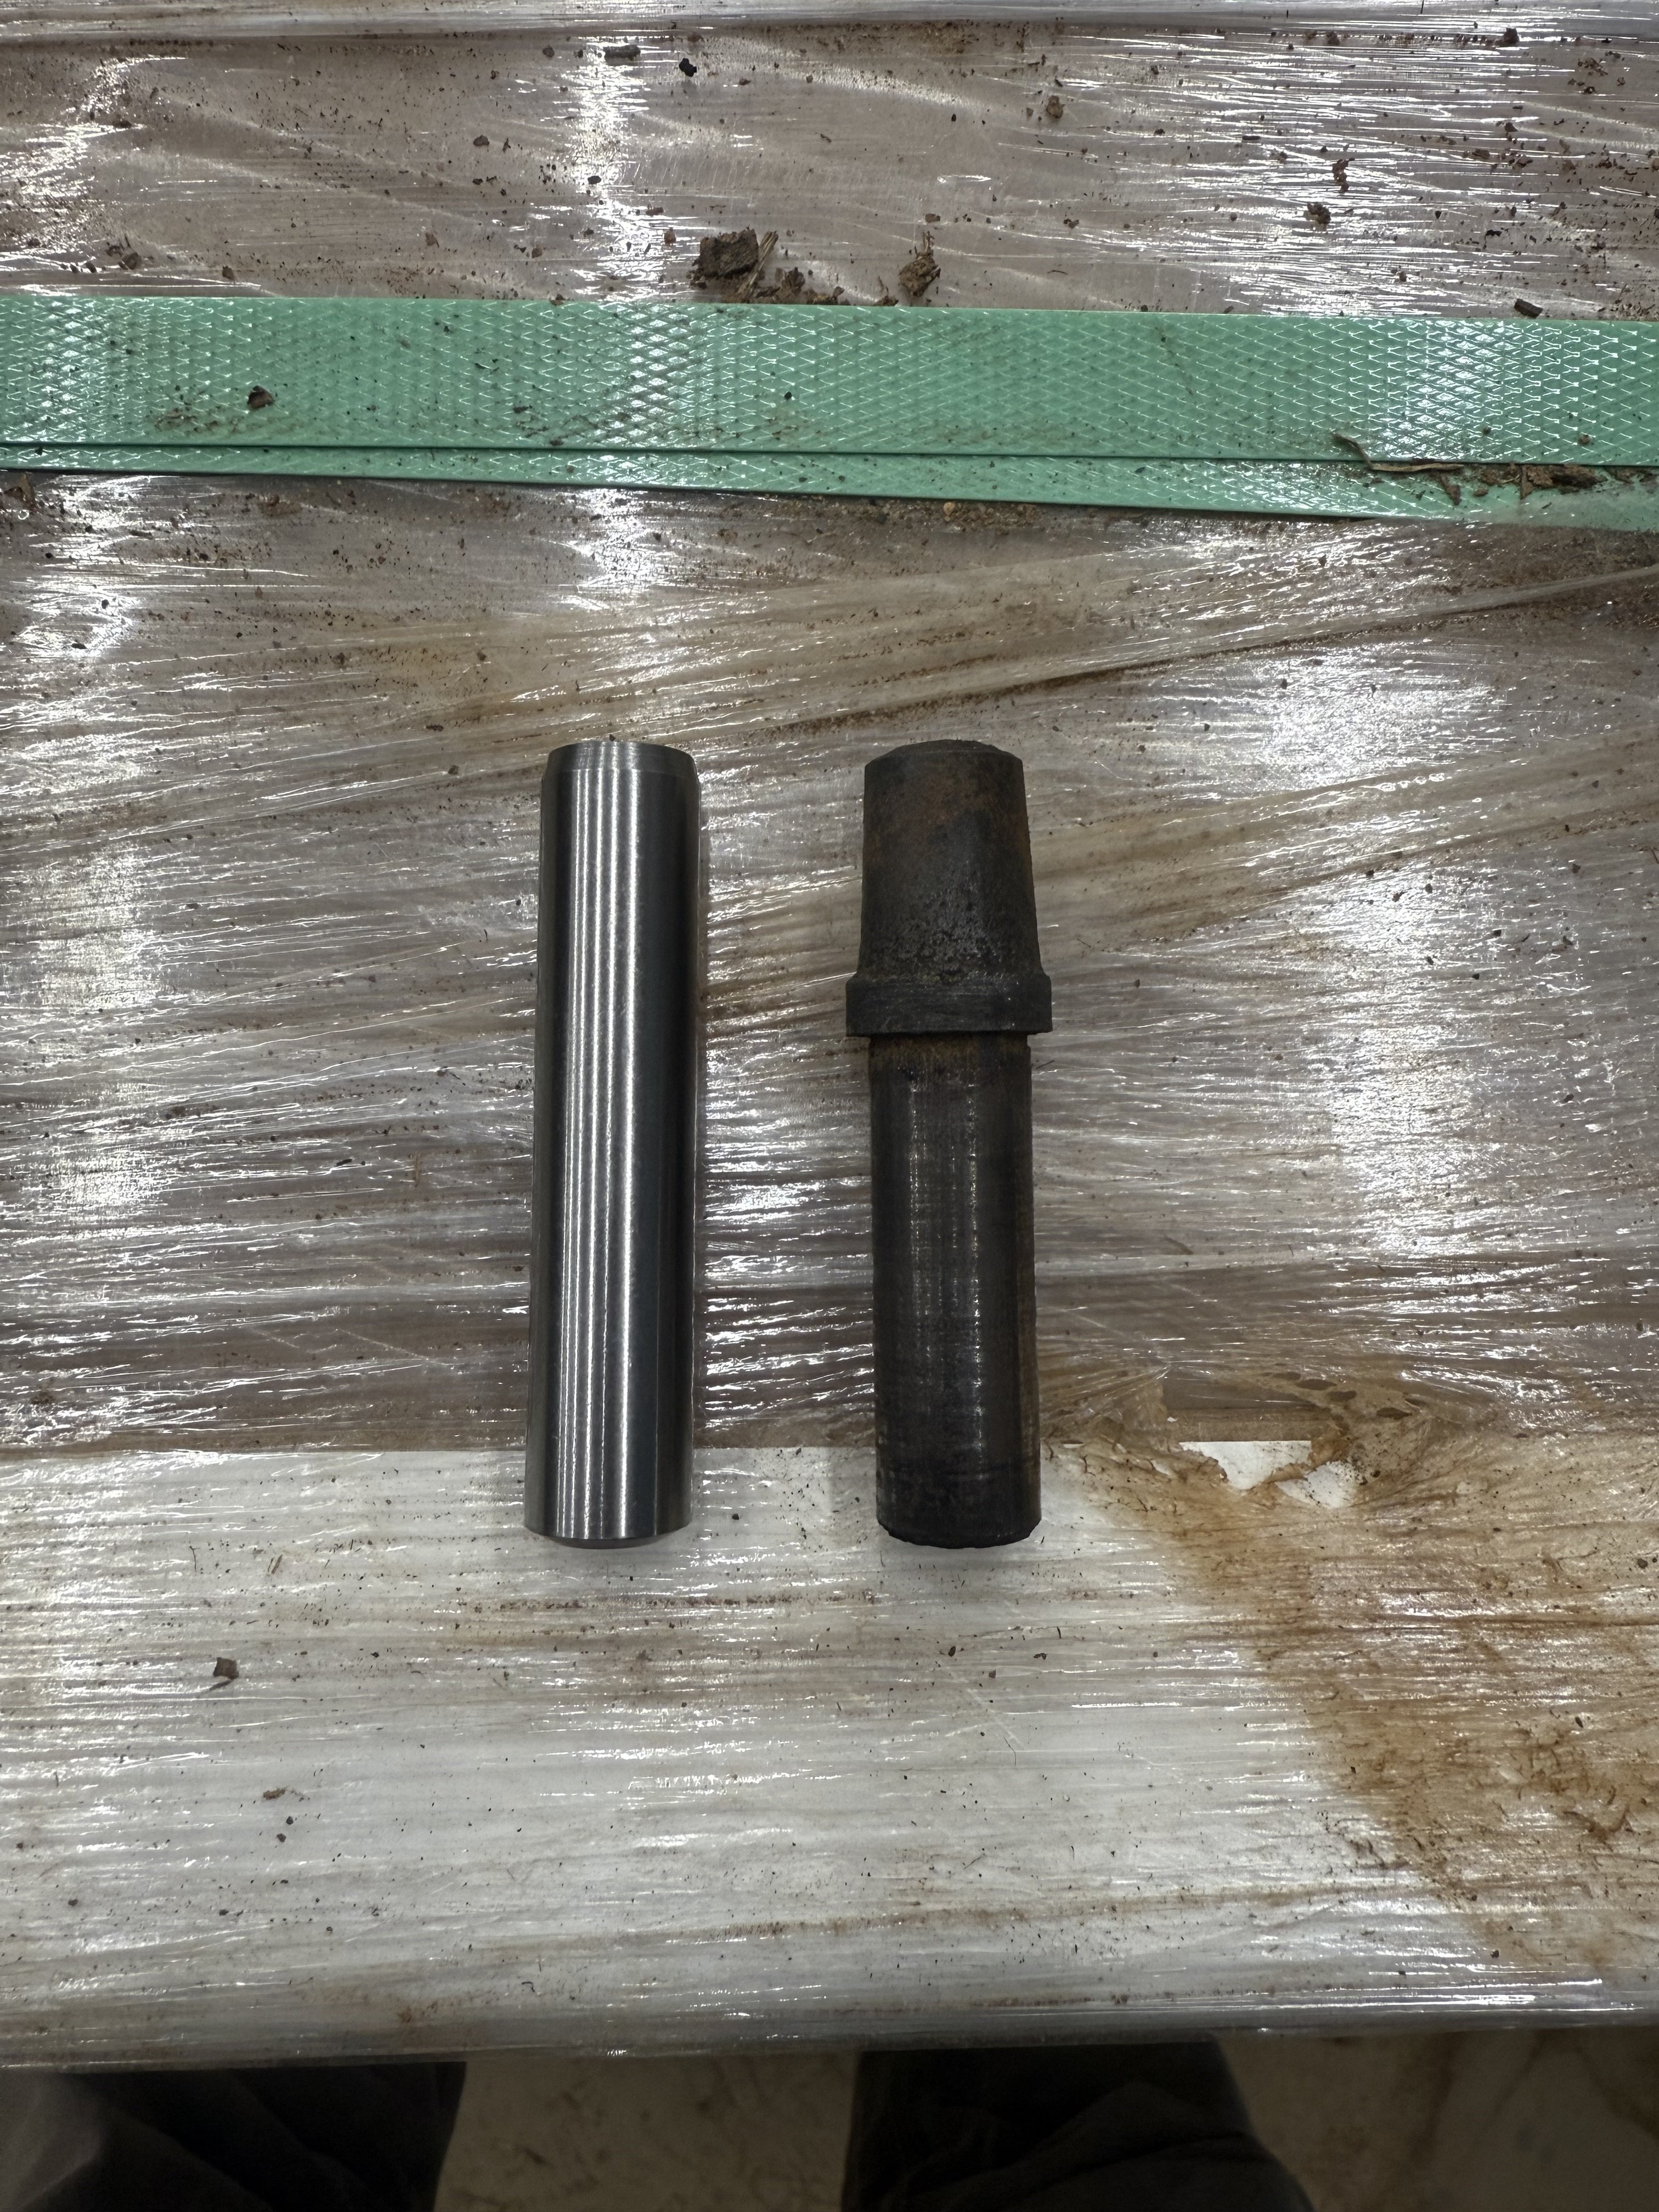
I’m rebuilding the head on my 47 Farmall A. I bought new valve guide sleeves but they are a different design than what was originally there. There’s a collar on the original ones that set the high off the head. The new ones have no collar. Overall height, inner and outer diameters are the same. Do I just measure the height off the head to be the same as the originals? Are these fine to use? Or, do I need to source other ones?
You are using an out of date browser. It may not display this or other websites correctly.
You should upgrade or use an alternative browser.
You should upgrade or use an alternative browser.


rustred
Well-known Member
They are a cheap reproduction , you have no choice but to measure the top end. Plus u see how the original one is tapered , that is why they don’t use valve stem seals , the new one is iffy. Might need sealsI’m rebuilding the head on my 47 Farmall A. I bought new valve guide sleeves but they are a different design than what was originally there. There’s a collar on the original ones that set the high off the head. The new ones have no collar. Overall height, inner and outer diameters are the same. Do I just measure the height off the head to be the same as the originals? Are these fine to use? Or, do I need to source other ones?View attachment 128462
Fritz Maurer
Well-known Member
You better be prepared to grind the valves and seats....they may be too far out to lap.....the valve is now gonna land straight on a crooked seat that may not be concentric with the new guide.
The worn-out guides allowed for a little misalignment.
The worn-out guides allowed for a little misalignment.
Fritz Maurer
Well-known Member
It depends on how far out of misalignment the new guides put the valve in relation to the seat.I did buy new valves and springs. With the new sleeves, am I required to grind the valves or is it possible lapping may do the trick?
If you were to attempt lapping, it would be best to start out with at least one flat surface, i.e. a new valve or a refaced valve.
But if a number of valves are too far out , you will be charged the same price at the machine shop whether for one valve or eight because they are going to reseat the valves that you just lapped.
If you did buy new valves, you don't need to do anything to them. The idea is to line the seat up with the valve by removing metal from the seat until it makes contact with the valve a full 360º . You are literally moving the seat over to the center of the valve.
Can't hurt to try , though. It will become apparent right away if it's just a matter of skinning off some rust or have to go to the shop.
Last edited:
rustred
Well-known Member
This is machine shop work. Once guides are replaced the seats need to be ground or replaced also. Depending on how bad they are. Even the new valves are put in the machine and checked with a slight resurface. The old springs are also checked for tension. Get lapping out of your head as no machine shop does that. Only these backyard guys do that , but no way is it the proper thing to do. The seat must be ground and have the correct width and be positioned properly on the valve face. Seat is 45 degrees. Then you have 60 and 30 degree stones to do that.I did buy new valves and springs. With the new sleeves, am I required to grind the valves or is it possible lapping may do the trick?
rustred
Well-known Member
Here is what you want the seat to look like. you see that black dot on the seat,.. that is the 45 degree seat width below is 60 degree angle and the top at head is the 30 degree angle. its hard to see the seat location on the valve face , its that line in the middle of the face. plus there is an interference angle of one degree between them , this has replaced lapping valves for decades and decades. plus head shops know all this. you want a good job it has to be done properly. and get all max power from the engine . show a pic of them seats on your head, as if they are too low they will need to be replaced as i did here.
Attachments


Last edited:
Fritz Maurer
Well-known Member
If possible, press the guides in. You can of course hammer them in, but the probability is better that a burr will form on the inside that will have to be removed.

560Dennis
560Dennis
Hammer them in, what size hammer do you use ?If possible, press the guides in. You can of course hammer them in, but the probability is better that a burr will form on the inside that will have to be removed.
Fritz Maurer
Well-known Member
Probably as big as the one shown in the picture, but i really didn't like it. Im finding out that these finished guides, whatever country they come from, are sometimes oversized OD slightly and go in very hard. I began measuring them to see what the problem was, I've seen them as high as .0005" over the. 0003 " required for a driving fit, for a total of nearly .001" oversize which is way too much. Never had one break while hammering it in, but then I didn't use that method very long. It is much smoother to press them in against pre- made depth stop.Hammer them in, what size hammer do you use ?
Had a couple 5.7 Diesel heads a couple decades ago, the guides shrunk when installed and nearly all of them needed to be finish reamed.....which naturally takes out the oil spiral. This seems to have been going on for a while.

Janicholson
Well-known Member
- Location
- Central MN St. Cloud
Measure the height of the upper portion carefully, find a piece of pipe (maybe 1/2") and cut a chunk off at that length. (a lathe is handy for that, or a bit of filing) use this as a stop for instillation by putting it over the new guide when it is 1/2 the way in place. then drive the guide until it is flush with the stop. Easy and accurate. JimI’m rebuilding the head on my 47 Farmall A. I bought new valve guide sleeves but they are a different design than what was originally there. There’s a collar on the original ones that set the high off the head. The new ones have no collar. Overall height, inner and outer diameters are the same. Do I just measure the height off the head to be the same as the originals? Are these fine to use? Or, do I need to source other ones?View attachment 128462

We sell tractor parts! We have the parts you need to repair your tractor - the right parts. Our low prices and years of research make us your best choice when you need parts. Shop Online Today.
Copyright © 1997-2025 Yesterday's Tractor Co.
All Rights Reserved. Reproduction of any part of this website, including design and content, without written permission is strictly prohibited. Trade Marks and Trade Names contained and used in this Website are those of others, and are used in this Website in a descriptive sense to refer to the products of others. Use of this Web site constitutes acceptance of our User Agreement and Privacy Policy TRADEMARK DISCLAIMER: Tradenames and Trademarks referred to within Yesterday's Tractor Co. products and within the Yesterday's Tractor Co. websites are the property of their respective trademark holders. None of these trademark holders are affiliated with Yesterday's Tractor Co., our products, or our website nor are we sponsored by them. John Deere and its logos are the registered trademarks of the John Deere Corporation. Agco, Agco Allis, White, Massey Ferguson and their logos are the registered trademarks of AGCO Corporation. Case, Case-IH, Farmall, International Harvester, New Holland and their logos are registered trademarks of CNH Global N.V.
Yesterday's Tractors - Antique Tractor Headquarters
Website Accessibility Policy