MF 205 rear wheel hub removal

rtoni

Member
Hello, new to this forum and hoping someone can help. I believe there have been a few (older) posts here related to the 1980-ish series of Massey Ferguson s MF 205 (the Japanese twin diesel compact tractor). I recently purchased one in reasonable shape, runs good, loader, back blade, etc. it will be very useful if I don t break anything else. Today I was out in the yard wrestling with stubborn rear wheel bolts and of course I broke one. I had soaked the hubs / bolts repeatedly over last couple days with penetrating oil. Some surrendered but this one gave me the finger and sheared off at the face of the hub. I don t have torches etc so I m thinking maybe I can yank this hub off and run it to a shop where they can clean it up for me. I would also like to inspect the axle /hub connection as there may be a bit of play there in the wheel.
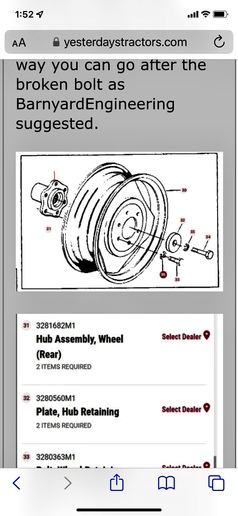
Based on the original manuals (which are surprisingly not that great) maybe I can remove the hub retaining bolt / plate and pull them off. Right. Except maybe for 40 years of rusted crud that says otherwise?

If there are any MF 205 owners reading this, please let me know if rear wheel hub removal on these machines can be done by a mere mortal working out in the driveway in the knuckle-busting November cold? And if there are tips or tricks etc. to help? Thanks in advance.

This post was edited by rtoni on 11/06/2022 at 07:36 pm.
 
Not familiar with that particular model, but typically a broken stud can be knocked out with a big hammer and punch, then a new one drawn in with a nut and a stack of washers.

Grease the threads and washers so nothing galls.

As for adjusting end play, read the manual carefully. Depends on the design how to adjust, if it is adjustable.
 
Thanks for replies. The bolts on this model thread into the hub, so unfortunately I can t punch or press it out. I think it would take some heat and some kind of bolt extractor. The heat part is where I m stuck.

I d consider just leaving it be, but I kinda stopped after I broke this one. The other 5 did back out a quarter turn with a light impact wrench and I m hoping I don t break another when I take them out. They re still tight. Unfortunately I have to do something since whoever installed this rim didn t tighten it down properly (I m guessing) since I can see a tiny bit of play between rim and hub. Ideally would like to take rim off cleanunup the hub and reinstall with new bolts.
 
There is a good chance the bolts go all the way through the hub and have some rusted threads on the back side. Not very easy to get to but if you could clean those threads and oil them, then since you have the bolts moving, use plenty of penetrating oil on both the front and back side, work the bolts in and out, a little more each time, and work oil into the threads. They should loosen up. (p.s. On blots that are being stubborn, I like to work them by hand with a breaker bar so I know how much force I'm exerting, at least until I get them loose enough that I don't think there is a risk of breaking them.)

This post was edited by ADB-Ia on 11/07/2022 at 07:50 am.
 
(quoted from post at 05:38:36 11/07/22)
As for adjusting end play, read the manual carefully. Depends on the design how to adjust, if it is adjustable.

That s good advice - I have all the original owners and parts and service manuals but believe it or not there s no detail on wheels or hubs. Couldn t even find bolt pattern specs to send to a friend who sometimes hits the tractor auctions and swaps and could keep an eye out for wheel parts. I called AGCO and closest dealer and they couldn t help - don t even have that info on file any more. The service manual shows splined axle shafts in the pics where they talk about rear axle seals etc but it doesn t talk about wheels at all. Parts manual shows a sketchy wheel hub drawing with a wheel hub retaining bolt and washer that screws into the end of the axle shaft but no hub or spline details other info. So it looks sort of simple design but I m complete novice at this. I m a little surprised they don t have more info on removing / replacing hubs, etc.
 
The only way you're ever going to know is to try. We can sit around here and guess at what is going to happen, but until you actually try to remove the rest of the lug bolts...

Can you get at the back side with some sort of powered wire brush? Clean the corrosion out of any exposed threads on the back side of the hub before trying to remove them. Douse them with penetrant, not to get them unstuck, but to help the exposed threads keep moving once they engage the hub.

The broken off bolt can be ground flush with the hub, then most likely turned through and out the back of the hub. I've done that. There was just enough bolt sticking through the backside to get the vise grips on, then I was able to turn them through.
 
Thank you. They do stick out the back side of the hub just a couple threads visible. I have been hitting them with oil, will keep soaking them. I m guessing now the impact driver was a bad idea (?).
 
(quoted from post at 08:39:50 11/07/22) The only way you're ever going to know is to try. We can sit around here and guess at what is going to happen, but until you actually try to remove the rest of the lug bolts...

Can you get at the back side with some sort of powered wire brush? Clean the corrosion out of any exposed threads on the back side of the hub before trying to remove them. Douse them with penetrant, not to get them unstuck, but to help the exposed threads keep moving once they engage the hub.

The broken off bolt can be ground flush with the hub, then most likely turned through and out the back of the hub. I've done that. There was just enough bolt sticking through the backside to get the vise grips on, then I was able to turn them through.

Thanks for the nudge . this isn t old hat for me so I appreciate the patience and discussion.

There s not enough bolt sticking out to grab on the back side of these bolts unfortunately there’s only a couple threads exposed. But based on your advice I assume that’s a good thing for the remaining bolts - not pulling too much crud into the hub when I try back them out? Broken bolt is already pretty much flush with the hub on the rim side - that s where it broke. I’ve been soaking both ends of bolts since I started monkeying with this a couple days ago. Once rain and wind let up I’ll get back at it.

This post was edited by rtoni on 11/07/2022 at 07:58 am.
 
Nothing wrong with using the impact wrench. Just that you can't feel the movement as they start to move. After turning wrenches a while you develop a sense of feel for how much is too much. Unfortunately that sense of feel is learned from breaking a few off. There is a certain dread when you feel it move but you know it wasn't the treads that let loose. BTDT many times.
 
So does this hub have a nut or bolt on the outside holding it onto the axle? If so the hub should be splined to the axle and should come off if you take the nut off. I would predict a pretty hard fight to get it off but if you have a friend with a torch and a good puller, you should be able to pull the hub off. And if anti-seize was used putting it together, it might just slip off. (Always room for wishful thinking)

This post was edited by ADB-Ia on 11/07/2022 at 08:17 am.
 
On the broken bolt, once you get the wheel off you can center punch it and drill a hole through it. Get a couple of propane torches and heat the bolt through the hole from both ends. It'll get red hot. Then it should come out with an extractor. Nice thing if the extractor breaks off you can punch it out from the other side.
 
(quoted from post at 09:14:30 11/07/22) So does this hub have a nut or bolt on the outside holding it onto the axle? If so the hub should be splined to the axle and should come off if you take the nut off. I would predict a pretty hard fight to get it off but if you have a friend with a torch and a good puller, you should be able to pull the hub off. And if anti-seize was used putting it together, it might just slip off. (Always room for wishful thinking)

This post was edited by ADB-Ia on 11/07/2022 at 08:17 am.
That s how it appears. Retaining bolt with a large flat washer and lock washer. I haven t tried to remove that bolt (yet).

What I wouldn t give for a garage / shop with all the right tools. One day (more wishful thinking )
 
(quoted from post at 09:19:00 11/07/22) On the broken bolt, once you get the wheel off you can center punch it and drill a hole through it. Get a couple of propane torches and heat the bolt through the hole from both ends. It'll get red hot. Then it should come out with an extractor. Nice thing if the extractor breaks off you can punch it out from the other side.
Drill through and 2 torches - great tips thank you I wouldn t have even thought about breaking an extractor in the hole
 
Below is what I see in the parts book for the rear hub. It appears you are able to get to the back side of the hub. Keep applying your favorite penetrating fluid (not WD40) to the exposed ends of the bolts. You said the others moved some. You said impact driver. Do you have an impact wrench or hand impact driver? With an impact wrench work them back and forth a bit. Loosen, tighten, loosen, tighten, etc. They should free up and turn more as you work them back and forth. With the wheel out of the way you can go after the broken bolt as BarnyardEngineering suggested.

mvphoto99199.jpg


mvphoto99200.jpg


This post was edited by Jim.ME on 11/07/2022 at 08:54 am.
 
(quoted from post at 09:52:40 11/07/22) Below is what I see in the parts book for the rear hub. It appears you are able to get to the back side of the hub. Keep applying your favorite penetrating fluid (not WD40) to the exposed ends of the bolts. You said the others moved some. You said impact driver. Do you have an impact wrench or hand impact driver? With an impact wrench work them back and forth a bit. Loosen, tighten, loosen, tighten, etc. They should free up and turn more as you work them back and forth. With the wheel out of the way you can go after the broken bolt as BarnyardEngineering suggested.
The pics are what I have yes. I ve been spraying the back side where bolts come thru with lots of penetrating oil. Using no wd40 anywhere. I do have impact wrench (not driver) - my mistake sorry about that. It s an electric with about 240 ft lb. I can access an air tool with more punch if need be but I figured I d try something a bit lighter first and see if that would move them. It moved some and broke one. The ones that moved I got about a quarter turn but still tight. Thanks again for the help.
 
In my opinion when a bolt is stuck that tight
penetrating oil is only making you think you are doing
something to help loosen it. I realize there may be
limited access but I put a red line on the photo by the
top bolt hole. If you can smack it there fairly square on
with a 2 pound hammer repeatedly would help. If
limited access if you can get an air hammer an go at
those points by each bolt may help. By doing this you
are slightly deforming the threaded hole around the
bolt for a few milliseconds. Also smacking the bolt
heads sharply again using the 2 pound hammer may
also help. Smack you finger a bit first so you are good
and mad. ; > )

cvphoto140105.jpg
 
(quoted from post at 13:07:14 11/07/22) Smack you finger a bit first so you are good
and mad. ; > )

Now [i:e4bf52820d]that [/i:e4bf52820d] is something I m good at.
 
The bolts are M16 x 35 with probably around 20-25 length left broken off in the hub. Am I correct to think I need a cobalt bit for this, and what size bit should I use? - I also need to get an extractor - I assume that tool would probably include some details on bit size etc but is there a general rule of thumb for bit size when drilling out a bolt - for example 1/2 or 2/3 the bolt diameter - or something like that?
 
Update - thanks to the suggestions here I managed to remove all remaining bolts. I still need to drill out the broken bolt but I need to pick up some hard steel bits, maybe cobalt.

There s some wear / damage to the rims where the bolt holes are, I m guessing that since the rim was not tightened properly and tractor was operated like that for who knows how long, there was some rotational slip between rim and hub and it took its toll. The rim holes appear to be "stretched" along the direction of the bolt circle / rotation. The bolt threads just under the bolt head where rim contacts them are pretty much worn too. I ll need to replace these bolts.

Is it safe to assume that if I torque the new wheel bolts properly that should prevent any slip between hub and rim? Even if the bolt holes are now a bit too big? I ll reuse the lock washers, maybe add flat washer to compensate for crappy rim holes?

Any feedback appreciated
 
Once the holes get egged out it is very hard to keep bolts tight. They will work their way loose. It surely has chamfered holes in the wheel so a washer/lock washer is not a solution. It defeats the purpose of the taper to hold the wheel in place. I had a combine one time that after loosing the drive wheel on the left hand side twice, we torqued the bolts tight and welded one flat of the bolt to the rim to keep it from loosening itself. Figured if we ever needed to take the wheel off again we could just grind off the weld.
 
(quoted from post at 14:01:26 11/10/22) Once the holes get egged out it is very hard to keep bolts tight. They will work their way loose. It surely has chamfered holes in the wheel so a washer/lock washer is not a solution. It defeats the purpose of the taper to hold the wheel in place. I had a combine one time that after loosing the drive wheel on the left hand side twice, we torqued the bolts tight and welded one flat of the bolt to the rim to keep it from loosening itself. Figured if we ever needed to take the wheel off again we could just grind off the weld.

According the 205 parts book page shown those are not tapered head wheel bolts; they are regular hex head bolts with lock washers. New grade 10.9 bolts and lock washers torqued 200 to 250 ft. lbs. would be what I would try, before replacing the rim. The lock washers (and flat washers if you choose to use them) should match the grade of the bolts. If you use a bit longer bolts and heavy flat washers, you could tack the flat washers to the rim after tightening if you want to help mitigate the damage to the bolt holes in the rim. Doing it that way the washers would stay but the bolts can be removed without cutting or grinding if the tire needs to be removed. Recheck for tightness regularly.
 
Correct - these are flat hex head bolts. I have a feeling it s gonna take me a long time to drill out the broken one if they re grade 10 hardened steel but I am going to try. I d be tempted to leave it as was suggested earlier on here, but the damaged rim makes me think I need all 6 in good shape. I d like to get another season at least out of the rim. It won t get heavy use but pretty steady once I get organized. Thanks again for all the helpful replies.
 
(quoted from post at 15:54:19 11/10/22) Correct - these are flat hex head bolts. I have a feeling it s gonna take me a long time to drill out the broken one if they re grade 10 hardened steel but I am going to try. I d be tempted to leave it as was suggested earlier on here, but the damaged rim makes me think I need all 6 in good shape. I d like to get another season at least out of the rim. It won t get heavy use but pretty steady once I get organized. Thanks again for all the helpful replies.

I don't know what grade the existing ones are. Are they marked 10.9 on the heads? Split point cobalt bits and some cutting oil should drill them ok. Heavy (thick) washers welded to the rim will reinforce it and the rim will likely last a long time, as long as the bolts are kept tight. Have the rim on and bolts tight when tacking the washers in place, so the placement is right. The rim can be removed to weld them out.
 
I don t see any obvious marks on the bolt heads. Would that me etched or stamped? They have 40+ years on them but I assume the marking wouldn t wear off? I don t have cutting oil but I have lots of 3-in-1 oil here, would that do in a pinch? Thanks again for the advice
 
(quoted from post at 16:45:43 11/10/22) I don t see any obvious marks on the bolt heads. Would that me etched or stamped? They have 40+ years on them but I assume the marking wouldn t wear off? I don t have cutting oil but I have lots of 3-in-1 oil here, would that do in a pinch? Thanks again for the advice

The grade is normal a raised stamping on the head if it is marked. A cutting fluid would be best. Some use water in a spray bottle, or you can likely be alright drilling it dry.
 
Spent some time gatherings parts (bits, cutting oil, torch) and it s been tons of rain here and temps now dropping to sub zero. My broken bolt removal task is pending some help from Mother Nature. Meanwhile I spent some time today with steel wool and got the broken bolt cleaned up a bit and there is in fact a "7" stamped in the middle of the hex head. I’m revisiting the manuals as this may be mentioned in the torque tables somewhere. I’m posting here in case it rings a bell for someone?

Edit: the service manual has a torque chart showing range of 116-137 ft lb for M16 bolts with a “7” marking. Does this seem a bit low for a grade 10.9 bolt? Mostly curious. I’m actually hoping these old bolts are a lower grade so I’m not out there drilling all day.
mvphoto99353.jpg


This post was edited by rtoni on 11/11/2022 at 06:54 pm.
 
(quoted from post at 22:44:36 11/11/22) Spent some time gatherings parts (bits, cutting oil, torch) and it s been tons of rain here and temps now dropping to sub zero. My broken bolt removal task is pending some help from Mother Nature. Meanwhile I spent some time today with steel wool and got the broken bolt cleaned up a bit and there is in fact a "7" stamped in the middle of the hex head. I m revisiting the manuals as this may be mentioned in the torque tables somewhere. I m posting here in case it rings a bell for someone?

Edit: the service manual has a torque chart showing range of 116-137 ft lb for M16 bolts with a "7" marking. Does this seem a bit low for a grade 10.9 bolt? Mostly curious. I m actually hoping these old bolts are a lower grade so I m not out there drilling all day.
mvphoto99353.jpg


This post was edited by rtoni on 11/11/2022 at 06:54 pm.

Those torques are more online with grade 8.8, so they should be easier to drill than 10.9.
 
Update (and question):
I managed to take advantage of a calm afternoon and with a 7/16" cobalt bit and a bottle of cutting fluid I drilled right through the piece of broken bolt in the hub. Took about 20 or 30 minutes drilling slow speed freehand and stopping occasionally to apply more fluid and give my arm / wrist a break. Bit stayed cool and still looks not too bad after I finally punched through so I think the cutting fluid helped. My only concern is that my freehand drilling was pretty much dead centre on the end where I started but went off centre a bit where I poked out the other end. This doesn t shock me, pretty good for old guy out shivering in the yard. There were nice uniform shavings coming off the cut.

Question- since I strayed a bit off the bolt axis, and close to (but not damaging) the threads where the exit hole is (it looks ok but it s definitely off centre) - assuming I get the remaining material red hot, is a fluted / straight extractor still the best option? I don t want it to bite into any thread material when I tap it in.

As always I appreciate everyone s replies and patience while I stumble through this
 
Hello again,
One of my wheel hubs has a very tiny "wobble" noticeable with turf tires spinning in the air on the jack stands. Veeeerrrry tiny amount. But upon inspection the splines on axle and hub look pretty good. Hub came straight off with a bit of a tug.

What I notice is that when I push the hub back on, it seems to fit nice and snug on the axle- but it will go in about 1/8" past the point where it would be flush with the end of the axle. So with retaining nut and plate tight, the hub can actually move 1/8" in/out along the axle. The interesting part is that if I push it in tight by hand, the wobble disappears, with that slight gap showing between the hub and retaining plate. If I pull it back against the retaining plate / nut, the wobble comes back. I had a washer cut to fit around the axle spline between the hub and retaining plate and fill in that 1/8" gap, so washer is flush with end of axle and retaining bolt pulls / holds it all tight. No gap/slide, No wobble.

Before I get all proud of myself - does anyone see a problem doing this? Not sure a slightly worn hub would result in this "in and out" slack, or if I should be looking for another hub, or maybe the machine was built that way (the early 80 s 205 was apparently designed to be " easy" for owner to work on with basic tools so maybe hubs were built to be able to move a bit along axle shaft?). I have no idea. Maybe this is nothing, or maybe the tractor is sending me an early warning about the hub.

Should I grease this spline / hub and bolt it in and call it a day? I have never-seize as well as all purpose grease here.

Any thoughts are always appreciated. Thanks

This post was edited by rtoni on 11/25/2022 at 12:31 pm.
 
It may have gotten loose at some point in the past and wore the splines a bit, as evidenced by the wobble if the hub is not pushed fully on to the axle splines. I would want the axle to be in a bit from the washer when the hub is tight, so I know the hub is tight on the splines. If the washer meets the end of the axle, you can't be sure the hub won't go on more or if the washer is stopping it. I would also consider getting some Loctite Quick Metal and coat the inside of the hub and the axle splines then assemble and torque to spec. Quick Metal is intended to help restore press fits. It will fill gaps between the male and female sides of the splines and help lock it up. Clean the components very good if you use Quick Metal, no grease oil, rust, or dirt.

This post was edited by Jim.ME on 11/25/2022 at 01:32 pm.
 
(quoted from post at 14:30:25 11/25/22) It may have gotten loose at some point in the past and wore the splines a bit, as evidenced by the wobble if the hub is not pushed fully on to the axle splines. I would want the axle to be in a bit from the washer when the hub is tight, so I know the hub is tight on the splines. If the washer meets the end of the axle, you can't be sure the hub won't go on more or if the washer is stopping it. I would also consider getting some Loctite Quick Metal and coat the inside of the hub and the axle splines then assemble and torque to spec. Quick Metal is intended to help restore press fits. It will fill gaps between the male and female sides of the splines and help lock it up. Clean the components very good if you use Quick Metal, no grease oil, rust, or dirt.

This post was edited by Jim.ME on 11/25/2022 at 01:32 pm.
Thank you once again Jim. It turns out that my washer thickness is just enough that the axle is in a bit as you suggested. I didn t torque it yet but just light ratchet tight and the hub tightened right up. My measurement for inside diameter was my best effort, I could have made it 1/16" smaller but not sure that s a game changer.

Some pics:

mvphoto99694.jpg


mvphoto99695.jpg


mvphoto99696.jpg
 

We sell tractor parts! We have the parts you need to repair your tractor - the right parts. Our low prices and years of research make us your best choice when you need parts. Shop Online Today.

Back
Top