rough running 8n

86wrangler

New User
hi guy, i just bought my first gas tractor. its a ford 8n front mount 12v. when i bought it it ran great for a few months then the rotor button broke. so i took it back where i bought it and they replaced the rotor button and said they resat the gap on the points. when i picked up the tractor it was running better than it had ever run. a few weeks later i got on it to box my drive and it was running rough. acts like it does not have full power and spiting and sputtering. so i replaced wires, plugs, and distributor cab and still same thing. you guys have any thought on what to do now?
 
If it sits outside , it may have picked up some moisture in the distributor . Gets some 5-56 or equivalant electrical moisture spray , spray the distributor & all the spark plug wires & coil . When the rotor cap broke , are you sure it didn't break the cap & break off the grd wire ? Check all your spark plugs for fouling or wet from gas or oil . Also as you have each plug out & the wire attached , ground it & turn the engine over with starter button , you should get a good blue spark . If not , then theres other issues . Also check to see if you are getting a good solid flow of gas to the carb .Post back the results . Remember , in order for these great tractors to run as they should , you need a good flow of gas to carb & a blue spark from the spark plug .HTH ! God bless, Ken
 
wrangler........well waddaya know, 'nutter' wholesale parts replacement scheme gone wrong.

Didja know points (0.015") slip???
Didja know incorrect points gap causes weak
sparkies and ruff runnin'???
Didja know ittza 2-bolt, 15-min job to remove yer
4-nipple frontmount dizzy and replace yer points
(0.015") on the kitchen table??? Just un-snapple
yer capple and letter dangle. Installation is a
reversal of the removal ...except... finger start
yer 2-bolts and then putt'chur rotor on. Now
rotate yer rotor until the OFF-SET drive tang
drops into the OFF-SET camshaft slot. Now tighten
yer 2-bolts, and re-snapple yer capple. Simple,
eh?

Remember to "polish" the invisible corrosion from
between the points. I clamp a $1-bill between
points and pull. Iff'n yer really cheap, tear a
strip from HEAVY brown paper grocery sack and
pull. .........Dell, yer sell-appointed sparkie-
meister
 
i just replaced the plugs, wires, and cap this morning and still running like it did when it had the old plugs, wires, and cap so i dont think thoses are the problems. i have not checked the coil or for a blue spark but it fires right up. i did remove screw on bottom of carb bowl and gas ran freely. i did notice there is small gap between distributor and the cap itself. would this cause a problem?
 
i did set gap on plugs. the gap on points was resat when rotor button was replaced. the tractor ran great right after that was done. the second time i ran the tractor after the gap was resat thats when it started running rough. it has only been started twice since the gap on points was resat. i did go ahead and buy new points just have not installed them yet, wondering if it could be something else i am over looking
 
" i did notice there is small gap between distributor and the cap itself. would this cause a problem? "

Yes. Item 7 below.

So will dirty/misaligned/incorrectly gapped points as Dell is telling you. Item 9 below.

Did you replace the 50 cent coil gasket when you replaced all of those other parts? The very first thing to suspect is points & that is the one thing you have ignored.

Before you check anything else, make sure you have the correct voltage at the top of the coil. It should be battery voltage w/ the points open & about half that w/ the points closed.

If you do not have the correct voltage at the coil, that’s your problem.

Assuming that the bushings & advance weights are ok, & that you have correct voltage to the coil, the most common electrical failure (no spark, weak spark) points on the frontmount are:

1. The insulator under the brass concave head screw.

2. The insulator at the end of the points where the copper strip attaches.

3. The copper strip is broken or grounded to the plate.

4. The condenser wire grounding.

5. The pigtail/tab not making contact.

6. Incorrect positioning of the spring clip on the plate causing the pigtail to ground.

7. Incorrect seating of the coil on the distributor due to a loose bail or no gasket; the coil must not move at all.

8. Water/moisture inside the cap due to gasket failure or the absence of a gasket.

9. Dirty/corroded/incorrectly gapped points

10. Burned rotor, cracked/carbon tracked cap.

Unless the coil is cracked or shows a dead short, chances are it's fine; square coils rarely fail cold. Pull the distributor & do a continuity check.

First, make sure your meter/light works (don't ask....)

Next, dress the points by running a piece of card stock or brown paper bag through them. New points sometimes have an anti-corrosive dielectric coating on them & old points can corrode or pick up grease from a dirty feeler gauge or excessive cam lubricant. Then, check the gap at .015 on all 4 lobes.

Now, follow these steps:

1. Coil off, cap off, points open. One probe on the brass screw & the other on both sides of the open points. On the side closest to the cam, you should have continuity. Not on the other side! If you do, you will also have continuity everywhere because the points are grounded.

2. Coil off, cap off, points open. One probe on the brass screw & the other anywhere on the body of the distributor. You should have no continuity! Now, rotate the tang on the distributor....as the points open & close, you have continuity (closed) and lose it when they open.

3. Coil on, cap off, points open. One probe on the lead on the top of the coil, the other on the cam side of the open points. You should have continuity!

4. Coil on, cap off, points open. One probe on the lead on the top of the coil, the other anywhere on the body of the distributor. You should have no continuity!

At this point, I just put the distributor, coil & cap all back on the tractor as a unit. The reason I do this is because it is real easy to get the cap or coil mis-aligned trying to put it back together one piece at a time & the result is something gets broken or you get a ‘no spark’ problem.

It's possible to put it back on wrong & break it. Look at the slot on the end of the cam shaft. What ever angle it happens to be, turn the distributor tang to match it. Make sure you can tell the wide side from the narrow side on both the cam & distributor! (close counts) Then place the distributor on the front of the engine, gently push it in place & slowly turn the distributor body until you feel the tang slip into the slot. Rotate the distributor body until the bolt holes line up. Then, hand tighten the two bolts until the distributor body is flush w/ the timing gear cover.

Finally, double check your firing order & plug wires. It’s 1-2-4-3, counterclockwise. It’s very easy to cross 3 & 4.

Post back w/ results & any other questions.
50 Tips


 
" the second time i ran the tractor after the gap was resat thats when it started running rough. it has only been started twice since the gap on points was resat"

You can change points everyday & it will not fix bad bushings. If you are having trouble w/ points failure, check the shaft. If you detect movement, chances are it needs new bushings.

The next trick to points lasting a long, long time is annual maintenance. (tip # 40) No matter how well it's running, pull the distributor (or cap for a sidemount), check the gap & put a dab of points lube on the cam. Not bearing grease or Vaseline; use the correct lube.

Quality parts are critical to longevity. Having learned the hard way, I most always use Blue Streak brand points. They are made by Standard parts & available at many auto parts stores. (frontmount points also fit a 48 Ford as I recall) Beware of sticker shock: $16-18 a set. My next choices are Wells or Echlin. Look for a brown rubbing block. Unfortunately, many folks have experienced problems w/ points made by Tisco, Sparex, A&I Products and any TSC ignition parts.

Correct points installation & gap is also important. Make sure the blade is at a perfect right angle to the points & you want to feel just the slightest bit of drag when you pull the blade through the points. Make sure the blade is clean & that you dress the new points by running some card stock or a piece of brown paper bag through them. Gap is .015 on the frontmount, .025 on the sidemount on all four lobes of the cam. Make sure the points align correctly. Proper alignment is also critical to longevity. Look at the points when they are closed; both sides should mate evenly.

Even as tight as I am, I always change the condenser when I change the points…….and then I toss the condenser in the “used” parts box. A bad condenser is rare; you can tell if the points are pitted/burned w/ metal transfer.

Good hold-down screws are important. (tip # 37) If the heads are wallowed out, what do you think the threads look like? You can use machine screws as temporary replacements, but you should use the OEM Fillister head screws. The larger head is there for a reason. If you do use standard machine screws, make sure they aren’t too long & interfere w/ the advance weights. Always use star washers under the screws.

Timing is important to engine performance. Make sure you set the point gap before you set the timing. Timing a sidemount is pretty straight forward; it has marks on the flywheel. It’s a bit different for a frontmount but it’s a necessary part of a tune-up nonetheless. And, contrary to what some folks think, timing a frontmount is not accomplished by getting #1 to TDC & putting the distributor back on the engine! Did you set the timing on it?

When I was 16 years old making $1.25 an hour & a set of points cost $1, I filed points. I must have been good at it because I recall it was almost a weekly exercise. If you ever file a set of points, you will remove the metallic coating on them & reduce the life span considerably. Unless you plan to keep on filing them, plan on replacing them pretty soon!

And lastly………it does not matter if it’s 6 volt or 12 volt, you must use the OEM ballast resistor on a frontmount. Too much current to the points will burn them up in short order (leave the key on with the points closed & you will experience this “learning point” in about 3 minutes, tip # 38) For a 12v conversion on a frontmount, you probably need another resistor in the circuit as well but unless you measure the coil resistance, you will not know for sure. On a 12v sidemount, it will need a resistor if it’s a 6v coil (and even some 12v round coils need one) or you can just get a true 12v coil from NAPA & not worry about it. (tip # 30).
50 Tips
 
did not replace the gasket. the coil DOES move (rotate) when moved by hand. how do i fix this? the coil will rotate and there is gap between cap and distributor.
 
did not set timing. can you tell me how to do it on a front mount? also what and where are these bushing that you are talking about? the coil does move so i may need theses.
 
The bushings have nothing to do w/ the coil moving. A new gasket will fix that.

The bushings are in the base of the distributor & in the tower on the plate.

If the shaft moves at all sideways, they need to be replaced. If the shaft does not move, don't fool w/ it.

If you've never replaced bushings, send the entire distributor to nnalert's.

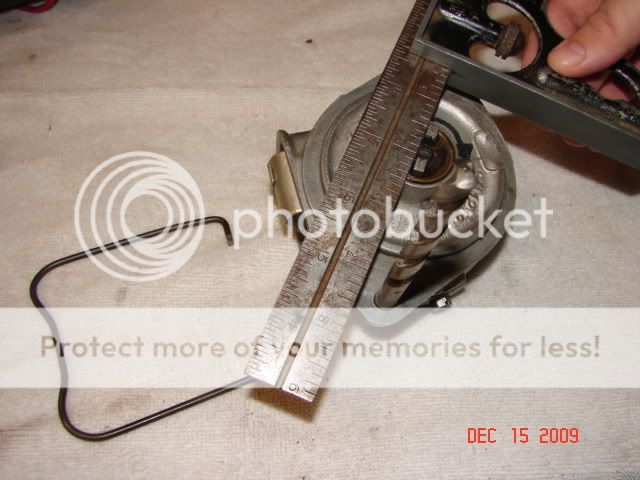
To set the timing, get a meter or test light, a 21/64” drill bit & a metal straight edge. Put the distributor face down w/ the condenser on the left & the timing plate lock screw on the bottom. Look at the end of the shaft: it has a narrow side & a wide side. Make sure you can tell the difference. Now, place the drill bit in the bottom mounting hole. (this will be your reference point for measuring) . Next, place a straight edge on the wide side of the tang on shaft as shown in fig. FO83 in the I&T FO4 manual. Rotate the shaft CCW (as viewed from rotor side OR CW as viewed from back/tang side) until the straight edge is ¼" beyond the outside edge of the drill bit you stuck in the distributor mounting hole. At this distance, the distributor points should start to open. (get your meter/light out now & check) If not, loosen the timing plate lock screw and turn to advance or retard the timing. (move the plate down to advance timing, up to retard) Remember, each one of those little hash marks represents about 4* of timing. Keep adjusting until you get the proper ¼" setting. (if the plate won’t move, you might need to remove the big C clip to loosen it a bit) As you’re adjusting, eliminate backlash by turning the shaft backwards (CW as viewed from the front) and bring the shaft forwards (CCW as viewed from the front) to measure your setting. This ¼" setting will get you static timing at top dead center.

After you set the points & timing, do a continuity check before you put the distributor back on the tractor.
timing003.jpg

DSC03063.jpg

50 Tips
 
i checked and rechecked the plug wires. they are correct. i do thinks it has something to do with the timing and or points and due to the coil and cap move and have gap between them when locked and place. quess it will just take more time to play with it, but please keep the ideas comeing
 
check air flow? something plugging up the intake? i cleaned out my sludged up oil bath and screen and it helped get a smoover runnin engine.
 
ok guys played with the 8n a little more today and still no luck. did notice that there is lite blue smoke coming from the exhaust. does this throw and signs or other ideas to you about what could be wrong with it? do you think its a fuel/carb issue?
 

" do you think its a fuel/carb issue? "

Forget about the smoke. It could be carb or fuel, but you need to do some troubleshooting to find out.

It takes three things for an engine to run: spark at the right time, compression, & fuel in the right mixture. For the moment, forget about compression & concentrate on narrowing the problem down to spark or fuel.


There are three very important tools you always need to have in your N tool box: a 3 inch piece of wire w/ alligator clips on each end, an old spark plug w/ the gap opened to at least 3/16” ( ¼” is better) and a 7/16 box end wrench. (see tip # 50 at the link below) And, you really do need a working ammeter on the tractor; it is a very important diagnostic tool. With these tools, you can quickly narrow down most N problems to spark or fuel.


First, check for fuel. Get a can & put it under the carb. Remove the bolt in the bottom of the carb; as long as the fuel is turned on, you should see gas flowing out of the carb. Let it run for at least 30 seconds. If it’s a dribble, or runs for 5 seconds & stops, or none at all, you have solved half the problem: it’s fuel related. If gas flows well out of the carb & only stops when you turn it off at the sediment bowl, chances are very good it’s not a fuel problem. So, next, turn the key on, crank the engine & look at the ammeter. What is the needle doing? Does it show a constant discharge, no movement at all, or does it move back & forth slightly? Next, get the old plug, ground it to a rust & paint free spot on the engine, turn the key on & crank the engine. If the spark jumps the 3/16” gap, you probably don’t have a spark problem. If it won’t jump the 3/16” gap, you have a spark problem. If the ammeter needle shows a constant discharge, or doesn’t move at all, that also tells you that you have a spark problem. Jump the ignition switch w/ your jumper wire & see what happens. If it runs, you found the problem. If it doesn’t have spark after you jump the ignition switch, post back for more info on further troubleshooting. (and do not forget to turn the ignition switch off; see tip # 38)


If it does not have gas coming out of the carb at a steady stream w/ the bolt out for at least 30 seconds, you have a fuel problem. First, remove the gas cap. Your vent could be clogged & it vacuum locked. If that doesn’t work, tap the carb bowl w/ a hammer handle in case the float is sticking closed. (don’t whack it w/ the head of the hammer; you can crack the bowl). If you still don’t see gas flowing, the N has three fuel screens; one in the brass elbow, one in the top of the sediment bowl & one on the stem of the sediment bowl in the gas tank. Check the screen in the elbow & the screen in the top of the sediment bowl. (don’t worry about the one in the tank) Both probably need to be cleaned. If you have the fuel knob turned on all the way, & 1 gallon or less in the tank, it may be trying to feed off of the reserve inlet which is probably clogged. Only open it 2 full turns. Put at least 2 gallons in the tank. (and do not forget to turn the gas off; see tip # 9)


There are ways to check for spark & fuel that work & ways that don't. For example, having gas to the carb is nice, but having it past the float is what counts! That’s why removing the 7/16” bolt in the bottom of the carb is the way to check for fuel. And, same thing w/ spark at the plugs. Some folks think that checking for spark means pulling a plug wire off & looking for one. Well, it's the distance the spark jumps at the plug that gives you the info you want. It takes about 17kv to jump a 3/16" gap & 22kv to jump ¼” in the open air. Remember, it’s 14psi outside of the engine & about 90psi at a 6:1 compression ratio in the cylinders & compressed air creates electrical resistance, so you really need the 17-22kv to fire the plugs when the engine is running. A store bought plug checker will work better than an old plug because it won’t shock the snot out of you like an old plug might!

Post back w/ results or more questions.
50 Tips
 
thanks for all the great info. now i have another problem, now no spark. quess i will check coil and go from there. coil, wireing, timing, or points. time to start breaking it down and trying to find the big problem.
 
Yesterday's Tractor Forums

We sell tractor parts! We have the parts you need to repair your tractor - the right parts. Our low prices and years of research make us your best choice when you need parts. Shop Online Today.

Back
Top