1942 Farmall H Memorial Project - Reassembly Begins

Ken Christopherson

Well-known Member
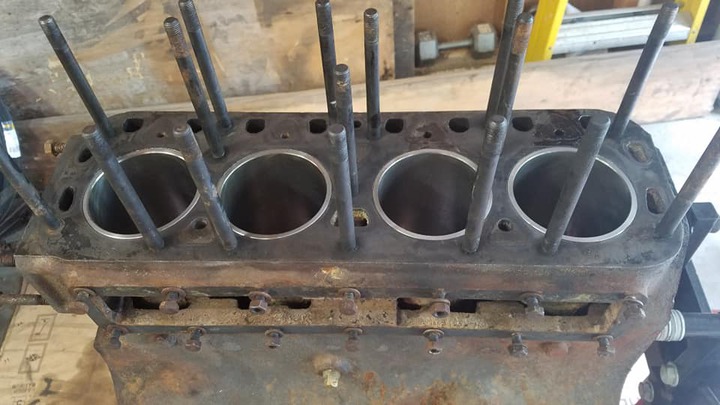
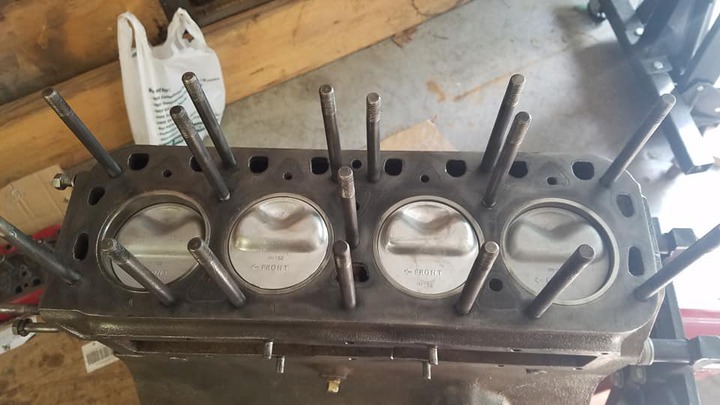
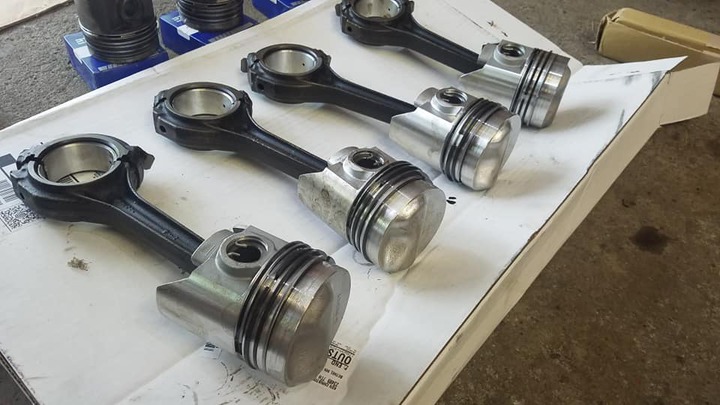
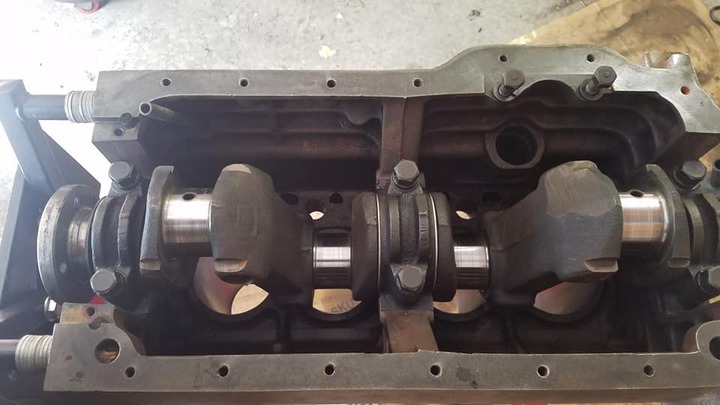
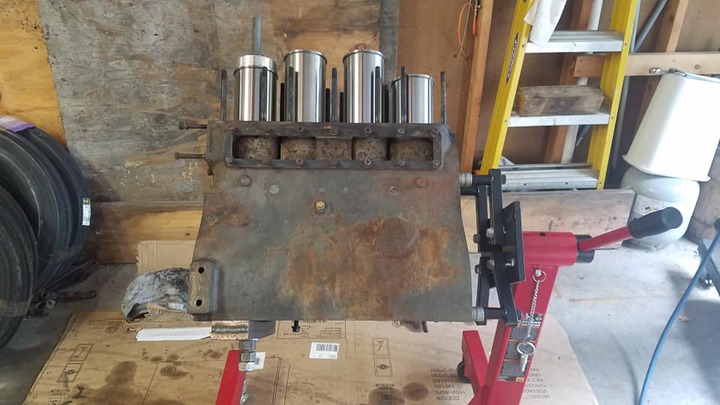
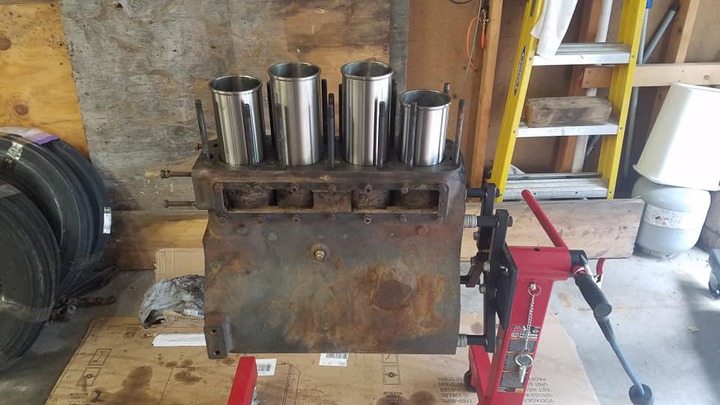
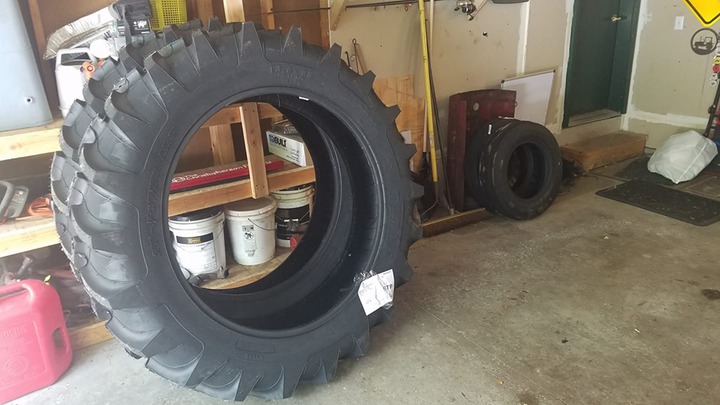
Hello all! Well, I finally got around to getting some more work done on the 1942 Farmall H memorial restoration project. Started getting the sleeves, pistons, bearings, etc. installed in the block. Sure is going together well. I'm still searching for a few more parts (battery box, rear rims I am waiting to hear on)... But once all that stuff comes in it is just more parts cleaning, lots of seals and gaskets getting replaced, and then it is off for sandblast, prime, and paint. I have some special touches getting added to this project to really set it off from others, and I hope you all like that. I won't spoil the surprise, though! I have to give a big thanks to Titan Tires for sponsoring, JR's Custom Plating, as well as many, MANY donors for either contributing to the GoFundMe or donating parts that I am in need of. The end goal is to take whatever funds are left and donate them to the SAVE organization. The tractor will be used to travel from show to show, plow days, and parades to help raise awareness for suicide and mental health. Included are some photos of where we are at so far, and also a link to the video series on the project.

I hope you all like the progress so far. She sure will be a good looking machine!
cvphoto28875.jpg


cvphoto28876.jpg


cvphoto28877.jpg


cvphoto28878.jpg


cvphoto28879.jpg


cvphoto28880.jpg


cvphoto28881.jpg

Reassembly Video 1
 
(quoted from post at 14:59:16 07/08/19) Looks good Ken. been watching on it on your you tube chanel. keep up the good work. bob

I concur. Great video, except I don't think you should wear all that JD gear while working on the H. It could cause problems down the road.
 
ooh my! hard to watch that. you should buy some tools. never saw anyone beat on an engine brg. with a cold chisel. even that carpenters claw hammer surprises me. that block has to be spotless before any assembly begins. deck cleaned and spotless, plus chase the threads. nothing was checked. wristpins were not checked to the rod bushings for wear. brgs. not lubed properly or plasti - gauged . piston rings not orientated, nor lubed before assembly.
 
helpful tip...........needs some oil on those new parts and old parts or lube....................dewy
 
even those snap rings go in one way and open side down. many don't know the difference.
 
I guess I have some learning to do? I'm not going to defend my behaviors. I am doing the best I can with what I have got. There are a lot of things in the process that I don't include in the videos because I consider them common sense. Like using SAE30 as lubricant when assembling pistons and sleeves, using assembly lube in the bearings, etc. (I believe I did include using the assembly lube). Using my inside bore gauges to check wrist pins bushings, mics to check the wrist pins, plasti-gauging the old bearings, measuring the crankshaft, etc. There are a lot of things I have to 'skip' otherwise my videos would be hours long and with a new baby at home I have to take advantage the small amount of shop time I get. I'm not here to make excuses, though.

I'm also not here to argue. Been coming to these forums since 1998, when I was 12. I don't intend to stop now. Just doing the best I can with what I have got. I'm no expert and don't claim to be. Maybe I have no business inside a motor, or hobbying with tractors in general? I just like to show that for those who enjoy this hobby that you don't NEED all of the tools if you are careful (like using a cold chisel).

Ah well, maybe I won't post any more updates in the forum until the tractor is running and finished?
 
Dewy - I do use assembly lube and SAE30 on the engine parts for assembly. I coat the parts and wipe off any excess, then once assembled it gets a splash again and rotated slowly to distribute. I just don't show a lot of this stuff in my videos. I have to expedite some of the filming processes as I don't get much shop time as it is with a 3 month old at home. Thanks for the concern!
 
Definitely didn't know this. Even the instructions included with the kit do not say this. Staggering the piston rings isn't on there either, but I give them a quick visual once-over before putting them in to ensure they are. It is my understanding they will move a little as the engine wears in, just like any other part.
 
(quoted from post at 22:34:44 07/08/19) Well, I'm getting by ok. If the engine grenades, I guess it's like they say - you reap what you sew. Thanks for your concern.

I really enjoy your videos and learn a lot from them. That's what this forum is for. Unfortunately lots of folks like to criticize while they're at it. Since everyone's giving you corrections, I'll add my own. It should be, "reap what you sow" instead of "sew". LOL. Sorry, I couldn't resist. Keep up the good work!
 
Ok, ok... Ha ha. Reap what I sow. Anyhow - glad you like the videos. There are a lot of things I don't have time to show in the videos just because I am limited
now with shop time and having our baby girl.

Stay tuned!
 
ken, what i learned on this site, and also on other sites as well, if you don't explain things in perfect detailed order in the way you do things , people like to bash the sh t out of you , half of these guys on here cant even change there own spark plugs. keep up the good work , love the video's
 
luv the videos ,keep on tractorian,i can barely get a picture up on forum much less a video on you tube........luv those tires........dewy
 
Don't worry. I am not taking too much of it to heart. I'm not perfect by any means. I try to do the best with what I have got. These tractors were meant to be
fixed in the field, by farmers, with limited tools. I'm sure that being in my garage, with the assortment of tools I have is far less dirtier than field repair
conditions.

Is it going to be a perfectly built, balanced motor that is spotless inside? No, but it will be FAR better than it was.

Thanks for the encouragement, and glad you like the videos! That is why I keep making them!
 
I was not bashing the sh t out of him. I saw all the mistakes made. its on video. plain as daylight the pistons were installed dry into the sleeves . you think this would pass in a shop? the shop foreman would be all over a person if he saw this very same thing. certain procedures to follow on an engine rebuild and this was a poor example to be posting for the ones that have no experience in mechanic's and think its a good job. pounding on those brgs with a steel chisel can cause the ends to mushroom and when torqued can cause crank and brg. damage. even turn a brg. from the metal filings off that brg. glad u think that's ok. that's the problem with a lot of this u tube stuff... its beginners thinking they are doing a good job. then the experienced guys watch that and criticize there mistakes. I been pulling wrenches for over forty years and sure do know what a good job is. also for example if the instructor in class was watching that he would have had all the mistakes taken care of. those pistons would have been pulled back out and the rings spaced and lubed in oil before the ring compressor is installed on the piston. plus all the other things that were omitted in this engine assembly. so how do you guys that say good job even know the difference in good and bad. I caught lots of mistakes, but didn't here of anyone else catching them???
 
I have put together multiple H M B A C engines and never once had to use any plastigage on them or had to make the block so clean you could eat off it. I've put together engines with the most basic tools and never had any issues. these old engines don't require every spec like a brand new car engine.
 
I agree. I have gotten by just fine using what I have in my garage. With 7 tractors, 6 of them saved from dead... They all run and run quite well. (The 7th is the latest project that I won't get to for a year or two)... I just think that we should really be encouraging others to do the best they can with what they have instead of telling them everything they are doing is wrong. What is wrong with alternative methods? These tractors were meant to be fixed in farm fields, by farmers, with limited tools and limited skills. Simplicity is the name of the game.

Let's keep the hobby alive by helping each other instead of discouraging each other.
 

We sell tractor parts! We have the parts you need to repair your tractor - the right parts. Our low prices and years of research make us your best choice when you need parts. Shop Online Today.

Back
Top