1949 8N 3-Point not going down

wilsonsk

Member
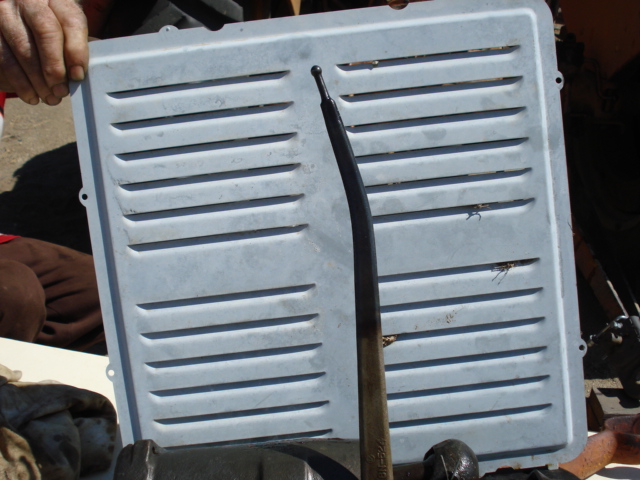
I had a 5 foot brush hog on my 8N over the weekend, I was using the lift control to keep it up a ways in tough grass, I went to lower it and it wouldn't tried going up and it did, but then wouldn't lower. If it disengage the PTO or shut of the tractor it would eventually leak down, but as soon as I engaged the PTO with the tractor running again, it went back up to the top. I searched here and learned enough to remove the right inspection plate and pus back the arm, I had to use a small crow bar and it came down fast when it did. It worked normally after that, but I didn't use the lift anymore. Still seems to be working fine. Was it simply hydraulically locked with too much weight? I had this happen in the winter with a boxblade and flipping the touch control lever forward would make it work, that had no effect this time. I took a video with my phone through the inspection plate hole, it is two complete cycles of teh lever, does everything look normal in there?

https://drive.google.com/file/d/0B1g8aLr20f7kaWE5Zktwbm5TNlU/view?usp=sharing
 
I also have a 49 8N with a similar if not the same problem. If the lift sticks up I flip the draft control lever down and then back
up. The lift will drop when I flip the draft control lever back up. Maybe that will work untill you can repair it.
 

That worked when it happened last winter, but had no effect this past weekend, it wouldn't drop until I removed the inspection plate and pushed back the arm, and that took considerable force.
 
Does it stay stuck whether in DRAFT CONTROL or POSITION CONTROL?


[i:654c4848f0][b:654c4848f0]<font size="4">Tim *PloughNman* Daley(MI)</font>[/b:654c4848f0][/i:654c4848f0]<table width="100" border="1" cellpadding="0" cellspacing="0" bordercolor="#000000"><tr><td height="25" colspan="2" bgcolor="#CC0000">
<font color="#FFFFFF" size="3">*9N653I* & *8NI55I3*</font>​
</td></tr><tr><td>
4lBA6Yh.jpg
</td><td>
zzYVuC4.jpg
</td></tr></table>
 

When it stuck this time, it stuck in both, last winter it would drop if I flipped the lever, this time it made no difference, it wouldn't drop until I pushed the arm back through the inspection hole on the right side, and it took a LOT of force. It seems to be working fine, but I'm not using the lift with the brush hog anymore, I don't really need to anyway.
 
(quoted from post at 12:50:12 09/05/17)
When it stuck this time, it stuck in both, last winter it would drop if I flipped the lever, this time it made no difference, it wouldn't drop until I pushed the arm back through the inspection hole on the right side, and it took a LOT of force. It seems to be working fine, but I'm not using the lift with the brush hog anymore, I don't really need to anyway.

A lot of force with a crowbar in there could also be bending your control rod.
 
It didn't feel like enough to bend it, but I was expecting to be able to move it by hand, I had to push pretty hard with the crow bar, although not prying, if that makes sense.
 
I have the goo drained out of the trans/hydraulic/rear end, it was bad, almost white, chunks of goo. I put 5 gallons of diesel in it and have run the lift up and down a few times, I'll let it sit then do that some more later.

After I had dropped off the brush hog (the lift had been working fine at that time), with no weight on the arms, and the lever for draft control rearward (straight up), the arms would drop to the bottom then come back up part way. If I put the draft conrtol lever forward (horizontal), they go all of the way down, flipping the lever makes them go back up part way. They did this before the oil drain, and still do it with the diesel in it, I can stand on them and push them down with the diesel in it, I didn't try that with the oil. Is that normal?
 
(quoted from post at 10:09:25 09/18/17) I have the goo drained out of the trans/hydraulic/rear end, it was bad, almost white, chunks of goo. I put 5 gallons of diesel in it and have run the lift up and down a few times, I'll let it sit then do that some more later.

After I had dropped off the brush hog (the lift had been working fine at that time), with no weight on the arms, and the lever for draft control rearward (straight up), the arms would drop to the bottom then come back up part way. If I put the draft conrtol lever forward (horizontal), they go all of the way down, flipping the lever makes them go back up part way. They did this before the oil drain, and still do it with the diesel in it, I can stand on them and push them down with the diesel in it, I didn't try that with the oil. Is that normal?

Why don't you just pull that top cover and see what is going on in there? You're not getting anywhere so far. When I finally pulled my top cover, the cam follower pin was so worn that most of the end was gone and it had actually slipped off the side of the cam.

It's a pia to pull that cover but sometimes you just have to do it.

In the pic below, you can also see how much my control rod was bent. You can see the color change on the bottom part of it. It almost looks like it was heated and bent on purpose.

There is no telling what the previous owner did to that thing since it is an 8N but it has a 2N top cover on it. The cover has no Draft / Position selector handle on it. I do have position control but there is no way to switch it to draft mode. That suits me though since I don't use any ground engaging implements.

DSC03717.jpg
 
It's coming apart either way, I am replacing the old piston with new style and all of the gaskets, I'll check out the follower pin as well. I have a new relief valve and will check the intake and exhaust valves when I have the pump out.

I'm just looking for anything in particular I should be looking for beyond that. I don't want to go this far and find out I missed something I could have caught by bringing some of these symptoms up.

I plan on running it a bit more on diesel tonight and then dropping the pump. Any tricks I need to know about the exhaust and intake valves?
 

" I plan on running it a bit more on diesel tonight "

Keep doing that and you will be replacing the pump. The pump was designed to run immersed in 90w gear oil.
 

I've run it a total of about 3 minutes, no load on the arms, was going to do maybe another 5 minutes, then dump it and pull the pump, but I can just pull the pump.
 
(quoted from post at 16:13:38 09/18/17)

In the pic below, you can also see how much my control rod was bent. You can see the color change on the bottom part of it. It almost looks like it was heated and bent on purpose.

heated and straightened, maybe, and has since bent again?
 
(quoted from post at 14:16:37 09/18/17)
From reading other posts, it sounds like those arms don't need to be heated to be bent back straight?

Yeah, most of the posts I've read said they can be straightened without heat, but it would hurt to use heat. I didn't try straightening mine out, I just purchased a used one that was nice and straight.

I might try to straighten out the old one some day if I get bored enough.
 
Hopefully I can get the pump out tonight and see what the valves look like. Then the top cover will be next.
 
(quoted from post at 18:16:37 09/18/17)
From reading other posts, it sounds like those arms don't need to be heated to be bent back straight?

i have seen people do things that didn't need to be done. i know, hard to believe, huh? ;)
 
....but if you take a hammer to it, the little ball on the end may make a quick departure. :(
 
(quoted from post at 15:27:51 09/18/17) ....but if you take a hammer to it, the little ball on the end may make a quick departure. :(

Sure, if you use the ball as a resting point for the end. Doesn't take much brains to see that is a bad idea. :wink:
 
(quoted from post at 18:55:11 09/18/17)
(quoted from post at 15:27:51 09/18/17) ....but if you take a hammer to it, the little ball on the end may make a quick departure. :(

Sure, if you use the ball as a resting point for the end. Doesn't take much brains to see that is a bad idea. :wink:
akes more brains, Cary, to recognize the thinly attached ball on the long thin rod will resonate when hit elsewhere along its length (ball in free air) and still fly off. :idea:
 
(quoted from post at 16:21:21 09/18/17)
(quoted from post at 18:55:11 09/18/17)
(quoted from post at 15:27:51 09/18/17) ....but if you take a hammer to it, the little ball on the end may make a quick departure. :(

Sure, if you use the ball as a resting point for the end. Doesn't take much brains to see that is a bad idea. :wink:
akes more brains, Cary, to recognize the thinly attached ball on the long thin rod will resonate when hit elsewhere along its length (ball in free air) and still fly off. :idea:

OK, so maybe it's better to heat the rod and bend it straight.
 
(quoted from post at 19:35:55 09/18/17)
(quoted from post at 16:21:21 09/18/17)
(quoted from post at 18:55:11 09/18/17)
(quoted from post at 15:27:51 09/18/17) ....but if you take a hammer to it, the little ball on the end may make a quick departure. :(

Sure, if you use the ball as a resting point for the end. Doesn't take much brains to see that is a bad idea. :wink:
akes more brains, Cary, to recognize the thinly attached ball on the long thin rod will resonate when hit elsewhere along its length (ball in free air) and still fly off. :idea:

OK, so maybe it's better to heat the rod and bend it straight.
r a big vice or press?
 

I have fine tuned them going thru the inspection cover with a torch nuttin to it other than they bend FAST... Once I got a handle on how to adjust them with the cover off I never had to fine tune one like that again...
 
I dropped the pump, someone has been in it before, the chambers are put back on with blue Permatex, so was the pump-to-tractor seal. As usual there was a fair amount of excess blue, but I have a gasket kit to put the pump back in, and I can break off teh excess on the pump chambers. There is LOTS of chocolate malt looking goo in the pump plate, although the intake and exhaust valves both work very smoothly, I pulled them out, now the next question, how does the exhaust valve come apart to check the spring?
 
(quoted from post at 22:53:24 09/18/17) I dropped the pump, someone has been in it before, the chambers are put back on with blue Permatex, so was the pump-to-tractor seal. As usual there was a fair amount of excess blue, but I have a gasket kit to put the pump back in, and I can break off teh excess on the pump chambers. There is LOTS of chocolate malt looking goo in the pump plate, although the intake and exhaust valves both work very smoothly, I pulled them out, now the next question, how does the exhaust valve come apart to check the spring?
here is no need to take it apart!
 
[/quote]

Ok, good, I like the sound of that better. Both intake and exhaust slide very well in their bores now, I'm guessing they were completely immersed in goo before I drained it.

Does the bushing that the intake valve slides in need to come out? And is there anything that should be there other than the spring and the cotter key that the spring sits against? That was all that came out of mine.
 
Also, what do you typically do to pull return from the drain plug? Drill and tap to plug for 3/4-NPT? I will be returning excess to teh transmission fill hole.
 
(quoted from post at 06:53:56 09/20/17) Also, what do you typically do to pull return from the drain plug? Drill and tap to plug for 3/4-NPT? I will be returning excess to teh transmission fill hole.

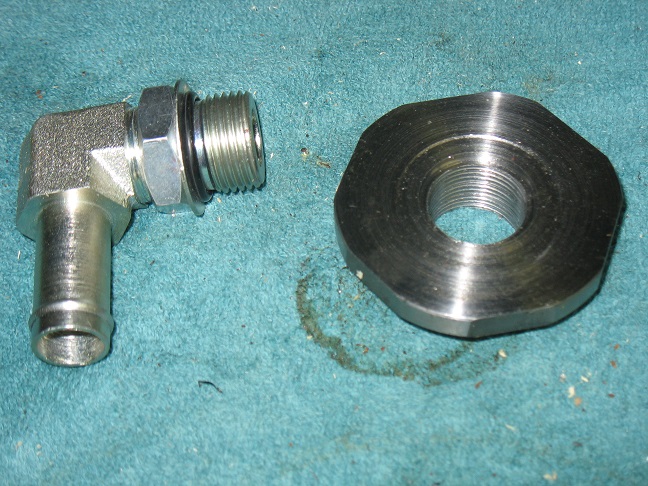
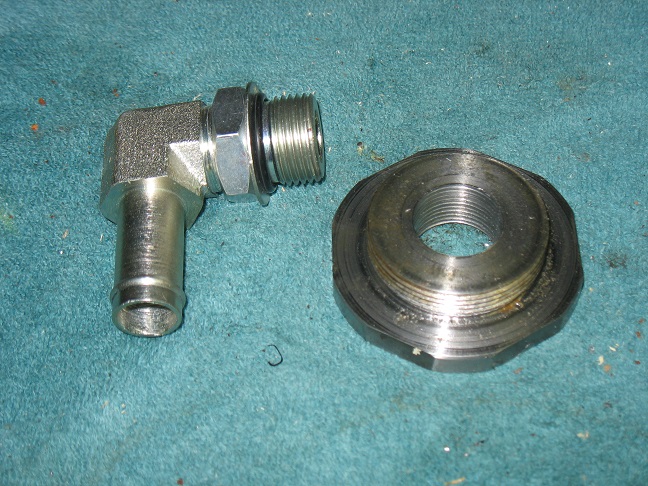
Live hydraulics presumably. If returning any substantial excess to the transmssion you need to pull from BOTH the transmission and pump drains using some sort of external tee connection. That prevents the external pump from sucking the pumps side dry and overfilling the transmission with the excess flow. Here is how I connect to the drains.

TOH

sumpadapter2.jpg


sumpadapter1.jpg
 
Awesome!! Thanks!

How far apart should I be taking the intake and exhaust valves on the pump? Does the sleeve need to come out for the intake?
 

Don't remember removing the intake side the ZAUST YES :!: Nuttin to it measure and put it back were you found it... You will find lot's of crud trapped in that circuit... Take pix and post...
 
(quoted from post at 08:14:00 09/20/17)
The sleeve 8N640 fits in "control valve"...

Nuttin to it go for a one shot kill...

Is this as far as I'm supposed to take it apart?

This is not mine, I'm not at home to take pix right now, but I have mine this far apart and it looks like this, I didn't take this part apart, was told not to, and I haven't taken anything else out of the exhaust bore in the pump either (it looks like a brass sleeve maybe inside the bore?). The valve itself feels good, slides effortlessly in the bore in the pump, and feels like the spring is intact.

I have the pump body on it's side and cleaned up, though I haven't taken it apart at all, and wasn't planning on it unless told otherwise.
 

drive the bushing out of the pump it runs in and clean the chit out of the oil circuit that gets trapped behind the bushing....
 
(quoted from post at 18:51:31 09/20/17)
drive the bushing out of the pump it runs in and clean the chit out of the oil circuit that gets trapped behind the bushing....
e wants you to clean the "chit" out of red &amp; associated passages.
afrVhek.jpg
 

Yes the grove is a continuations circle chit packs in there... The bushing has one small hole to pass the oil. It will surprise folks what they will find once the bushing is removed... More so it will surprise folks how EZ is is to remove and put back... Nuttin to it don't be skeered nuttin is gonna bit you...
3719.jpg
 
(quoted from post at 17:50:51 09/20/17)
Yes the grove is a continuations circle chit packs in there... The bushing has one small hole to pass the oil. It will surprise folks what they will find once the bushing is removed... More so it will surprise folks how EZ is is to remove and put back... Nuttin to it don't be skeered nuttin is gonna bit you...
3719.jpg

Does it matter which direction I take it out?

I do have a new relief valve as well.
 

It looks like two bushings are in there, slight step smaller for the farther in bushing, and it appears to be brass maybe? Do both come out? I have a socket that goes in the end that the exhast valve goes in and will push on the farther in, slightly smaller bushings, but a few lit raps didn't budge it, and I don't want to beat it up and find out I went the wrong way.
 
(quoted from post at 14:51:40 09/21/17)
Drive it out towards the front of the tractor? Or towards the rear of the tractor? Does it matter?
can not give you a positive answer. Opinion: going out, it likely does not matter, but it appears to have a beveled end vs straight on the other, so I would install it beveled end first. If that bevel is obvious to you as it sits installed, then that will tell you which way it was installed previously.
 

Just drove one out started from the front did not like it went to the back... It don't mater comes out either way will take a pix paying jobs come first... Stand it up I laid it on a concrete slab and drove it out once it started moving it came on out...... For sure drive it in from the front till its flush it don't make any difference far as I can see how it comes out. The one I have the hole in the bushing was @ 2:00 pointing toward the pressure relief valve.
 

O.D. of the bushing is 1" I would not use a socket it would be a driver with a pilot so I did not damage the inside wall of the pump as I drove it out. I had a bushing that fit a bushing driver but lost it while driving the bucking out I did not put the retainer nut on it the fist time I hit the bushing it bounced and the bushing for my tool shot out the door. The table I use to lay parts and tools on is not solid enoufh to do work like this so did not use a bushing just wrapped tape on the end so it fit nice. The hole in the pump bushing is 5/32 its small.


3764.jpg
3765.jpg
3766.jpg
3767.jpg
3768.jpg
3769.jpg


Lost bushing out there somewhere.

3770.jpg
3771.jpg
 
Awesome! Thanks, that really helps, I moved it this morning with a brass drift, from the front to the back, but just until it was flush, I have to pick up a piloted driver today and I'll finish it. It takes a bit more to move it than I expected, that was what I was trying to move initially, but it didn't feel like it was yielding so I wanted to make double sure I was doing it right, don't need to break anything, I appreciate the patience and the detail. THANKS!!
 

I turned down a driver early this morning and drove it back in. Never got around to playing with it anymore paying jobs got in the way… Just another 12hr day in paradise… BTW found the MIA adapter from my bushing tool set…
 
I got it out, I didn't make it to get a driver, I used a 6" long 1/2" bolt, threaded a nut on to where the threads end and wrapped the threads with duct tape, it worked great, I went towards the back of the tractor and it was not going easily, I went towards the front and it went pretty good, almost feels like there is some draft on the sleeve. It looked very clean in the channel that goes to the pressure relief. I did do about 5 minutes of diesel flush with the PTO running before disassembly.
Someone has had the pump apart as well, blue silicone EVERYWHERE, and they were not shy about it, lots of excess. I took the right side plate off of the pump to clean the silicone off, pump chambers and pistons look good. I have to finish cleaning and reassemble, then the top cover comes off.
 
Got the pump cleaned up, back together and ready to go.

I pulled the top cover off, found the follower pinwore about half way through, I drove it out, need to order another one.

I pulled the piston and cylinder out and found the control arm bent as they always seem to be, and also found that someone had already machined a groove for an oring. It had an oring on it, but no backup washer, and it is not wide enough (.200 vs. .311). I'll take it to work and open it up. The bore of the cylinder isn't great, but I'll hone it and see how it cleans up.
 
[/quote]

My plan is to press it straight. I have read several posts where they have been straightened cold, I'm just going to go slow.
 

I used a vise grips and a piece of angle, just kept squeezing and adjusting. It had a little spring so it isn't completely straight, but I'm going to run with it. I was surprised how soft it was.

4386.jpg
4387.jpg
4388.jpg
 
After all kinds of other things going on, including measurable snowfall here in Mn, I finally got it back together. I had to widen the oring groove on the piston, the PO had someone cut a groove, but made it exactly the size of the oring, including the full radius in the bottom of the groove. It had a smaller cross-section oring, I'm guessing because the correct size wouldn't fit in the cylinder as it had nowhere to squeeze. It was smaller diameter of the piston itself. I widened the groove per the specs and put the correct oring and leather seal on it. The cylinder bore was not great but I honed it pretty well and put new steel rings on in addition to the oring/leather. I adjusted the lever per the service manual, everything seems to work great. It has stayed up for 4 or 5 hours now. I'm satisfied if it stays up long enough to change from forward to reverse. I put the fitting and check valve on the test port and bought a flow divider, I will see if I can get my pump mounted in the near future, my biggest concern now was being able to plow snow when it comes for real. I have a new pin and bushing for the front axle, need to order radius rod pins and get that rebuilt sooner I think.
 

We sell tractor parts! We have the parts you need to repair your tractor - the right parts. Our low prices and years of research make us your best choice when you need parts. Shop Online Today.

Back
Top