
I have a 2N that had been running great. I started it and ran it for like 4 minutes and it stalled and has resisted all attempts to start. The gas was drained and refilled. The condenser was changed, plugs are new, carb has been removed and checked. There is spark in all 4 cynlinders. The tractor will start with a squirt of starting fluid but then struggles and shuts down. Any suggestions????
You are using an out of date browser. It may not display this or other websites correctly.
You should upgrade or use an alternative browser.
You should upgrade or use an alternative browser.
The plugs are very wet when they are removed. Could the amount of fuel be insufficient that is actually getting to the cylinders and plugs to keep it running? It does seem like it is struggling to stay running when it runs with starting fluid. It'll fire for maybe 10 to 15 seconds and sputter out.
Need to take one of the old plugs and gap it about 3/16". Connect it to one of the plug wires and ground it against a clean, paint free spot on the head..Crank the tractor over with the starter. You should see bright blue spark jumping the gap..Yellow spark is not good enough. I"m betting on glazed points. Did you check the points when you changed the condenser?
Bruce (VA)
Well-known Member
There are two schools of thought when it comes to getting a non-running tractor to start. One way is to just start replacing every part you can get to until it starts or you run out of money. The other way is to take a step-by-step approach to solving the problem, working from most likely to least likely. The trick to fixing these tractors (or trouble shooting any piece of equipment) is to be systematic about it. You need to isolate the problem step by step and work from most likely to least likely. You don't know if you have a spark or fuel problem.
It is important for you to tell us if your tractor has a 6 volt or 12 volt electrical system. The troubleshooting is different based upon the configuration of your engine.
First, replace the plugs. If you flooded it, they're fouled & it will be it next to impossible to start. You don't need to toss them; heat the tips for a few seconds w/ a propane torch to burn off the invisible spark-robbing deposits from today's additive filled gasoline........or wash them in lacquer thinner.
It takes three things for an engine to run: spark at the right time, compression, & fuel in the right mixture. For the moment, forget about compression & concentrate on narrowing the problem down to spark or fuel.
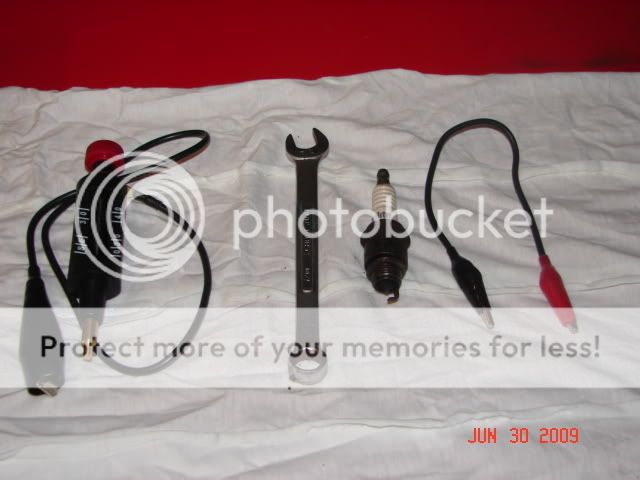
There are three very important tools you always need to have in your N tool box: a 3 inch piece of wire w/ alligator clips on each end, an old spark plug w/ the gap opened to at least 3/16” ( ¼” is better) and a 7/16 box end wrench. (see tip # 50 at the link below) And, you really do need a working ammeter on the tractor; it is a very important diagnostic tool. With these tools, you can quickly narrow down most N problems to spark or fuel.
Next time it stops, check quickly for fuel then spark. When I say quickly, I mean get off the seat, grab the tools & do it right then. Do not wait a minute or two. First, check for fuel. Get a can & put it under the carb. Remove the bolt in the bottom of the carb; as long as the fuel is turned on, you should see gas flowing out of the carb. Let it run for at least 30 seconds. If it’s a dribble, or runs for 5 seconds & stops, or none at all, you have solved half the problem: it’s fuel related. If gas flows well out of the carb & only stops when you turn it off at the sediment bowl, chances are very good it’s not a fuel problem. So, next, turn the key on, crank the engine & look at the ammeter. What is the needle doing? Does it show a constant discharge, no movement at all, or does it move back & forth slightly? Next, get the old plug, ground it to a rust & paint free spot on the engine, turn the key on & crank the engine. If the spark jumps the 3/16” gap, you probably don’t have a spark problem. If it won’t jump the 3/16” gap, you have a spark problem. If the ammeter needle shows a constant discharge, or doesn’t move at all, that also tells you that you have a spark problem. Jump the ignition switch w/ your jumper wire & see what happens. If it runs, you found the problem. If it doesn’t have spark after you jump the ignition switch, post back for more info on further troubleshooting. (and do not forget to turn the ignition switch off; see tip # 38)
If it does not have gas coming out of the carb at a steady stream w/ the bolt out for at least 30 seconds, you have a fuel problem. First, remove the gas cap. Your vent could be clogged & it vacuum locked. If that doesn’t work, tap the carb bowl w/ a hammer handle in case the float is sticking closed. (don’t whack it w/ the head of the hammer; you can crack the bowl). If you still don’t see gas flowing, the N has three fuel screens; one in the brass elbow, one in the top of the sediment bowl & one on the stem of the sediment bowl in the gas tank. Check the screen in the elbow & the screen in the top of the sediment bowl. (don’t worry about the one in the tank) Both probably need to be cleaned. If you have the fuel knob turned on all the way, & 1 gallon or less in the tank, it may be trying to feed off of the reserve inlet which is probably clogged. Only open it 2 full turns. Put at least 2 gallons in the tank. (and do not forget to turn the gas off; see tip # 9)
There are ways to check for spark & fuel that work & ways that don't. For example, having gas to the carb is nice, but having it past the float is what counts! That’s why removing the bolt in the bottom of the carb is the way to do it. And, same thing w/ spark at the plugs. Some folks think that checking for spark means pulling a plug wire off & looking for one. Well, it's the distance the spark jumps at the plug that gives you the info you want. It takes about 17kv to jump a 3/16" gap & 22kv to jump ¼” in the open air, so that's why you need to use a spark plug. Or, a store bought plug checker (on the left in the picture). Remember, it’s 14psi outside of the engine & about 90psi at a 6:1 compression ratio in the cylinders & compressed air creates electrical resistance, so you really need the 17-22kv to fire the plugs when the engine is running.
50 Tips
It is important for you to tell us if your tractor has a 6 volt or 12 volt electrical system. The troubleshooting is different based upon the configuration of your engine.
First, replace the plugs. If you flooded it, they're fouled & it will be it next to impossible to start. You don't need to toss them; heat the tips for a few seconds w/ a propane torch to burn off the invisible spark-robbing deposits from today's additive filled gasoline........or wash them in lacquer thinner.
It takes three things for an engine to run: spark at the right time, compression, & fuel in the right mixture. For the moment, forget about compression & concentrate on narrowing the problem down to spark or fuel.
There are three very important tools you always need to have in your N tool box: a 3 inch piece of wire w/ alligator clips on each end, an old spark plug w/ the gap opened to at least 3/16” ( ¼” is better) and a 7/16 box end wrench. (see tip # 50 at the link below) And, you really do need a working ammeter on the tractor; it is a very important diagnostic tool. With these tools, you can quickly narrow down most N problems to spark or fuel.
Next time it stops, check quickly for fuel then spark. When I say quickly, I mean get off the seat, grab the tools & do it right then. Do not wait a minute or two. First, check for fuel. Get a can & put it under the carb. Remove the bolt in the bottom of the carb; as long as the fuel is turned on, you should see gas flowing out of the carb. Let it run for at least 30 seconds. If it’s a dribble, or runs for 5 seconds & stops, or none at all, you have solved half the problem: it’s fuel related. If gas flows well out of the carb & only stops when you turn it off at the sediment bowl, chances are very good it’s not a fuel problem. So, next, turn the key on, crank the engine & look at the ammeter. What is the needle doing? Does it show a constant discharge, no movement at all, or does it move back & forth slightly? Next, get the old plug, ground it to a rust & paint free spot on the engine, turn the key on & crank the engine. If the spark jumps the 3/16” gap, you probably don’t have a spark problem. If it won’t jump the 3/16” gap, you have a spark problem. If the ammeter needle shows a constant discharge, or doesn’t move at all, that also tells you that you have a spark problem. Jump the ignition switch w/ your jumper wire & see what happens. If it runs, you found the problem. If it doesn’t have spark after you jump the ignition switch, post back for more info on further troubleshooting. (and do not forget to turn the ignition switch off; see tip # 38)
If it does not have gas coming out of the carb at a steady stream w/ the bolt out for at least 30 seconds, you have a fuel problem. First, remove the gas cap. Your vent could be clogged & it vacuum locked. If that doesn’t work, tap the carb bowl w/ a hammer handle in case the float is sticking closed. (don’t whack it w/ the head of the hammer; you can crack the bowl). If you still don’t see gas flowing, the N has three fuel screens; one in the brass elbow, one in the top of the sediment bowl & one on the stem of the sediment bowl in the gas tank. Check the screen in the elbow & the screen in the top of the sediment bowl. (don’t worry about the one in the tank) Both probably need to be cleaned. If you have the fuel knob turned on all the way, & 1 gallon or less in the tank, it may be trying to feed off of the reserve inlet which is probably clogged. Only open it 2 full turns. Put at least 2 gallons in the tank. (and do not forget to turn the gas off; see tip # 9)
There are ways to check for spark & fuel that work & ways that don't. For example, having gas to the carb is nice, but having it past the float is what counts! That’s why removing the bolt in the bottom of the carb is the way to do it. And, same thing w/ spark at the plugs. Some folks think that checking for spark means pulling a plug wire off & looking for one. Well, it's the distance the spark jumps at the plug that gives you the info you want. It takes about 17kv to jump a 3/16" gap & 22kv to jump ¼” in the open air, so that's why you need to use a spark plug. Or, a store bought plug checker (on the left in the picture). Remember, it’s 14psi outside of the engine & about 90psi at a 6:1 compression ratio in the cylinders & compressed air creates electrical resistance, so you really need the 17-22kv to fire the plugs when the engine is running.
50 Tips
Bruce:
Its a 12 volt conversion and has run great for over a year. It started running odd in the fall, the rpms would sometimes ebb and flow. Then it started and and stalled and has ran since (Monday). I have tried to isolate the probable causes. I did find one of the posts that attach the carb to the manifold was severed. So basically the carb was secured by one post. At that point we felt maybe the tractor was sucking in air from the torn gasket. The carb was removed and the float and needle appeared to be in working order. That was obviously not the problem. I replaced the the spark plugs and the new ones showed no improvement. However, the spark out of the cylinder. The color is more yellow then blue. I also drained all the gas from the tank and i did remove the bottom plug. The flow seems constant. I have 2 new gallons of brand new gas and same result. The compression is very good for this tractor. I tested it last year at between 98 and 105 per cylinder. I almost feel like the problem is electrical in the ignition sequence, perhaps the coil or points? what do you think about that option?
Its a 12 volt conversion and has run great for over a year. It started running odd in the fall, the rpms would sometimes ebb and flow. Then it started and and stalled and has ran since (Monday). I have tried to isolate the probable causes. I did find one of the posts that attach the carb to the manifold was severed. So basically the carb was secured by one post. At that point we felt maybe the tractor was sucking in air from the torn gasket. The carb was removed and the float and needle appeared to be in working order. That was obviously not the problem. I replaced the the spark plugs and the new ones showed no improvement. However, the spark out of the cylinder. The color is more yellow then blue. I also drained all the gas from the tank and i did remove the bottom plug. The flow seems constant. I have 2 new gallons of brand new gas and same result. The compression is very good for this tractor. I tested it last year at between 98 and 105 per cylinder. I almost feel like the problem is electrical in the ignition sequence, perhaps the coil or points? what do you think about that option?
Bruce (VA)
Well-known Member
The only thing you can rule out right now is compression. It's fine. Until you check for spark & fuel as soon as it stops, and do it just like I suggested, you will still be guessing.
Rule out fuel. As soon as it stops running, check it as I suggested. Then, you have narrowed it down to spark.
" the carb was secured by one post. " It's a stud; replacements are easy to find. Did you replace it?
" Its a 12 volt conversion and has run great for over a year."
You could easily have a resistor problem causing the yellow spark. What coil (6v or 12v) & additional resistors (if any) are in the circuit?
50 Tips
Bruce (VA)
Well-known Member
" Can u removed the distributor without taking off the metal and fan? I hate taking the hood and all that off in December : ( "
That question tells me that you would really benefit from my advice in tip # 39. If that's how you have been changing the points, you have wasted a lot of time.
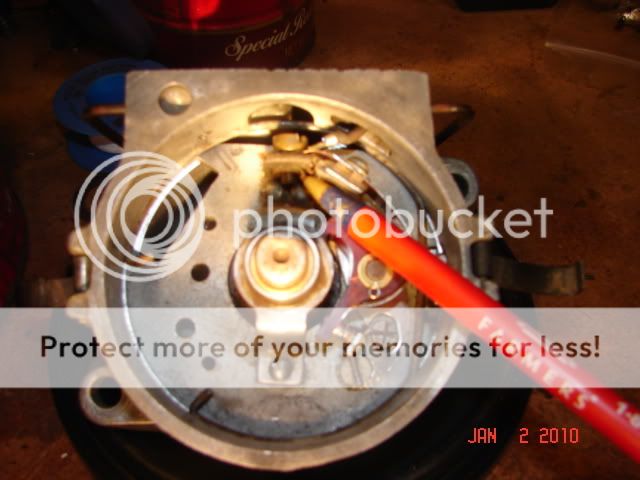
The front distributor was designed to come off of the tractor to replace/adjust the points. Remove the wire on the coil, remove the coil bail, remove the distributor cap & take the two bolts off. The base of the distributor has an offset tang & can only go back one way unless you really force it on. Look at how the points & condenser set in the distributor before you start pulling it down! Turn the tang & observe how the points open & close. If this is your first time doing it, draw a sketch!. Make sure you are using quality parts; the points should have a phenolic rubbing block & not the cheap white plastic crap. Use only Wells, Blue Streak or Echlin brand points. (* see below) Be careful not to ground the tip of the condenser wire to the body of the distributor when you replace the points. Do not break the little copper strip that goes to the points. (If you do, make another out of the old set of points) Also, make sure the condenser wire does not go through the same opening in the distributor that the coil pig tail does. The condenser wire goes the opening on the top right. Look at the old points; are they burned, pitted or mis-aligned? Check the point gap, .015 on all four lobes. Make sure the blade is at a perfect right angle to the points & you want to feel just the slightest bit of drag when you pull the blade through the points. Set the points on the highside of the cam. Make sure you have the star washers under the screws on the points. Dress the points by running a piece of card stock or brown paper bag through them. New points sometimes have an anti-corrosive dielectric coating on them & old points can corrode or pick up grease from a dirty feeler gauge or excessive cam lubricant. And, don’t forget to lube the rubbing block w/ cam lube; not Vaseline, not bearing grease, but cam lube. (** see below)
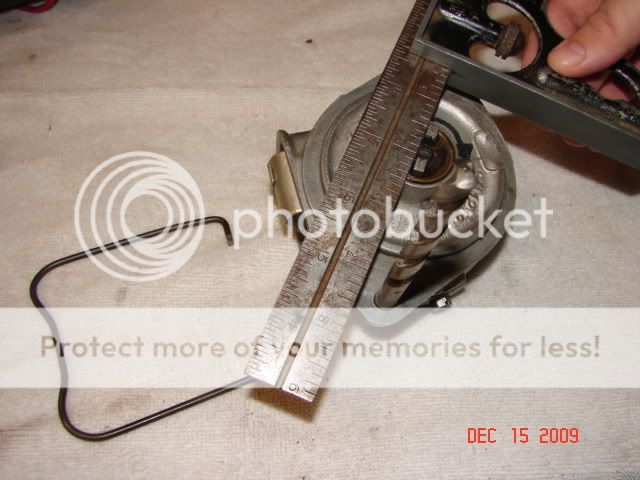
Now, set the timing. Get a meter or test light, a 21/64” drill bit & a metal straight edge. Put the distributor face down w/ the condenser on the left & the timing plate lock screw on the bottom. Look at the end of the shaft: it has a narrow side & a wide side. Make sure you can tell the difference. Now, place the drill bit in the bottom mounting hole. (this will be your reference point for measuring) . Next, place a straight edge on the wide side of the tang on shaft as shown in fig. FO83 in the I&T FO4 manual. Rotate the shaft CCW (as viewed from rotor side OR CW as viewed from back/tang side) until the straight edge is ¼" beyond the outside edge of the drill bit you stuck in the distributor mounting hole. At this distance, the distributor points should start to open. (get your meter/light out now & check) If not, loosen the timing plate lock screw and turn to advance or retard the timing. (move the plate down to advance timing, up to retard) Remember, each one of those little hash marks represents about 4* of timing. Keep adjusting until you get the proper ¼" setting. (if the plate won’t move, you might need to remove the big C clip to loosen it a bit) As you’re adjusting, eliminate backlash by turning the shaft backwards (CW as viewed from the front) and bring the shaft forwards (CCW as viewed from the front) to measure your setting. This ¼" setting will get you static timing at top dead center.
After you set the points & timing, do a continuity check before you put the distributor back on the tractor. Before you start, make sure your meter/light works (don't ask....)
With the distributor still off the tractor, follow these steps:
1. Coil off, cap off, points open. One probe on the brass screw & the other on both sides of the open points. On the side closest to the cam, you should have continuity. Not on the other side! If you do, you will also have continuity everywhere because the points are grounded.
2. Coil off, cap off, points open. One probe on the brass screw & the other anywhere on the body of the distributor. You should have no continuity! Now, rotate the tang on the distributor....as the points open & close, you have continuity (closed) and lose it when they open.
3. Put the coil on the distributor, cap off, points open. One probe on the lead on the top of the coil, the other on the cam side of the open points. You should have continuity!
4. Coil on, cap off, points open. One probe on the lead on the top of the coil, the other anywhere on the body of the distributor. You should have no continuity!
At this point, I just put the distributor, coil & cap all back on the tractor as a unit. The reason I do this is because it is real easy to get the cap or coil mis-aligned trying to put it back together one piece at a time & the result is something gets broken or you get a ‘no spark’ problem. It's possible to put it back on wrong & break it.
Look at the slot on the end of the cam shaft. What ever angle it happens to be, turn the distributor tang to match it. Make sure you can tell the wide side from the narrow side on both the cam & distributor! (close counts)
Then place the distributor on the front of the engine, gently push it in place & slowly turn the distributor body until you feel the tang slip into the slot. Rotate the distributor body until the bolt holes line up. Then, hand tighten the two bolts until the distributor body is flush w/ the timing gear cover.
Post back w/ results & any other questions.
* NAPA part numbers:
· Points: FD-6769X
· Condenser: FD-71
· Rotor: FD-104
· Cap: FD-126
** Distributor cam lube: http://www.autoanything.com/fluids-manuals-63-771-1978/201A1960.aspx?kc=FFPMM

50 Tips
That question tells me that you would really benefit from my advice in tip # 39. If that's how you have been changing the points, you have wasted a lot of time.
The front distributor was designed to come off of the tractor to replace/adjust the points. Remove the wire on the coil, remove the coil bail, remove the distributor cap & take the two bolts off. The base of the distributor has an offset tang & can only go back one way unless you really force it on. Look at how the points & condenser set in the distributor before you start pulling it down! Turn the tang & observe how the points open & close. If this is your first time doing it, draw a sketch!. Make sure you are using quality parts; the points should have a phenolic rubbing block & not the cheap white plastic crap. Use only Wells, Blue Streak or Echlin brand points. (* see below) Be careful not to ground the tip of the condenser wire to the body of the distributor when you replace the points. Do not break the little copper strip that goes to the points. (If you do, make another out of the old set of points) Also, make sure the condenser wire does not go through the same opening in the distributor that the coil pig tail does. The condenser wire goes the opening on the top right. Look at the old points; are they burned, pitted or mis-aligned? Check the point gap, .015 on all four lobes. Make sure the blade is at a perfect right angle to the points & you want to feel just the slightest bit of drag when you pull the blade through the points. Set the points on the highside of the cam. Make sure you have the star washers under the screws on the points. Dress the points by running a piece of card stock or brown paper bag through them. New points sometimes have an anti-corrosive dielectric coating on them & old points can corrode or pick up grease from a dirty feeler gauge or excessive cam lubricant. And, don’t forget to lube the rubbing block w/ cam lube; not Vaseline, not bearing grease, but cam lube. (** see below)
Now, set the timing. Get a meter or test light, a 21/64” drill bit & a metal straight edge. Put the distributor face down w/ the condenser on the left & the timing plate lock screw on the bottom. Look at the end of the shaft: it has a narrow side & a wide side. Make sure you can tell the difference. Now, place the drill bit in the bottom mounting hole. (this will be your reference point for measuring) . Next, place a straight edge on the wide side of the tang on shaft as shown in fig. FO83 in the I&T FO4 manual. Rotate the shaft CCW (as viewed from rotor side OR CW as viewed from back/tang side) until the straight edge is ¼" beyond the outside edge of the drill bit you stuck in the distributor mounting hole. At this distance, the distributor points should start to open. (get your meter/light out now & check) If not, loosen the timing plate lock screw and turn to advance or retard the timing. (move the plate down to advance timing, up to retard) Remember, each one of those little hash marks represents about 4* of timing. Keep adjusting until you get the proper ¼" setting. (if the plate won’t move, you might need to remove the big C clip to loosen it a bit) As you’re adjusting, eliminate backlash by turning the shaft backwards (CW as viewed from the front) and bring the shaft forwards (CCW as viewed from the front) to measure your setting. This ¼" setting will get you static timing at top dead center.
After you set the points & timing, do a continuity check before you put the distributor back on the tractor. Before you start, make sure your meter/light works (don't ask....)
With the distributor still off the tractor, follow these steps:
1. Coil off, cap off, points open. One probe on the brass screw & the other on both sides of the open points. On the side closest to the cam, you should have continuity. Not on the other side! If you do, you will also have continuity everywhere because the points are grounded.
2. Coil off, cap off, points open. One probe on the brass screw & the other anywhere on the body of the distributor. You should have no continuity! Now, rotate the tang on the distributor....as the points open & close, you have continuity (closed) and lose it when they open.
3. Put the coil on the distributor, cap off, points open. One probe on the lead on the top of the coil, the other on the cam side of the open points. You should have continuity!
4. Coil on, cap off, points open. One probe on the lead on the top of the coil, the other anywhere on the body of the distributor. You should have no continuity!
At this point, I just put the distributor, coil & cap all back on the tractor as a unit. The reason I do this is because it is real easy to get the cap or coil mis-aligned trying to put it back together one piece at a time & the result is something gets broken or you get a ‘no spark’ problem. It's possible to put it back on wrong & break it.
Look at the slot on the end of the cam shaft. What ever angle it happens to be, turn the distributor tang to match it. Make sure you can tell the wide side from the narrow side on both the cam & distributor! (close counts)
Then place the distributor on the front of the engine, gently push it in place & slowly turn the distributor body until you feel the tang slip into the slot. Rotate the distributor body until the bolt holes line up. Then, hand tighten the two bolts until the distributor body is flush w/ the timing gear cover.
Post back w/ results & any other questions.
* NAPA part numbers:
· Points: FD-6769X
· Condenser: FD-71
· Rotor: FD-104
· Cap: FD-126
** Distributor cam lube: http://www.autoanything.com/fluids-manuals-63-771-1978/201A1960.aspx?kc=FFPMM
50 Tips
The coil came with the 12v kit. I would say it has been in the tractor since maybe August of 09. I have discussed this matter with the local New holland dealer. They wanted me to just unbolt the distributor and bring it in. While I was there I was able to buy a replacement stud. I will do as you suggest with the fuel after trying to start it. I have always just used the spark plugs as they come. Would opening them up to 3/16 improve spark?
Bruce (VA)
Well-known Member
" Would opening them up to 3/16 improve spark? "
No
You only open the test plug to 3/16" to see if the spark will jump the gap outside of the cylinder.
" I have always just used the spark plugs as they come. "
I'm surprised it runs at all. You need to gap the plugs. Use a wire gauge; gap is .025.
" They wanted me to just unbolt the distributor and bring it in."
Yea, you can do that. But, if you read my other response, you can replace the points & set the timing yourself.
50 Tips
Anonymous-0
Well-known Member
Mine did exactly that once. It was the main jet plugged. Would start/run only with starting fluid. There was so much rust crud covering the main jet I didn't even see it. but after I cleaned the little hole by blowing air through it till I saw light it then started and ran with no problem since. tryWy
Tool man Tim
New User
if you have good gas to carb...Try this open main jet 1/2 turn, start using choke or gas staight into carb.. when running place hand over carb inlet to increase vac. and suck out that debris past the main jet and idle jet or remove and clean the carb with compressed air.
We sell tractor parts! We have the parts you need to repair your tractor - the right parts. Our low prices and years of research make us your best choice when you need parts. Shop Online Today.
Copyright © 1997-2025 Yesterday's Tractor Co.
All Rights Reserved. Reproduction of any part of this website, including design and content, without written permission is strictly prohibited. Trade Marks and Trade Names contained and used in this Website are those of others, and are used in this Website in a descriptive sense to refer to the products of others. Use of this Web site constitutes acceptance of our User Agreement and Privacy Policy TRADEMARK DISCLAIMER: Tradenames and Trademarks referred to within Yesterday's Tractor Co. products and within the Yesterday's Tractor Co. websites are the property of their respective trademark holders. None of these trademark holders are affiliated with Yesterday's Tractor Co., our products, or our website nor are we sponsored by them. John Deere and its logos are the registered trademarks of the John Deere Corporation. Agco, Agco Allis, White, Massey Ferguson and their logos are the registered trademarks of AGCO Corporation. Case, Case-IH, Farmall, International Harvester, New Holland and their logos are registered trademarks of CNH Global N.V.
Yesterday's Tractors - Antique Tractor Headquarters
Website Accessibility Policy