

You should upgrade or use an alternative browser.

A good 3-point lift will lift 800lbs and will hold up for 4-hrs. ALWAYS keep yer implements on the ground for SAFETY sake ........Dell
Bruce (VA)
Well-known Member
50 Tips
Bruce (VA)
Well-known Member
No
You should start by troubleshooting the problem.
old
Well-known Member
- Location
- Camdenton Missouri
notjustair
Well-known Member
notjustair
Well-known Member
Anonymous-0
Well-known Member
Zane's jig is definitely a good purchase if you pull off the hydraulics top cover since it lets you make the adjustments just once, instead of repeatedly removing the top cover to tweek them. The top cover is easy to remove and work on but it is HEAVY - I've heard anything from 85-100 lbs -- and cumbersome to move around. I think he was having problems with his web page but his e-mail address is -- [email protected].
Anonymous-0
Well-known Member
Bruce (VA)
Well-known Member
But you do not need a mirror. You've seen all you need to see.
Chances are very, very good that you have a worn lift piston and/or cylinder.
Chances are less that it's a gasket.
You can pull it down & see if it's the lift piston or the cylinder.
Or you can just order all the parts and be done with it.
Before you start, it would be a wise move to get a jig from Zane Sherman to adjust the internal linkage. And, make a couple of “guide studs” by cutting the heads off of two 7/16-14 x 3 5/8” bolts. Also, if your lift cylinder rebuild kit has the leather washer, get CNH part number 87051231 which is the neoprene washer for the lift piston instead of the leather one.
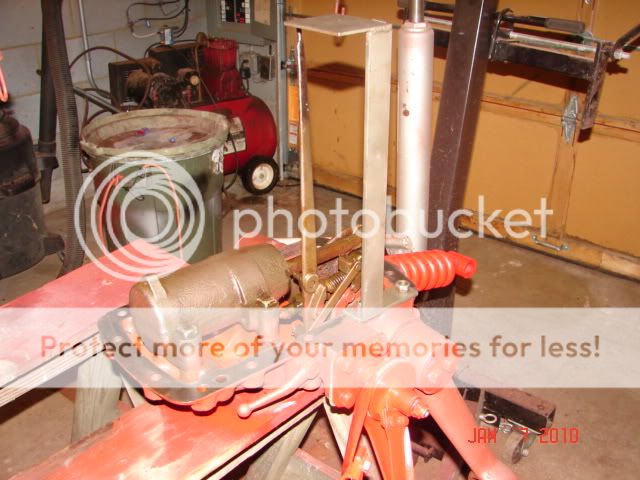
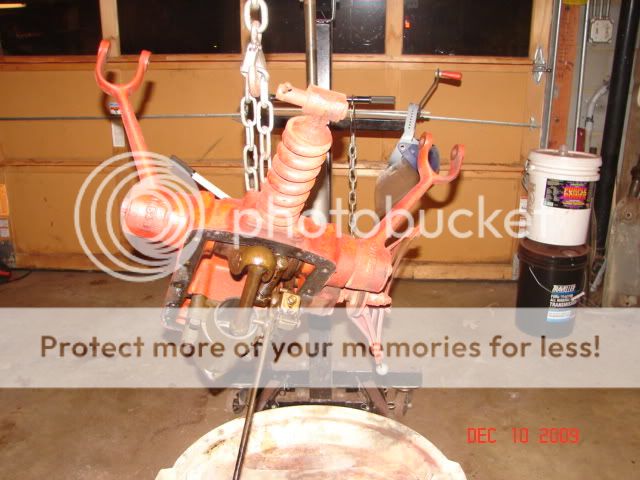
The lift cover weighs nearly 100 lbs with the upper lift arms attached, & is very hard to maneuver. An engine hoist is an excellent idea. Remove the seat and spring, disconnect the upper lift arms at the knuckles. Remove the 14 bolts that hold the cover to the housing. (note that there are three different lengths) DO NOT remove the four nuts under the seat! Remove the right side inspection cover so you can remove the control rod tip from the pump intake valve. Lift the back of the cover straight up and slide a piece of wood under the cover to keep the tip of the control rod out of the rocker shaft. Once you are sure the control rod is out of the rocker shaft, you can then remove the cover. Turn the cover upside down, remove the four bolts that hold the cylinder to the cover, & use a little compressed air on the cyclinder to remove the piston. Check the cylinder for excessive scratches, hone if necessary. Install a new piston with "0" ring and backing washer in the cylinder. Install the CNH neoprene washer w/ the concave side toward the “O” ring. At this point, check the cam follower pin & the control rod. If the cam follower pin is worn replace it. Then, if you have a jig, adjust the linkage to specs. The ‘shade tree’ adjustment was to bend the control arm to compensate for normal wear in the linkage, springs & cam follower pin. If the control rod is bent, remove it & straighten it. (very carefully; they break easily!) Replace the gaskets under the cylinder and bolt it back on the cover. Put the gasket on the tractor (no sealer) and put the gude studs in place. Unless you do this every day or have eyeballs in your finger tips, get some help to guide the tip of the control arm back into the rocker shaft. (this is the point you will wish you had a engine hoist to hold the top cover while the control rod dances around the intake valve arm on the pump!) Align the cover holes up with the housing holes. Remove the guide studs. Tighten cover bolts, connect lift arms install the seat. Re-install the inspection covers with new gaskets.
50 Tips

We sell tractor parts! We have the parts you need to repair your tractor - the right parts. Our low prices and years of research make us your best choice when you need parts. Shop Online Today.
Copyright © 1997-2025 Yesterday's Tractor Co.
All Rights Reserved. Reproduction of any part of this website, including design and content, without written permission is strictly prohibited. Trade Marks and Trade Names contained and used in this Website are those of others, and are used in this Website in a descriptive sense to refer to the products of others. Use of this Web site constitutes acceptance of our User Agreement and Privacy Policy TRADEMARK DISCLAIMER: Tradenames and Trademarks referred to within Yesterday's Tractor Co. products and within the Yesterday's Tractor Co. websites are the property of their respective trademark holders. None of these trademark holders are affiliated with Yesterday's Tractor Co., our products, or our website nor are we sponsored by them. John Deere and its logos are the registered trademarks of the John Deere Corporation. Agco, Agco Allis, White, Massey Ferguson and their logos are the registered trademarks of AGCO Corporation. Case, Case-IH, Farmall, International Harvester, New Holland and their logos are registered trademarks of CNH Global N.V.
Yesterday's Tractors - Antique Tractor Headquarters
Website Accessibility Policy