CasebyCase58
New User
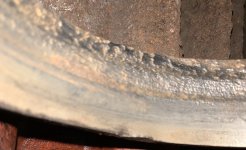
Hello All. I’m working on a 1959 Case 800 diesel tractor with the 267 diesel block. I am in the process of an out of frame rebuild and am looking at installing new sleeves. I pulled the old ones out (completely toast) and the bores where the lower o-rings seal are fairly pitted. I’ll attach a photo of the worst spot. I’d like to try and fix them with epoxy or something similar and was wondering if you guys had any tips or tricks for doing it. I have a similar post on the Case forum, but decided to post it here as it’s not really manufacturer specific.
Thanks for the help,
Al
Thanks for the help,
Al