
I"ve not done much in the way of troubleshooting because i"m not sure i"m smart enough to figure out what exactly to do. it"s been suggested i"ve got a dead short somewhere that caused my ammeter to blow. And now what I"m seeing happening: I replaced the ammeter and I connect up two wires to one terminal and then when I graze the single wire that goes to the other terminal it starts to fry it. I guess that would be the dead short part. Does it help at all to say that this happens when I"ve disconnected one of the ignition swith wires to break that circuit. I can"t find any wires with bare anywhere that could be shorting out against anything, but the I can"t see into all the nooks. What"s the best way to get smart about how to trouble shoot this? Does this question and problem even make sense. I"m an average idiot, but feel a little dumber than that at the moment.
You are using an out of date browser. It may not display this or other websites correctly.
You should upgrade or use an alternative browser.
You should upgrade or use an alternative browser.
You really need a multimeter. This meter will let you read volts, amps and ohms. When you're looking for a short, you want to read ohms, which is a measure of the resistance to current flow. Disconnect both wires from your battery, connect the multimeter to the battery wires. Do you see close to zero ohms? Start by removing wires until the reading goes way up. It helps if you have a wiring diagram, to use as a map, and systematically disconnect and test. Like any skill, electrical troubleshooting gets easier with practice!
I use a Fluke meter, over $100.00, it's a great tool, and very reliable, however, you can get a decent meter at Radio Shack for $30 to $50. Sears carries some as well.
While the Fluke is more expensive, it comes with a lifetime warranty, and I use mine a lot, so it's well worth the investment.
Jerry
Anonymous-0
Well-known Member
is this the one where it was running,hand fell off of amp guage ,you replaced guage and it fried,or am I thinking of someone else?if so humor me,remove the mounting bracket from your new amp meter and try to hook up wires without it.did you get a new guage or are you using the one that melted?tell us again is it 12volt or 6volt ,frontmount or side mount dist.if it still fries without bracket, and its converted to 12v,disconnect the battery wire going to alternator,dont let it touch anything its hot!tape it up and then try to connect up amp guage.if your alternator is staying full on you could be pulling(depending on alternator)up to 80 amps or more.
Anonymous-0
Well-known Member
one other thing since we cant see it,did you by any chance,get an original guage somewhere?and your trying to replace a aftermarket guage?the original style guage did not have a direct electrical hookup,only a wire that ran through a loop and read by induction.you cant wire them the same.
NovaNewfie
Member
Is your tractor positive or negative ground?
NO! NO!! NO!!!........it is NOT eazier to replace yer 6-volt wiring harness with a 12v conversion.
What you don't understand is.....the ORIGINAL tractor amp-meter was a "LOOP" style and had NO CONNECTIONS to the back of the ammeter. Seriously, NO connections. You threaded yer battery charge wire thru the loop like a needle.
Since you report yer ammeter was 2-terminals, guess what??? It ain't original. And you fugged up yer replacement ammeter installation. These old tractors are NOT ROCKET SCIENCE. But the ammeter terminals MUST NOT ground out by the "U"-bracket that holds it in the dash panel. Understand?
(hint) You should have ONLY 1-WIRE on each terminal. ......Dell
(quoted from post at 15:49:44 04/05/09) thanks for note. I put multitester to disconnected battery cables and get no circuit. electrical things have always been a bad memory in my memory - cause i really don't get it. is it possible it would be easier to convert to 12 volt system and replace wiring harness?
Brother, if you can't find a short, no way can you convert to 12v.
I think you need to find some local, qualified help.
20 something years ago, and knowing what I knew then (I don't remember all of what I knew then, now), and sick of gennys that played out on me in a year or two, and having to buy another one, I had to make a decision.
My decision was that I wanted to power my electrical system with an alternator.
Then I had to weigh the making the 12v plunge.
The 12v plunge isn't for the weak of mind.
I went to a local alternator shop and had a long talk with the owner.
I have been running a 6v Chevy, positive ground, one wire, alternator since that week.
I understand all of the electrical issues necessary to make the 12v plunge, but I don't have a reason to do that.
My tractor works just fine on 6v.
(quoted from post at 15:49:44 04/05/09) thanks for note. I put multitester to disconnected battery cables and get no circuit. electrical things have always been a bad memory in my memory - cause i really don't get it. is it possible it would be easier to convert to 12 volt system and replace wiring harness?
NO! The more things you change after it no longer runs, the deeper you dig the hole you are in.
LET me repeat what I told you on March 28.
"OK, first, let us try to determine whether the ammeter is the problem or there is a short in some other device/wiring. I expect only one wire on each of the two ammeter posts, is that correct? In the interest of minimizing posts & time, if the answer is yes, then remove both wires from ammeter & touch them together (key & all else turned OFF) and see if you get a spark. Yes/no?
If yes, report back and also answer what if any thing electrical does your tractor have, lights, etc.
If NO, then while those two wires are together, can you turn on the key & start the tractor?"
HAVE YOU DONE THIS YET?
If not, do it NOW.
(quoted from post at 18:00:19 04/05/09)(quoted from post at 15:49:44 04/05/09) thanks for note. I put multitester to disconnected battery cables and get no circuit. electrical things have always been a bad memory in my memory - cause i really don't get it. is it possible it would be easier to convert to 12 volt system and replace wiring harness?
NO! The more things you change after it no longer runs, the deeper you dig the hole you are in.
LET me repeat what I told you on March 28.
"OK, first, let us try to determine whether the ammeter is the problem or there is a short in some other device/wiring. I expect only one wire on each of the two ammeter posts, is that correct? In the interest of minimizing posts & time, if the answer is yes, then remove both wires from ammeter & touch them together (key & all else turned OFF) and see if you get a spark. Yes/no?
If yes, report back and also answer what if any thing electrical does your tractor have, lights, etc.
If NO, then while those two wires are together, can you turn on the key & start the tractor?"
HAVE YOU DONE THIS YET?
If not, do it NOW.
If you will look back...
JMOR and I told you the same, SIMPLE troubleshooting tips, us posting at about the same time, with the same answer.
http://ytforums.ytmag.com/viewtopic.php?t=454633
Have we heard from that yet, NO.
Both of our posts was at Sat Mar 28, 2009 2:51 pm
Both gave the same instructions.
nix on the new harness then. the ammeter i took out had two wires connected to the right terminal (looking at it from the front) and one wire attached to the left. so, i hooked up the replacement part in the same way. i'm not using the u-bracket right now...the meter was a tight fit into the opening, so i don't think it's grounding out with the bracket.


Your wire harness is a rats nest and is causing you major gfrief.
replace the harnes and don't convert to 12v.
you think you are having problems now.. converting to 12v with the problems you have now .. and they will multiply.
get the wireing straight.. SOMEWHERE you have a short...
soundguy
replace the harnes and don't convert to 12v.
you think you are having problems now.. converting to 12v with the problems you have now .. and they will multiply.
get the wireing straight.. SOMEWHERE you have a short...
soundguy
Anonymous-0
Well-known Member
ok,you dont have a alternator so you can forget that.i'm like JMOR where does the second wire on right side of amp meter run to?also would it by any chance be running to the start solenoid?one place to check is to see if the resistor block,where all the wires are connected below amp guage,is cracked.you could have moved wires when you replaced amp guage,and got it shorted to frame if it is.
Just so you don't gloss over, jackinok's recommendation, I will say it is definitely worth checking, as it has in fact happened before.
"one place to check is to see if the resistor block,where all the wires are connected below amp guage,is cracked.you could have moved wires when you replaced amp guage,and got it shorted to frame if it is."
"one place to check is to see if the resistor block,where all the wires are connected below amp guage,is cracked.you could have moved wires when you replaced amp guage,and got it shorted to frame if it is."
Anonymous-0
Well-known Member
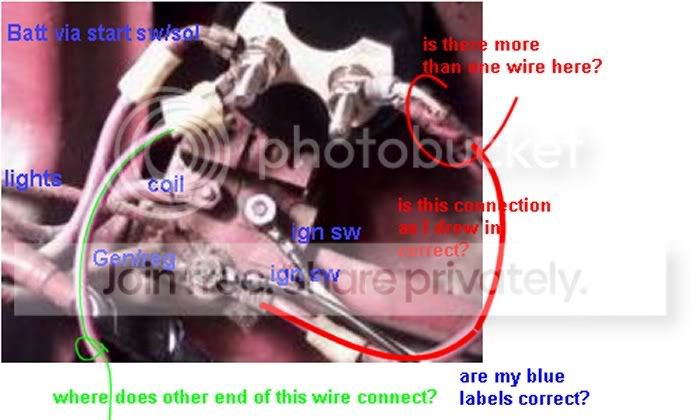
also,look at your picture,on the resistor block under your amp meter,do you see the two slotted screws that hold it two tractor?NONE of the wires can touch these or they will ground out.now,look at the bttm right(on your picture)do you see a piece of what appears to be black plastic hanging out?guess what,thats an insulator,it should be behind the screw where all the wires hook to on bttm of resistor block BETWEEN mounting screws and frame,its possibly cracked,maybe when someone replaced switch.if it is it will ground to frame right there one the back side.its hard to tell from picture,but it appears to be broken to me.it could have been like that for years until you moved wires and made it short out.would explain why your problem just started also.
Your getting so much advice I hesitate to respond.
If you look at the picture you see where all the wires come together on the bottom terminal. ( I said in the pic leave the big one on, maybe not till you check the terminal itself) One of them wires is causing problems. Also that "extra" wire on the amp gauge shouldn't be there, somone used the amp gauge as a terminal block. Its not a big deal, all the terminals on the amp gauge are positive, but extra wires screw up the readings.
Take that nut off that lower terminal, and remove all the wires. Don't worry about what order they are in like the amp gauge they are all positive. When you put them back just make them fit as neatly as you can. Including that extra wire that was on the amp gauge.
So now you have one big wire on each terminal of the amp gauge, and no wires on the bottom terminal block. There all just hanging there not touching anything right?
Now you use your meter, set to ohms scale of about 100 ohms. Make sure your red lead is in the positive/volt/ohms hole of the meter. Make sure the black lead is in the ground/common/negative hole. Your meter will be marked with one of these options I don't know which one.
A quick test to see how your meter works, turn it on, notice the reading with the leads not touching anything. Now touch the leads together, notice the reading goes to zero or at leat some decimal like 00.003. Thats what a dead short looks like.
You still have the battery disconnected right? So connect the black lead to the negative battery terminal (the wire not the battery). If you can clip it in there so you don't have to hold it it will be easier. Now touch the junction block screw with the red lead. Make sure you have good contact, as rust and dirt will make it look like your not touching it. If you get a zero reading the screw is grounded to the frame. If you can't get a reading even after scratching through the dirt and rust move on to the wires, test them one at a time, again making sure you have good contact on each one.
Anything zero, or near zero is suspect. There are coils in the regulator, ignition, and generater, they may not read zero which is normal.
When I was first lurnin troubleshooting I hated the idea of pulling something out of circuit to test it. Just so you know-with all them wires on the juction block screw, everything will read a dead short.
Good luck! PcRider

despite it being a rats nest...what's your take on the wiring shown in the photo? everyone's been saying one wire in, one wire out. this shows two on one terminal, one on the other. the wiring set up in the photo is the way things were wired previously when I had a functioning piece of equipment.
I already gave you 'my take'.. it's a rats nest.. it's not oem.. you have extra wires that go who knows where.
my advice is a good harness and then you will know what you have, and then we can hlp you with wire problems.. as it s now.. it's anybodies guess how it is wired..
And there IS a problem, if you are burning wires when you turn switches on..
soundguy
my advice is a good harness and then you will know what you have, and then we can hlp you with wire problems.. as it s now.. it's anybodies guess how it is wired..
And there IS a problem, if you are burning wires when you turn switches on..
soundguy
Hey, 8N1948, I asked you about 6 posts back, where the extra wire was connected at the other end (green in my mark up of your photo), as well as verification of what otherwise looks to be OEM wiring. But, did you answer? No, you didn't. Instead, you ask, "what's your take?". A question does not answer a question. You want some help? Then answer the questions. If you don't want help, don't answer questions, rip all wires out, throw in trash, get a clean sheet of paper and a roll of wire and start from ground zero.
Got it?
Got it?
Well, I don't know if I've helped you yet. I/we need some help from you in the way of information, if I/we are to help you. I don't think you are far away from finding the problem.(quoted from post at 15:47:18 04/06/09) ok. thank you for your help
Wires to ignition sw look newer, suggesting terminal block disturbance. In addition to possible shorts to it's mounting screws that jackinok mentioned, note that the back side of those terminals are in countersunk holes and not far from metal structure that block bolts to.

Thanks. I'm going to try the wiring harness route - until my need for the tractor and what I'm willing to pay to fix it intersect. I didn't get far when looking for the harness. I saw one advertised for 8n but it called out it was for a 2 wire generator. I've got a 3-wire generator. I'm having trouble finding one for sale described like that. This could be a long process
You have a 2 brush genny, that in essence.. needs only 2 wires.. armature and field.. ground is via the bracket.. but as a redundancy.. there is a ground wire as well.. thus the 3rd wire.
Just choose a correct harness based on your tractors distribuitor.. front or side mount.. and go from there.
doesn't have to be reproduction quality.. a 15$ job from tractor supply is fine.
if you don't want to go that route... and have a roll of 14awg wire, and a few feet of 8 or 10 awg wire.. I can tell you how to make a simple, working wireing point to point setup.
soundguy
(quoted from post at 20:49:12 04/07/09) your offer to describe how to make it work starting with a few lengths of wire makes it sound so easy that even i might be able to do it. I'd be most happy to take a run at it with your directions. pls foward at your convenience. thanks!
SouNders posts are valued, here.
G6 at Snook, TX
Well-known Member
If I understand you in my Balvenie Scotch induced state you are going to start cutting wires? I started to do that and then I came across the wiring harness at TSC and for $18 I saved my self many headaches. Use your eyes and common sense and it all falls together nicely.
Again, if I misinterpret you, please disregard.
Again, if I misinterpret you, please disregard.
point to point wireing.
first.. wire fromterminal on start switch to the small 3rd terminal on the start solenoid.
bat ground cable to chassie ground
bat hot cable to starter solenoid hot side.. switched side to transfer bar/starter.
field on reg to field on gen
arm on reg to arm on gen
ground on reg to ground on gen.
( arm is the big post on the round rear cover plate.. field and ground are the small studs on the barrell.. field has a rubber or phenolic grommet insulating it's base. )
use the 8 or 10 awg wire from arm to reg.
from bat terminal on reg, go to one post of 2-post style amp meter, from other post of amp meter go to the hot side of the start solenoid. these wires should also be 8 or 10 awg... rest of the wires can now be 14awg.
wire from side of ammeter where reg is attached to key switch.. other side of key switch to coil.. if this is a front mount.. go thru the resistor. if this is a side mount, coil will have another wire from it to the distrib.
if you have lamps, run a wire from the same terminal where the ignition and wire from reg are to the fused lamp switch.. from there run wires tot he lamps. I like to run a seperate chassie ground to the mount base of each lamp that way 50 year old rusty sheet metal doesn't have to be my ground.
poof.. you are wired to start, charge, and run.
couple feet of e-tape and some zipo ties and a few feet of 8/10 and 14 awg wire.. plus some terminal ends.
if you did it right, there will be one wir eonly on one side of the ammeter, going to hot of start solenoid, and the other will have 2 or 3 depending on if you have lamps or not.
if meter reads backwards.. swap wires side to side.
soundguy
thank you for going to the trouble of posting these pics. i find that a little more testing of circuits showed it was the ignition switch that caused the problem all along. the switch shorted the last time I turned it off - and i didn't notice at the time. so, when i got on to do more work, it was a mystery what happened. the reason i didn't think it might be the switch right off was that a year or so ago i lost the key and put in new switch. i couldn't beleive that it could have gone bad so soon. things are running good now. thanks again
i'm glad you did post. you're thorough. thank you for going to the trouble of posting the pic with the commentary. i find that a little more testing of circuits showed it was the ignition switch that caused the problem all along. the switch shorted the last time I turned it off - and i didn't notice at the time. so, when i got on to do more work, it was a mystery what happened. the reason i didn't think it might be the switch right off was that a year or so ago i lost the key and put in new switch. i couldn't beleive that it could have gone bad so soon. things are running good now. thanks again, the conent of your post is very helpful.
thank your for your post. i'm learning alot. i find that a little more testing of circuits showed it was the ignition switch that caused the problem all along. the switch shorted the last time I turned it off - and i didn't notice at the time. so, when i got on to do more work, it was a mystery what happened. the reason i didn't think it might be the switch right off was that a year or so ago i lost the key and put in new switch. i couldn't beleive that it could have gone bad so soon. things are running good now. thanks again for your help
i find that a little more testing of circuits showed it was the ignition switch that caused the problem all along. the switch shorted the last time I turned it off - and i didn't notice at the time. so, when i got on to do more work, it was a mystery what happened. the reason i didn't think it might be the switch right off was that a year or so ago i lost the key and put in new switch. i couldn't beleive that it could have gone bad so soon. things are running good now. thanks again for your help. your posts were very useful to me
i find that a little more testing of circuits showed it was the ignition switch that caused the problem all along. the switch shorted the last time I turned it off - and i didn't notice at the time. so, when i got on to do more work, it was a mystery what happened. the reason i didn't think it might be the switch right off was that a year or so ago i lost the key and put in new switch. i couldn't beleive that it could have gone bad so soon. the wires are still like they are in the pic i posted. the ammeter shows discharge (running backwards?)when running...so, is the the condition you mentioned in your earlier note suggesting that if this is happening I should switch the wires goint to the ammeter. And, what about that second wire on the one terminal. should that wire to bottom terminal on the block with all the other wires going to it? pcrider suggests moving that wire to the lower terminal on the block. you guys are good at this. thanks so much to you all
when you say to move that wire to the terminal on the bottom, you mean the one the bottom yellow line is pointing to? just want to be sure. when you say using the ammeter as terminal block will screw up readings, you mean the how the ammeter is reading or how my multimeter reads resistance? the ammeter, after getting everthing hooked back up an running, shows a slight discharge...could that be caused by that second wire on the one terminal of the ammeter?
You Ask:
when you say to move that wire to the terminal on the bottom, you mean the one the bottom yellow line is pointing to? just want to be sure.
Yes the one the bottom yellow line is pointing to.
You Ask:
when you say using the ammeter as terminal block will screw up readings, you mean the how the ammeter is reading or how my multimeter reads resistance?
What I meant was it will mess up your amp meter readings.
Amp meters read the total load for the amperage being used by placing the meter in series with the load. Hooking things up to the meter like your picture shows is placing it in parallel, not series. As has been mentioned only 2 wires go to the amp meter, no exceptions. Both of the correct wires will be the bigest wires on your tractor with the only exception being the battery cables.
You mentioned a slight discharge when the key is in the off position. Normally the amp meter will show zero when the key is off. Turning the key on shows a slight discharge, and starting the motor shows a positive charge. If the meter works the opposite of this (showing a slight charge when the key is on) the wires are on the meter backwards, just reverse them on the back.
You may, or may not have another problem to look at. To find out, just take a battery cable off, and see if the reading returns to zero. If it stays a little bellow zero(the same as you mention), the meter is just not perfect. If it returns to zero this would indeed indicate a discharge somewhere.
Like before, you can simply take the wires off the bottom terminal (don't forget that extra wire on the amp meter).This time leave the BIGGEST wire on the bottom terminal. You won't test anything without it, and you don't want to accidently short it to the frame, since it will be hot when the battery is hooked up. With the battery hooked up, and the key off, put the wires back on one at a time, don't bother to screw them down tight, and watch to see which one causes the discharge.
I know some stuff about electrical, but...
I am not familiar with the N generators, or regulators. I can not advise you further in that matter. Using the method I've outlined will tell you what to look at though. It could be normal for all I know, although I wouldn't think so. Step one is still going to be find the guilty wire, trace it to the problem, and go from there.
My 1948 N is 12 volt, only because thats what was on it when I bought it. As such my only other experience with generators was on my first car, a 57 chevy. I didn't even have a job at the time. My attempts to troubleshoot that thing were limited to standing over the engine scratching my head, and smacking the regulator. (doesn't work by the way)
Good luck!
PcRider
ok, things are finally sinking in on the wire to the ammeter. I'll get on that first thing today. and, once again, thank you for taking the time to help me out with this. the 'some stuff'you know electrical is a lot more than I know as is obvious. i'm just glad there are folks out there like you and the others on this board that take the time to help out others. rgds, K
We sell tractor parts! We have the parts you need to repair your tractor - the right parts. Our low prices and years of research make us your best choice when you need parts. Shop Online Today.
Copyright © 1997-2025 Yesterday's Tractor Co.
All Rights Reserved. Reproduction of any part of this website, including design and content, without written permission is strictly prohibited. Trade Marks and Trade Names contained and used in this Website are those of others, and are used in this Website in a descriptive sense to refer to the products of others. Use of this Web site constitutes acceptance of our User Agreement and Privacy Policy TRADEMARK DISCLAIMER: Tradenames and Trademarks referred to within Yesterday's Tractor Co. products and within the Yesterday's Tractor Co. websites are the property of their respective trademark holders. None of these trademark holders are affiliated with Yesterday's Tractor Co., our products, or our website nor are we sponsored by them. John Deere and its logos are the registered trademarks of the John Deere Corporation. Agco, Agco Allis, White, Massey Ferguson and their logos are the registered trademarks of AGCO Corporation. Case, Case-IH, Farmall, International Harvester, New Holland and their logos are registered trademarks of CNH Global N.V.
Yesterday's Tractors - Antique Tractor Headquarters
Website Accessibility Policy