Please help. I want to do this right!

Hello
Since I've had my 8N it's been giving me electrical problems. sometimes it runs great and then it runs like crapola and the last was it would fully charge all the time.
Well over a period of it's years from previous owners it's had it's wiring really cobbled. It has been upgraded to a 12 volt system and never really was done correct just because of the way it ran and the way the wiring looked.(spiced here and there taped here and there and just looked terrible)

Well what I will be doing is going to start out from scratch and I want to get it right.
I bought the new complete upgrade alternator system that came with the new wiring, Ceramic resister, FRONT mount coil, and all new brackets with new alternator. While I was at it I also bought new points and condenser.
The tractor now has a car type of key switch with about 6 or seven wires connected to it so I want to do away with all this cobbled up stuff and go back to the original switch with just the two wires it's supposed to have. I also bought the new 8N switch.
Now the 12 volt wiring in the kit. Is this all the wiring I'll need? The tractor has no lights so I don't have to worry about that. The tractor already has a white Ceramic type of resistor too and I'll replace it with the new one. While I have the hood off I'm also going to replace the tank screen and bowl assembly.

I'm going to pull the hood off so to get at all this stuff easily so what the BEST and EASIEST way to remove the hood assembly???

Any help on this would be of great help. I just don't want to screw something up and want to do this right the first time and get rid of all this old cobbled wiring so this tractor will run great once and for all.
When she does run she runs beautiful.

Thank you very much in advance
Regards
Steve
 
sounds like yuo are throwing way more money at it than needed.. but that's your perogative.

is the new coil a 6v 1 ohm coil.. or a newer 2.5 ohm coil.. if 2.5 ohm.. one ceramic resistor will likely be enough.. if a older style coil, I'd run the oem ballast resistor and a ceramic resistor.. check current in the ignition to make sure it is in the 3a range or so.

soundguy
 
Steve.......I don't care, either the 6-volt squarecan ignition coil ...or... the modern 12-volt squarecan ignition coil, BOTH need the "infamous ballast resistor" mounted on the back of the dash panel underneath the amp meter. NO ARGUE!!!

Many el-cheepo 12-volt conversions use an additional ceramic 12-to-6v converting resistor (2.5-ohm, 50w) to use in addition to the ballast resistor. 2-resistors inline like flashlite batterys. Understand?

Unfortunately, neither the original 6-volt or the modern 12-volt squarecan ignition coil has a "label" molded in so yer left guessing with an ohm meter. 6-volt about 1-ohm; 12-volt aprox 2-1/2-ohm. Exact value is immaterial but there is an easily discernible magnitude of difference.

The eazist way to remove the sheet metal hood and doglegs is with a helper and 2-sawhorses to set it on. Yes, the fuel tank stays with the hood. My 13yo son helped me. I also got some quality daddy time supervising the new wiring harness installation.

You do know ittza 2-bolt, 15-min job to remove the frontmount distributor and change the points (0.015") on the kitchen table, don't you??? You can NOT reinstall outta time 'cuz of an OFFSET drive scheme. Remember to "polish" the points after installation with a dollar bill to remove invisible contaminates. Or iff'n yer really cheap, a torn strip of heavy brown grocery sack will do. .......Dell, a 12v advocate for the right reasons. That said, I haven't found the right reason for my eazy starting 6-volt 52-8N and I know how to do it right the first time. Infact I know 8-ways to do it right and they all work. I also know a gazillion ways to do it wrong.
 

idea of wiring diagram for 6 to 12 volt conv
a9092.jpg
 
If you purchased the Atlantic alternator conversion kit from this site or nnalert you most likely have a one wire system not the type that needs a diode as shown on most wiring diagrams provided on this site. Call whoever you got it from to make sure. At lot of people don't like it but the one wire system will work without difficulty. Look at all the parts in your kit. You may need to remove the pulley that came on the alternator and install a smaller one that should be in the box. This small pulley should take the same size in width of fan belt as is on your water pump. They should have also provided you a longer fan belt then the original. The small size pulley on the alternator is necessary so you don't need to run the rpms up on the engine very high to start the alternator charging. The wiring harness provided in the kit is all that you will need but the instructions are not very clear. Lay the harness on the engine and read the instruction several times and trace every wire. It will work. The front mounted coil will need one or more resisters in line with the 12 volt supply to limit the current or it will burn up. You need to measure the coil with an ohm meter. You need around 3.5-4 ohms total. This is the ohm value of the coil and one or more extra resisters. You can use the original ballast resistor as part of this. Others on this site will give you more details. A much better way is to convert your front mounted coil so you can use a real 12 volt no resister needed round can coil. This way you don't need to measure anything or do any calculations. Google "Hobo Rosser". On his site you will find instructions for "Front Coil Conversion". If you decide to do this ask more question once you have read it over. The wiring changes a little. The 12 volt conversion does not change the type of points, cap, rotor, condenser or plugs used. If you have extra money that you want to put into it there is even an electronic ignition you can buy for around another $125.
 
Shure do. In fact I am a call'n DELL to ask where does HE store the parts for one of His 18 WAYS.

jOHN,pa nERVOUS STUDENT
 
is the new coil a 6v 1 ohm coil.. or a newer 2.5 ohm coil.. if 2.5 ohm.. one ceramic resistor will likely be enough.. if a older style coil, I'd run the oem ballast resistor and a ceramic resistor.. check current in the ignition to make sure it is in the 3a range or so.

souNdguy,When I got the tractor the coil was bad and I replaced it with a 12 volt coil since it had been already converted. (It had the run 15 minites and quit syndrom) and it fixed that at the time
The reason I'm doing it this now is the tractors wiring is in such bad shape and all cobbled up. Plus why would there be so many wires going to the ignition switch on the (one size fits all car switch) when there should be only two?
When I do this I bought a new original type two wire 8N switch also Again, I just want to get the wiring right and in new condition.
Also, The new coil in the kit is a new 12 volt coil.

Many el-cheepo 12-volt conversions use an additional ceramic 12-to-6v converting resistor (2.5-ohm, 50w) to use in addition to the ballast resistor. 2-resistors inline like flashlite batterys. Understand?

Thanks Dell, I saw in the instructions something about this and that is why it somewhat confused me since they did send me a new resistor (crematic). So I'll look behind the dash to see if the original risister is still there. If so I'll use it in-line. (correct?)

The eazist way to remove the sheet metal hood and doglegs is with a helper and 2-sawhorses to set it on. Yes, the fuel tank stays with the hood.

Do you remove it at the bottom of the dog legs and at the dash? or at the top of the dog legs?

You may need to remove the pulley that came on the alternator and install a smaller one that should be in the box. This small pulley should take the same size in width of fan belt as is on your water pump. They should have also provided you a longer fan belt then the original. The small size pulley on the alternator is necessary so you don't need to run the rpms up on the engine very high to start the alternator charging

YesNOXjohn, it came with all the above and I will change the pulley. It also came with a new belt and attaching hardware. I got this kit on ebay. and they told me if I needed any help to be sure and ask here in this forum if any help is needed. BTW I was looking at the schematic above and noticed the wire junction. exactly where it that located.
Thanks for all the help I'm getting here and with your help I think I should be OK.
What's strange is the tractor was running good when I parked it about a month ago and now it just won't even try to start. turns over great but no start. So I feel this is a good time as any to replace all the old worn out wiring.
Regards
Steve
 
Steve.......you asked......"Do you remove it at the bottom of the dog legs and at the dash? or at the top of the dog legs?".......sheesh, bottom of the doglegs. 4-bolts on the dash, 2-bolts bottom of dogleg. Iff'n you removed the hood at the top of the doglegs, you would not need sawhorses. (altho it is much more convient on the sawhorses) Note: yer grill will fall out on yer toes as you remove the bottom dogleg bolts.

You ask......"Thanks Dell, I saw in the instructions something about this and that is why it somewhat confused me since they did send me a new resistor (crematic). So I'll look behind the dash to see if the original risister is still there. If so I'll use it in-line. (correct?)"......since you already have a 12v squarecan ignition coil, all you need is the "infamous ballast resistor" mounted on the back of the dash. NO OTHER RESISTORS, understand? .......Dell
 
(quoted from post at 11:34:11 01/20/10) Steve.......you asked......"Do you remove it at the bottom of the dog legs and at the dash? or at the top of the dog legs?".......sheesh, bottom of the doglegs. 4-bolts on the dash, 2-bolts bottom of dogleg. Iff'n you removed the hood at the top of the doglegs, you would not need sawhorses. (altho it is much more convient on the sawhorses) Note: yer grill will fall out on yer toes as you remove the bottom dogleg bolts.

You ask......"Thanks Dell, I saw in the instructions something about this and that is why it somewhat confused me since they did send me a new resistor (crematic). So I'll look behind the dash to see if the original risister is still there. If so I'll use it in-line. (correct?)"......since you already have a 12v squarecan ignition coil, all you need is the "infamous ballast resistor" mounted on the back of the dash. NO OTHER RESISTORS, understand? .......Dell
Great thanks on the hood since I've never taken it off before.

Also I just wanted you to know that this tractor already had a crematic resister just above the tool box under the door. so I'm not sure why they used it. So I guess I''l look to see if the original is there behind the dash after I get the hood off. this is a learning curve for me since all my experience is in automotive work.....LOL
 
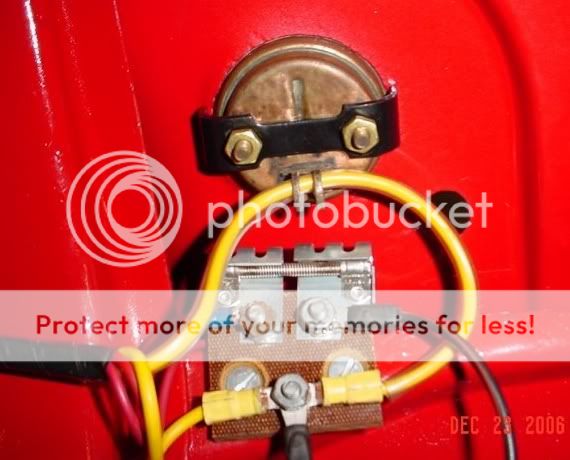
Dell I could not find the stock resistor that everyone talks about. To make thing simple this is what I'm dealing with. All there was is the single crematic resistor and that's it.
Here are some pic's

381515680.jpg


381515666.jpg


381515686.jpg


How should I go forward on this? Nothing has been done except I took the alternator off that you see here. Also notice the car type ignition switch. There is also a non stock push button starter switch.
 
You see that slot head screw below the ammeter? And the empty hole about an inch to the left of same screw? That is where the stock 12250 ballast resistor was mounted.
loop_amp_with_res.jpg
 
(quoted from post at 22:35:48 01/20/10) You see that slot head screw below the ammeter? And the empty hole about an inch to the left of same screw? That is where the stock 12250 ballast resistor was mounted.


To some this might be a stupid question ..............
Do I have to have that Stock resister? Or can I just use the cramatic resister that came with the kit? The new one in the kit looks just like the one that's on the tractor now.
It appears that the alternator in this kit might be a one wire and the one that was on before was a regular three wire car alternator.
If I need the stock resister just let me know so I can order it.
Like someone said above the instuctions in this kit are a little less than desired
This looks just like the kit I bought

wm_8NE10300ALT-Cx.jpg


Thank you in advance for any and all the help
Steve
 
(quoted from post at 10:00:15 01/21/10)
(quoted from post at 22:35:48 01/20/10) You see that slot head screw below the ammeter? And the empty hole about an inch to the left of same screw? That is where the stock 12250 ballast resistor was mounted.


To some this might be a stupid question ..............
Do I have to have that Stock resister? Or can I just use the cramatic resister that came with the kit? The new one in the kit looks just like the one that's on the tractor now.
It appears that the alternator in this kit might be a one wire and the one that was on before was a regular three wire car alternator.
If I need the stock resister just let me know so I can order it.
Like someone said above the instuctions in this kit are a little less than desired
This looks just like the kit I bought

wm_8NE10300ALT-Cx.jpg


Thank you in advance for any and all the help
Steve
o, you don't HAVE to have the 12250 resistor, but they have a nice feature in their design whereby they change resistance with temperature, so you get greater current to coil during cold starts and as it heats up, it cuts back on the coil-heating current for the days work.

As far as exactly the resistance you need..........without knowing the resistance of the coil you are using, the resistance of the resistor in the kit.......we can't help you with a simple, precise answer. Bottom line is that with the sum of coil resistance and ballast resistor(s), you want 4 amps of coil current, stalled, points closed. Typically, then ASSUMING (danger) a 2.5 ohm coil, 1 ohm 12250 resistor, and 14.4 volts (battery up & charging), then you would have 14.4/(3.5)=4.11 amps. A reasonable number (some will say a bit on high side). What is the resistance of the white ceramic resistor that came in the kit? Most often these aftermarket tractor suppliers use the 8NE10306 and there are reports of these being found from 0.5 to as much as 1.6 ohms......quality control? That's a 3 to 1 range and your current might then be 14.4/(2.5+0.5)=4.8amps or maybe 14.4/(2.5+1.6)=3.5amps.
Real good luck would have a 12250 at about 0.7 (warm) + 0.5 (ceramic) + 2.5 = 3.7 ohms, resulting in 14.4/3.7= 3.9amps. Great.
Your coil is probably 2.5 but there are coils that look the same which have 0.5 to 1.0 ohm, too. You didn't want to hear all that, I'm sure. You can trust that the kit supplier out it all together correctly and hook up what they sent you and go for it. The worst that can happen is coil is overstressed, need a new one & at that point in time you do go ahead and work thru all the above so you don't need a 3rd coil. Alternatively, all is well and it runs like a charm without ever having to exercise the old gray matter. Vegas time!
 
Yesterday's Tractor Forums

We sell tractor parts! We have the parts you need to repair your tractor - the right parts. Our low prices and years of research make us your best choice when you need parts. Shop Online Today.

Back
Top