Popping Under Load Started Again (H w/MAGNETO)

The other day I was pulling logs and I knew I was about to run out of gas. Unhooked a log and was gonna get her up to the house when she ran out while idling on the trail. Ok. No biggie. Went out and got some fresh ethanol free 89 octane gas. Put it in the next day and fired her up. Went back to dragging logs, but noticed she was sputtering & popping again under load.

I had this problem a month ago and found 1 plug might have been bad. Replaced the plugs with 3116's and she ran great again.

The only thing that happened before this started was the running out of gas. Oddly enough though......when this happened a month ago, I was getting low on gas there too, but it didn't run completely out that time.

I've been wanting to replace the cap & rotor and points and condenser, but it was running good, so why fix it? But now I'm heading that route again.

I check the screen in the carb and blew back the line. Gas flows out good. Clean the bowl, not much was in there. I don't know if there is a screen in the tube going into the tank from the bowl.
I also pulled all the wires except one at a time for each cylinder while idling. Each cylinder will run at idle by itself with the other 3 wires off.

It idles like a sleeping baby and runs full throttle.
But if I move the throttle from idle to full in a rapid fashion, it will pop and sputter till it catches up. And if I put it under load, such as going uphill, it will pop and sputter.

Harry
 
check the cap rotor and points and gap .013, might be bad condenser also. then report. dont know the history on this unit, but its always
good to do a major tune up. which means adjusting the valves , cleaning the carb, and making sure the adjustments are set to spec. then they
run pretty darn good. its up to you to check on things then report or show what you have found. like for example the cap could be cracked and
if you checked it , u would have found the problem.
 
(quoted from post at 10:19:21 02/01/21) The other day I was pulling logs and I knew I was about to run out of gas. Unhooked a log and was gonna get her up to the house when she ran out while idling on the trail. Ok. No biggie. Went out and got some fresh ethanol free 89 octane gas. Put it in the next day and fired her up. Went back to dragging logs, but noticed she was sputtering & popping again under load.

I had this problem a month ago and found 1 plug might have been bad. Replaced the plugs with 3116's and she ran great again.

The only thing that happened before this started was the running out of gas. Oddly enough though......when this happened a month ago, I was getting low on gas there too, but it didn't run completely out that time.

I've been wanting to replace the cap & rotor and points and condenser, but it was running good, so why fix it? But now I'm heading that route again.

I check the screen in the carb and blew back the line. Gas flows out good. Clean the bowl, not much was in there. I don't know if there is a screen in the tube going into the tank from the bowl.
I also pulled all the wires except one at a time for each cylinder while idling. Each cylinder will run at idle by itself with the other 3 wires off.

It idles like a sleeping baby and runs full throttle.
But if I move the throttle from idle to full in a rapid fashion, it will pop and sputter till it catches up. And if I put it under load, such as going uphill, it will pop and sputter.

Harry

Sounds to me like it may be running bit lean.

I don't recall seeing in your post that you have adjusted the carburetor?

Take note of the main jet adjustment and "open" it 1/2 turn and note what happens, if "better" you may need to open it more (again take precise note of how much so you can always "go back"), if worse you can always go back to where it was.

Also, you didn't mention location or ambient temperature, if CCCOLD where you are there MAY be some carb icing going on, or a little water/ice in the carb.

(Many will agree that ethanol gas is not the best choice for STORAGE, but it is less prone to freezing up/icing than "ethanol free".)

You could try adding a bottle of gas line antifreeze to your tank.

From you description I would not blindly tear into the mag and install "today's parts" which are probably of lesser quality than what you have.

I would check the spark with a spark gap tester set at 1/8" or so, and if the spark doesn't falter likely the mag isn't your trouble.

Lastly, when checking for a weak or dead cylinder it's best to "ground out" the spark at each plug with an insulated tool rather that "pulling" a plug wire.

When you do that you take away the intended ground path for the spark and it will then seek ground through the cap or rotor (possibly leaving a damaging "carbon track" there) or through the insulation in the coil, with the same potential for damage.

Ya, I know Grandpa did it and probably "got away with it", but it's not the best practice.
 
make sure the main load screw is 2 1/2 turns out minimum for no load, 3-3 1/2 is good. do some experimenting.
like to know what you mean by popping, is it through the exhaust or through the carb inlet? makes a big difference. could be tight valves, could be burnt valve. check your compression as i always say, when in dought, then you know what your dealing with instead of the guessing game.
 
Pull the carb drain plug and make sure you have a good steady flow of gas that will fill a pint jar in less then 3 minutes and 2 is even better. Yes do catch it to look for dirt/rust/water in the gas. If you have that then try opening up the main jet a bit and see if that helps. Also when was the last tiem you serviced the air cleaner and dumped the mud and water and put in fresh oil
 
Sounds to me like it may be running bit lean.

I don't recall seeing in your post that you have adjusted the carburetor?

Take note of the main jet adjustment and "open" it 1/2 turn and note what happens, if "better" you may need to open it more (again take precise note of how much so you can always "go back"), if worse you can always go back to where it was.

Also, you didn't mention location or ambient temperature, if CCCOLD where you are there MAY be some carb icing going on, or a little water/ice in the carb.

(Many will agree that ethanol gas is not the best choice for STORAGE, but it is less prone to freezing up/icing than "ethanol free".)

You could try adding a bottle of gas line antifreeze to your tank.

From you description I would not blindly tear into the mag and install "today's parts" which are probably of lesser quality than what you have.

I would check the spark with a spark gap tester set at 1/8" or so, and if the spark doesn't falter likely the mag isn't your trouble.

Lastly, when checking for a weak or dead cylinder it's best to "ground out" the spark at each plug with an insulated tool rather that "pulling" a plug wire.

When you do that you take away the intended ground path for the spark and it will then seek ground through the cap or rotor (possibly leaving a damaging "carbon track" there) or through the insulation in the coil, with the same potential for damage.

Ya, I know Grandpa did it and probably "got away with it", but it's not the best practice.

You laid out some really good points there, especially about grounding the sparks out. Sometimes I get a bit hasty.

I did double check the high speed jet. It is 3 turns out. One thing I noticed though, is that it doesn't have a hard solid seat when turned all the way in.

ALSO, forgot to mention, after I turned it off, I noticed gas dripping from bottom of carb. There is something just behind the high speed jet, as in behind the jet screw towards the air filter. Looks kinda like a freeze out plug, but has a hole in the center. Sure looked like the gas was seeping from that!! It didn't leak from that while running though, only when shut off.

Now the threaded plug in the side of the carb is really in there tight and the square head is boogered up. I tried removing that last time, but was scared of making it worse. Gonna have to get on it hard with some vice-grips.

Also, there is a brass cap type screw on the front side of the carb, just around the front bend from the high speed jet. It has a flat head screwdriver slot in it. What is that??

Temperatures here are below freezing right now and I think they were yesterday as well, which is when this started. Dealing with a Nor'easter blizzard right now. I didn't know non-ethanol gas freezes quicker than 10% ethanol.

The air filter oil is dark. Can't remember when changed last, but is always done with engine oil change. With that being said, it is due for the oil change. I have the filter and oil, just haven't done it yet.

Harry
 
That freeze plug looking part with the hole in it is there so that gas doesn't fill up the carb when not running. It is always a good idea to shut the gas off when not running it gas can/will fill up the engine and mix with the oil and that can mean a blown engine. Worked on a 9N For that I drained 5 plus gal. of gas and oil out of the oil pan due the the fact the guy didn't shut the gas off
 
This is my 1950 H carb procedure.
NOTE that the two adjustment screws operate differently; the idle screw turns CCW for leaner, the main fuel screw turns
CW for leaner.
Make sure the float isn’t sticking or touching the insides of the float chamber. Some previous advice was to use a Dremel
tool and smooth the insides of the float chamber so the float doesn’t rub or touch. Pretty important.
Set the float so the top of it rests 1 27/32" above the flat surface of the float chamber.
[Note a new float might already be set correctly.]

INITIAL settings are as follows to get the engine started;
Main fuel adjusting screw; big screw facing down at an angle, towards the rear, at the bottom of the carb; 2 1/2 to 3
turns open. This main screw turns clock-wise for leaner mixture. [This screw adjusts fuel.]
Idle-air-mixture screw; smaller screw facing forwards, on upper left-hand side of carb; 1 to 1 1/2 turns open. This idle
screw turns counter-clockwise for leaner. [This screw adjusts air.]
Idle speed screw; faces outboard, at the top of the carb; set for 450 rpm, and make sure the governor correctly engages
in the slot. [This screw adjusts RPM’s.]

FINAL settings are as follows;
Get the engine warmed up, and idling.
Turn OUT the small idle-air-mixture screw until rough running, then turn in until engine idles smooth. (Mine is set at 1
turn open.)
Rev it up, wide open, warmed up, then turn the big main fuel adjusting screw IN until rough, then out til smooth, then
1/4 turn to 1/2 turn further out. (Mine is set at 1 turn open. Other advice has been to set it at 2 1/2 turns open for
pulling implements.)

Engine should rev up smoothly and evenly.
Too Lean = stumble, sputter, damaged melted plugs.
Correct = tan plugs.
Too Rich = back smoke, black sooty plugs.
 
Sounds more like you need to get the water /dirt out of the fuel tank first then clean out carb. Since the problem happens with the low fuel times.
 
(quoted from post at 11:20:47 02/02/21)

Engine should rev up smoothly and evenly.
Too Lean = stumble, sputter, damaged melted plugs.
Correct = tan plugs.
Too Rich = back smoke, black sooty plugs.

Thanks for your carb settings.

I started her up today to move it from the snow to the plowed surface. She started right up. Popped quite a bit while moving thru the snow.
Pull throttle rapidly from idle to full throttle and there was a definite puff of black smoke. Did this a few more times caused some dark smoke and some carbon flakes to blow out. I'm starting to think it is rich or the timing is off. Maybe the points or the float stuck.

I didn't have time to tinker with it today. Was clearing snow all day. Also messed my hand up today, so I probably won't have the ability to mess with it for a day or two.

My high speed is set at 2-3/4 turns out. That is where I've had her set for years. There is a brass cap screw near the bottom of the carb? On the front side (left side). I've had this carb apart many years ago. I can't remember what that brass cap screw is??

The plugs are new. I will pull them and report back their color/condition.

Thanks,
Harry
 
FBH 44 gave you good instructions on adjusting the carburetor. Never go by a
specific number of turns in or out because all carburetors are not equal.

You said when you screwed in the main high speed adjustment that it never
bottomed out. That shows you what I mean they are not all equal. You may have
a short needle that came in a kit at some point. They work but are not
original.

That is why you warm it up and start screwing it in until engine slows, or
spits, or dies but at any rate changes .Then you know you have reached a
point that changes the mixture. If you cannot make engine change it's tune,
you need to find out why to make a good adjustment.

A large brass screw you mentioned must be the idle mixture screw some one has
boogered badly. It needs to be in adjustable condition also.

When you pulled all wires except one, I hope you grounded the others good. To
leave them hanging open circuited can cause spark to take short cuts inside
dist cap and leave carbon tracks which will eventually give problems. Also,
it is hard on the coil as it is trying to build enough voltage to complete a
circuit so it may damage the insulation inside coil to find a way out.

Spitting and sputtering under load is normally lean mixture or spark plug
problems. If it worked good with new plugs they may be slightly fouled
already causing your problem. Might need a good cleaning from faulty mixture
or excess engine oil.
 
I just wish the description of happenings would be correct. Popping and
backfiring , is not the same outcome as spitting and sputtering.
 
(quoted from post at 21:19:13 02/02/21) I just wish the description of happenings would be correct. Popping and
backfiring , is not the same outcome as spitting and sputtering.

Sorry. I would say more like popping & back firing.....from exhaust. Not from carb.
 
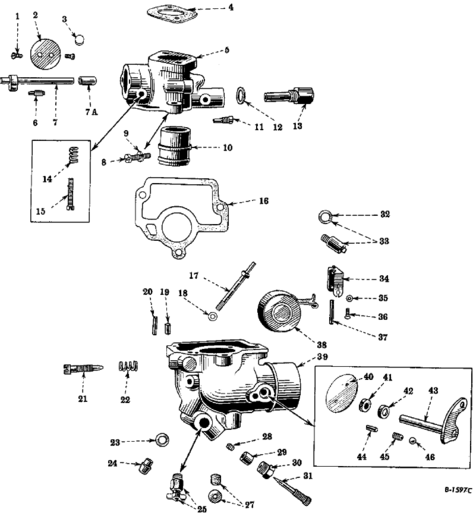
This may help. The lowest screw #31 is load screw to fine tune fuel at moderate to full load. The #21 screw is idle adjust. The detail view 14-15 are idle
speed.
cvphoto74219.gif

Make sure the distributor shaft has zero play Up down and toward engine and away (any play you can feel or see is way too much) Jim
 
(quoted from post at 13:04:35 02/04/21) This may help. The lowest screw #31 is load screw to fine tune fuel at moderate to full load. The #21 screw is idle adjust. The detail view 14-15 are idle
speed.
<img src="https://www.yesterdaystractors.com/cvphotos/cvphoto74219.gif">
Make sure the distributor shaft has zero play Up down and toward engine and away (any play you can feel or see is way too much) Jim

Thanks Jim.
I'm curious what that #24 is?

Harry
 

Here is what I did today.

Removed cap & rotor and cleaned the brass terminals of each. Used some alcohol as a cleaning solution to wipe internal surfaces. Blew out with compressed air. Re-installed.
When looking into the cap, the terminals have arc burns on the CCW corner of each terminal. When looking at the rotor from the top, it shows arc burn on CCW corner of terminal. Keep in mind, this is a Magneto type cap & rotor.
Jim, the shaft has very slight play up, down and side to side. The shaft also has some in & out play as well as rotational play.

I drained the carburetor at the drain plug. It filled a 20 ounce bottle in less than 2 minutes.

Emptied the Air Filter, cleaned it out good and replaced with clean oil. The external and internal screens are clean. No obstructions in the down-pipe air intake. Also removed air intake hose from carb. No improvement with air intake removed.

I removed the muffler to be sure there were no obstructions. No improvement with muffler off. Quick acceleration with muffler off shows a backfire flame popping out.

Keep in mind, the tractor starts right up, no problem. It idles like a purring kitten. Full throttle causes no backfire. Only pops while under load (uphill movement, pushing snow, dragging a log, sudden acceleration, when letting out clutch pedal causing gears to engage).
At Mid-throttle, you can hear a distinct but yet subtle miss.

I didn't have time to do anything else today, including pulling the plugs.

I uploaded a 13 second video of what it sounds like on a rapid acceleration, but I think it is too big to be allowed here. Here is a link where you can also download the video. The link will only work for 7 days.

https://we.tl/t-u1h5FcVJ8Y

Thanks for all the help,
Harry
 
The in out play is normal. The side to side is problematic in the the looseness allows the spark to happen at random times. The points rubbing block
contacts the 4 lobes of the distributor cam at different spots allowing the wild timing. I assume it has uniform compression across the cylinders +
or - 8 tp 10 PSI. With the cap off and a feeler gauge in hand, with the points open (on the top of the cam bump) push the distributor shaft away from
the rubbibg block and while doing that measure the opening. Then pulling the shaft toward the rubbing block measure the point gap. if more than
.002" I would get a rebuilt distributor. Another way of seeing this effect is to use a timing light and watch to see if the timing mark jumps around
at various speeds. it should be steady at any particular speed, and advance as speed increases.
You should be able to rotate the rotor clockwise about 20 degrees then it should snal=p back to where it was. If it doesn't turn, or flops easily,
the centrifugal advance might be toast. Jim
 
If this is on an H4 magneto, the rotor is not timed right. It has to jump the
spark too far from the rotor to the cap terminals.
 
mvphoto69899.jpg


mvphoto69900.jpg


Finally had chance to get into it a little more. The plugs are very wet & sooty looking like it is burning rich. I uploaded 2 pictures. These plug were brand new a month ago with only a few hours on them.
 
(quoted from post at 11:20:47 02/02/21)

FINAL settings are as follows;
Get the engine warmed up, and idling.
Turn OUT the small idle-air-mixture screw until rough running, then turn in until engine idles smooth. (Mine is set at 1
turn open.)
Rev it up, wide open, warmed up, then turn the big main fuel adjusting screw IN until rough, then out til smooth, then
1/4 turn to 1/2 turn further out. (Mine is set at 1 turn open. Other advice has been to set it at 2 1/2 turns open for
pulling implements.)

Engine should rev up smoothly and evenly.
Too Lean = stumble, sputter, damaged melted plugs.
Correct = tan plugs.
Too Rich = back smoke, black sooty plugs.

On my last comment, I meant to say that the plugs were 'black' & sooty. They were not wet like they were fouling.

So anyway, I cleaned the plugs up a bit with some ether and brake clean and an old toothbrush. Started it up and let it warm up. At that point, it ran fine. No more popping. To put it under a load, I pushed some snow piles with it and started up an incline in 4th gear. No popping, running fine.

Then I started to wonder why the plugs sooted up in the 1st place. Both times this has happened in the past, the engine was doing a lot of idling while I would cut logs and rig my pull cables and snatch-blocks.
So maybe the idle screw was set too rich?

So I re-adjusted the carb settings.
At full throttle, I turned the high speed in (CW) until it started to struggle. I turned this back out until the struggle went away and then added 1 more full turn out. The final setting of the high speed screw is 2-1/2 turns out. It used to be 2-3/4.

I turned the idle mixture screw out till it stuttered and then back in to where is sounded best. The idle mixture screw is 1 full turn out from the inner most stop position. I believe it was previously set at 1-1/4 turns out.

So if turning the idle screw out makes it leaner, I would actually be 1/4 turn richer than before. Is that right?
If I understand what someone else commented before, the idle screw adjust air, not fuel. So turning the screw out, would be adding more air to the mixture?

I also located the notches on the pulley and checked with a timing light. There were 2 notches about 3/8" apart and a single notch almost 90 degrees behind the other 2. Checking with a timing light, the 2 close notches were about 11 o'clock from the pointer. Changing engine speed didn't seem to make a difference on their location. I couldn't locate the single notch with the timing light.

Harry
 

UPDATE~
Yesterday, I was able to check compression and adjust the points.

Compression for all 4 cylinders was between 108 and 110. This was after I ran it and warmed it up. #1 & #2 leaked off 2psi after about a minute, whereas #3 & #4 leaked off 5psi after about a minute.
By adding a little oil in each cylinder, they were from 118 to 120, an increase of 10psi.

The points were wider than spec and the stationary contact was not square with the movable contact. I cleaned them the best I could with a fine file and some emory while still on the unit and was able to bend the stationary contact slightly to square it up. Set the points to .013.
The main coil wire was jumping a 1/4"+ (closer to 5/16") with a nice blue spark.

Cleaned the carbon off the plugs again the best I could with brake clean and ether and a toothbrush.

Started it up, let it warm up, and it seemed to be running okay. Will run it more over the next few days to see if the plugs carbon foul again. The wider point gap may have been weakening the spark. I'm hoping.....

I never touched the valve adjustment since I've owned it (23 years), so I may need to look at them regardless in the near future.

.
 
(quoted from post at 05:57:28 02/14/21)
UPDATE~
Yesterday, I was able to check compression and adjust the points.

Compression for all 4 cylinders was between 108 and 110. This was after I ran it and warmed it up. #1 & #2 leaked off 2psi after about a minute, whereas #3 & #4 leaked off 5psi after about a minute.
By adding a little oil in each cylinder, they were from 118 to 120, an increase of 10psi.

The points were wider than spec and the stationary contact was not square with the movable contact. I cleaned them the best I could with a fine file and some emory while still on the unit and was able to bend the stationary contact slightly to square it up. Set the points to .013.
The main coil wire was jumping a 1/4"+ (closer to 5/16") with a nice blue spark.

Cleaned the carbon off the plugs again the best I could with brake clean and ether and a toothbrush.

Started it up, let it warm up, and it seemed to be running okay. Will run it more over the next few days to see if the plugs carbon foul again. The wider point gap may have been weakening the spark. I'm hoping.....

I never touched the valve adjustment since I've owned it (23 years), so I may need to look at them regardless in the near future.

.

"#1 & #2 leaked off 2psi after about a minute, whereas #3 & #4 leaked off 5psi after about a minute."

That would be a compression tester issue, NOT an engine issue as once you stop cranking the engine doing a compression test pressure is not retained in the engine cylinder.

The compression tester has a check valve at the sparkplug adapter end that maintains the pressure and gauge reading.

Sounds like your compression tester has a leaking check valve, maybe some carbon particles in it.

Typically, those check valves compression tester check valves look like a tire valve core but have a weaker spring.

"Compression Tester Replacement VALVE CORE (S) pack of 3 for gas engine testers

New high quality valve cores for the inlet side of gas engine compression testers

these are the low pressure opening valve cores that are needed to get a correct pressure readings on your handheld or screw in type gasoline compression tester. Regular tire or ac valve cores require higher opening pressure and give inaccurate (low or zero) readings.

Because the correct valve cores have such a low opening pressure they seem to go bad often (or get stuff stuck in them) and that's when the gauge wont hold pressure or bounces up and down when trying to test an engines compression."

(From ebay auction #254835899956)
 

Just a quick update. After cleaning points and re-gapping as well as cleaning the plugs, the unit has been running fine.

I also adjusted the magneto timing with a timing light setting the mark at 1-63/64" ahead of the TDC mark on pulley.

Also, fine adjusted the carb again.

I've pushed some heavy snow and the unit has been running like a top.

I will run some more and pull the plugs to see what they look like.

Thanks to everyone with all their help and thoughts. It helps to get my brain thinking again. Special Thanks to rankrank1, who posted a very informative comment about timing marks back in 2013. Glad I found that. Priceless!!
 

We sell tractor parts! We have the parts you need to repair your tractor - the right parts. Our low prices and years of research make us your best choice when you need parts. Shop Online Today.

Back
Top