Progress on SA restoration

Anonymous-0

Well-known Member
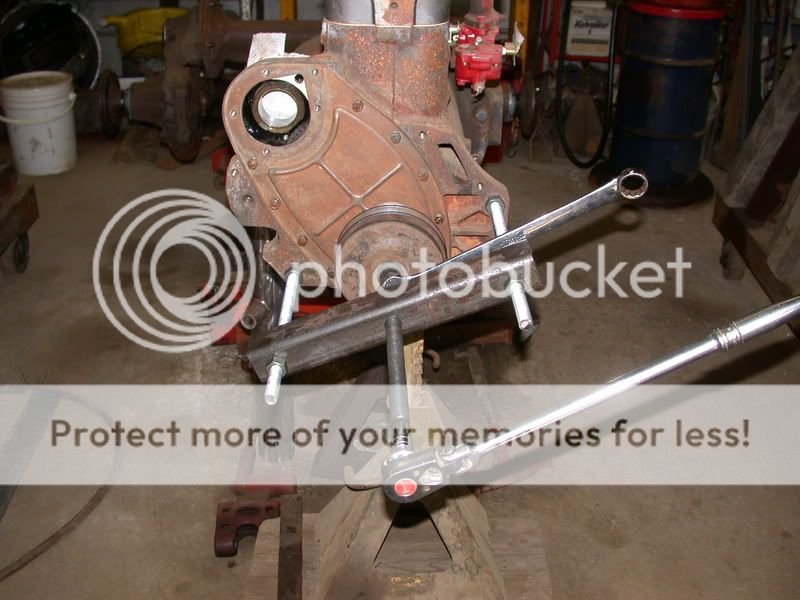
We finally found new pistons for our Touch Control Unit and assembled the unit. We painted the top of the torque tube and bottom of the control unit and we'll install it tonight. Thanks to all the postings about installing the crankshaft pulley, I made a tool and put it on the engine, it worked like a charm!
DSCN5323.jpg

DSCN5315.jpg
 
Greg, looking sweet!

Couple of questions...

I have to get my pulley on yet. The end of my crank is threaded, and I was going to run a piece of all-thread into that, slip the pulley over it, and use some washers and a nut to 'pull' on my pulley, which would put no pressure on the new main thrust bearing, but I've been thinking about what Hugh MacKay said, that he had trouble using a rig like yours with a 1" bar with FINE threads. My crank is tapped for 7/16" with ROUGH threads, so I'm doubting my idea will work. Two things- My bolt holes on the block (to use a set-up like yours) are offset from the end of the crank, and I'm wondering if yours were directly in line. Seems like I wouldn't get the line-of-pressure directly in line with the crank. Second, did you heat your pulley prior to pressing it on? Oh, one more- my pulley has the offset-center for hand-starting with a crank, and it only has one pulley. What does your 2nd pulley turn?

Glad to see you're making progress. It encourages me! Right now, I found I have a bad cylinder head stud, with the fine-threads damaged. I have to locate another. I'm awaiting some calls, but IH sells them individually, so that's probably what I'll do tomorrow.
 
Pete: I wouldn't call it trouble. My devise was very much like Greg's and I was using 1" fine thread. the pressure I had to exert on and 18" wrench handle made me question if 7/16" coarse thread would stand the pressure.

When I made my push device up, the center hole is offset by 3/16"
 
Didn't intend to misquote you, Hugh. By 'trouble', I meant that it didn't just ease on. What I DID do was take your words to heart. I'll just have to figure what to do with the offset.
 
Pete,

I would not try using all thread in the end of the crank. The amount of pressure it took to install the pulley would pull the all thread right out of the crank! I oversized the holes to make it (more or less)centered to push on the pulley.

I used a plate from a seal driving tool (large truck) against the pulley to push with, that's probably what your seeing as a second groove. My pulley only drives a single belt.

I heated mine up, as did Hugh, warm to the touch. I highly recommed using 2" square (at least 3/16 wall) to make the tool with. I tried making one with 1" square and it crushed about half way on. By the time I made a second one with 2" square, everything cooled down.

Regards,
Greg
DSCN5316.jpg
 
(quoted from post at 05:24:39 04/15/08) Pete,

I would not try using all thread in the end of the crank. The amount of pressure it took to install the pulley would pull the all thread right out of the crank! I oversized the holes to make it (more or less)centered to push on the pulley.

I used a plate from a seal driving tool (large truck) against the pulley to push with, that's probably what your seeing as a second groove. My pulley only drives a single belt.

I heated mine up, as did Hugh, warm to the touch. I highly recommed using 2" square (at least 3/16 wall) to make the tool with. I tried making one with 1" square and it crushed about half way on. By the time I made a second one with 2" square, everything cooled down.

1. Nice pulley installer... I would hate to see what it took to remove it.

2. Nice paint job on the touch control unit. What brand/color of paint are you using? What reducer and hardener? Is it fairly easy to work with?

3. Keep up the work on the SA, and post some more pics.

Regards,
Greg

DSCN5316.jpg
 
Yesterday's Tractor Forums

We sell tractor parts! We have the parts you need to repair your tractor - the right parts. Our low prices and years of research make us your best choice when you need parts. Shop Online Today.

Back
Top