Setting 300U Clutch release fingers

Mosier91

New User
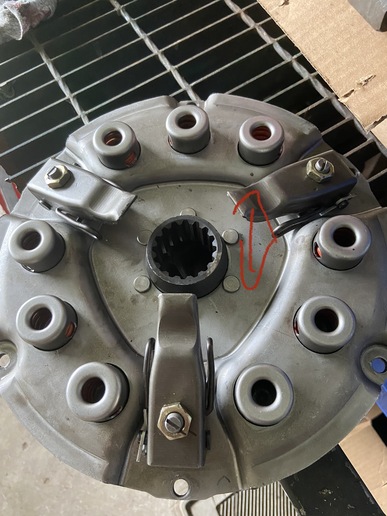
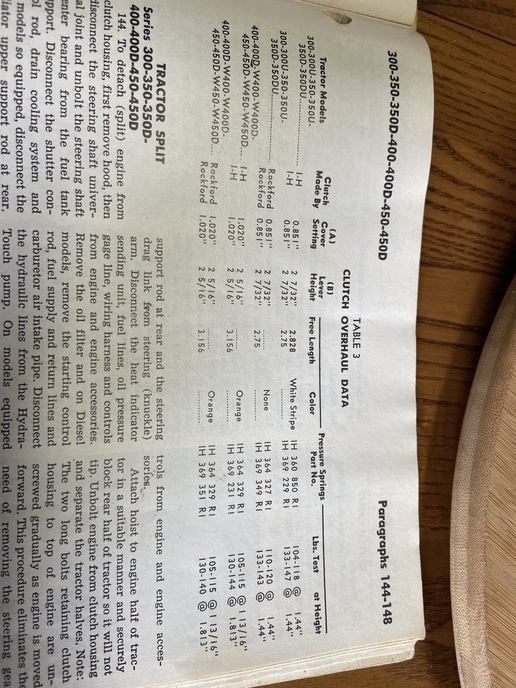
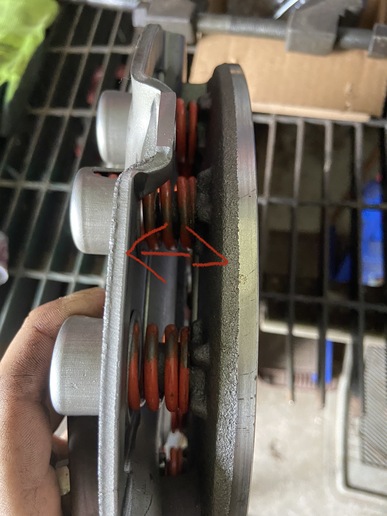
New pressure plate for my 300U measures 1.940 between top of finger and the lowest surface of the cover plate. (Photo #1) Between the top side of friction surface and highest point of the underside of the cover plate is 0.965. (Photo #3) According the the manual I want them to read 2.219 and 0.851 respectively. Assuming I am measuring from the correct surfaces. I understand how to adjust the fingers, but I am not sure how best to go about adjusting everything. I am assuming that these numbers are taken on the bench, and not after being bolted onto the flywheel with the friction disk in place. Any help would be appreciated.
Thanks in advance!


cvphoto104195.jpg


cvphoto104196.jpg


cvphoto104197.jpg
 
Well they are USUALLY set in a clutch rebuild fixture bolted down . Now in ALL the clutches i have installed since stating to play the game of wrench twisten and that goes back to 1961 i have NEVER had to reset fingers on a rebuilt pressure plate , NOW on the ones that YOU have to be the rebuilder on then yes those i have done in a fixture . So here IF i had one that did not look right myself i would first check the flywheel step for the correct high cut then place the disc in the fly wheel then bolt the pressure plate down THEN CHECK . Then if it wrong i would not change nothing and take it back .
 
So with the clutch and friction disk bolted into the flywheel if I insert
the depth gauge of a caliper down onto the surface of the friction disk
and measure to the tip of the fingers and get the desired
measurement of 2.218 all is well? That means without a bench jig the
cover setting cant be measured then. As long as the fingers are set
right when installed so too should the cover setting then?
 
Maybe you have moved on. That 2 7/32 inch measurement seems like lot of space between those fingers and the center surface of the pressure plate your arrow is roughly showing. It has been quit a few years since I had one of those apart. If I was doing it before assembly I would have to use a straight edge or carpenters square to make measurements from the engine side of the bell housing mating surface to the location of the clutch fingers. And a measurement from the bell housing face to the throw out bearing when it is installed. Comparing the measurements to determine if the settings will allow the clutch to release. Those measurements are provided in the manual because ..back when.. the mechanic may have disassembled the pressure plate and had the mating surface turned the same as the flywheel. Then when reassembling he would need those settings to set up the pressure plate assembly. Rebuilt and new replacement pressure plates have had this set at the factory so you just install it. It is wise to look at the fingers of the installed pressure plate to make sure they are set even. Hope you have a pilot tool to center the disc so the splines line up well when you go back together. If you do have the tool ..plastic dummy pilot shaft.. when you tighten the clutch hold the back of it up get a feel for where center is up and down. Then hold it near center as you snug up the pressure plate to pinch the disc. Once it is clamped in position good you can relax and focus on tightening the bolts down in an even pattern working one side to the other. Once the PP is installed and tight the pilot should come out and go back in easy so you know the alignment is good. This may all be stuff you know, just trying to help.
 
Seems I was mistaken about the location of the measurements. Once the plate is installed I believe now that the measurement is take by inserting a depth gauge through the center and placing it against the surface of the friction disk and measuring to the tip of the finger.
 
I don't think there should be any need to touch the adjusters on a new or rebuilt pressure plate if you have the right one to start with.
 

We sell tractor parts! We have the parts you need to repair your tractor - the right parts. Our low prices and years of research make us your best choice when you need parts. Shop Online Today.

Back
Top