New to me Franken-Fergie

Sounds like yours was wired similarly to mine when I bought it. I had to install a new switch and the previous owner had really rigged up the alternator to LOOK connected, just to sell, but it was just running off the battery and the wiring was all wrong. The owner was pretty old and frail, and his son-in-law had "prepped" it to sell. With the help of internet wiring diagrams, it's all straightened out now and working like it should. From your posts, it's obvious you know what you're doing. You'll get it all straightened out soon.
20230909_160958.jpg
 
Sounds like yours was wired similarly to mine when I bought it. I had to install a new switch and the previous owner had really rigged up the alternator to LOOK connected, just to sell, but it was just running off the battery and the wiring was all wrong. The owner was pretty old and frail, and his son-in-law had "prepped" it to sell. With the help of internet wiring diagrams, it's all straightened out now and working like it should. From your posts, it's obvious you know what you're doing. You'll get it all straightened out soon.
View attachment 4435

Trick with mine is the Alt excite wire was wired to switch to starter post. Once running you turn to start and it's charging. Still may get a dioide and hook it up to ACC post. If the RPMs go real low sometimes it will stop charging and you have to turn key again. I've been keeping my eye on ampmeter.

Will be a learning curve checking governor.
 
You don't need a diode if you hook it accessory post on ignition switch, you do need a diode if you hook it ignition terminal. on 2,3 or4 position switch.It's called accessory because it won't feed the coil on accessory position .
 
Might check your timing. Could influence the stumbling.


That was the first thing I did when I got the tractor. Cap was in good shape but some mud daubers had moved in I had to clean cap out. Cover over the rest of dist kept them out of there.

Under the cover was a nearly new set of blue streak points, rotor in good shape. I cleaned up in there, and made sure advance was free/working by hand, gave the felt on the rubbing block a dab of grease and cleaned/gapped the points. Then static timed it with an ohm meter.

Then I went on to: the fuel system, ended up new sed bowl/filter, gas line, carb rebuild, and new manifold. Had a seep in the gas tank (some beat/dented the tank?), brazed that. Gas tank is clean and shiny inside, fresh non-E10 gas.

The hot wire to the coil had a crimp splice on it, I don't trust those. I cut that out and soldered the ends then used liquid electrical tape followed by shrink wrap.

I will check timing again when running, make sure advance is really working. No advance would make it a dog once the throttle opened up too. Thanks!

I'll need my tach/dwell out anyway if I need to play with the governor. With tach/dwell and timing light I'll get someone to work the throttle and check advance is working. I have the specs from the Fergy shop manual. Spark plugs are brand new gapped ACs.

Might get to it end of week, outdoor mechanic friendly weather of 50 oF predicted!!!
 
Last edited:
Got to work on the tractor today.

Started with major governor adjustments, at first to see if they were far off.

The first adjustment for major governor adjustment: "With carb butterfly and and throttle rod (1) at WOT, adjust carburetor rod ( 16) for 1/16" "overtravel" Is this a 1/16" gap between the throttle control rod plunger (29) and governor operating lever (6)? I'll have to come back to this point. I found other issues.

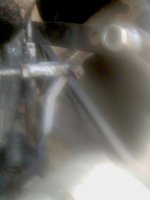
Opening the carb butterfly fully it was found that the carburetor rod was making contact/rubbing the new manifold as the throttle was opened. I dropped the carb off the manifold to try to use some washers to shim the rod out away from the manifold.

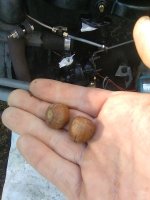
First surprise, two acorns in the intake for the carb! When I had the carb and manifold off, unknown to me, some dam tree rat put two acorns inside the carb air intake pipe. They were too big to get by the choke butterfly. That would certainly make running with the throttle opened run poorly, choking off the engine.

Back to the carburetor rod. #10 washers are too small and 1/4" too big. Hardware store had #10 but no #12, a 6mm was a good fit on the rod. I ended up using the #10 washers opened up with a round file, they were thinner than the 6mm and I could shim the rod better. I shimmed it so I could just get the cotter pin retainer installed. That gave the rod end/manifold enough clearance.

I put the carb back on and there was still interference opening the carb butterfly. The other point of contact with the manifold , was the carbs wingnut idle adjusting screw. Not an easy fix to that. I dropped the carb again. It was getting dark. Next plan is to take my 4" angle grinder to the manifold flange to grind some clearance. Should be able to get to where I need to grind, without removing the gas tank/manifold, again.

So fitment of AM manifolds have issues. As mentioned before I should have test fit the manifold to head, and ground clearance to give wrenches clearance to turn the nuts for the manifold studs. Also now know the carb mounting flange on the manifold needs grinding to clear the linkages and idle screw..

Tomorrow is another good weather day, I'll report back in the evening. Maybe with the linkage fixed and acorns gone I won't have to play with the governor to get it to run well?

1 carb:governor linkage.png
1 carb:governor linkage 2.png
 
Last edited:
I got some more progress done today on the governor/throttle linkage

Pic from yesterday found next to carb choke butterfly. Dam tree rats, the air rifle will be out......

1 TO30 acorns in intake.jpg

I had to remove the carb again to get at the manifold where the idle adjust screw was rubbing. I was just able to get my 4" grinder wheel between the engine and manifold and grind off the offending manifold casting. Glad I didn't have to pull the manifold. The casting had some material just above the machined surface where the carb mates, some slop from the casting process that protruded.

I disconnected the throttle control plunger, then adjusted the compensating spring on the throttle rod. It seemed pretty far off.

I also adjusted the governor bumper screw/spring as described in the video above. The video said to screw the adjusting screw in until it contacts the governor spring, then lock down the lock nut. It seemed pretty far off also. Multiple turns too far out. Has anyone done the adjustment this way? The manuals do it differently, with engine running.

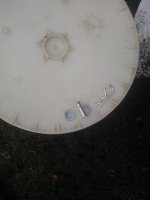
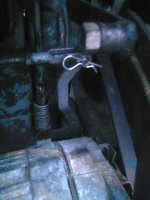
There was still some binding in the governor linkage where the carburetor rod connects to the governor lever. Instead of a clevis pin held with a cotter pin, a farmer/hillbilly mechanic used a 1/4" pan head screw (slotted) and jammed two nuts together to hold it in place. One was a regular hex head 7/16" the other was a square 7/16" nut. They were froze/rusted together and you couldn't hold the screw as you couldn't get a screwdriver in there with the water pump in the way. I used the grinder again to cut that off and got a proper clevis/washers/clip.
1 TO30 control %22clevis%22.jpg1 TO30 new control clevis.jpg1 TO30 control clevis.jpg

The linkage is all smooth and free now. It started getting dark before I had time to adjust the carburetor control rod length, and the governor level arm rod/ throttle control plunger. A quick look at both and they seemed close to correct.

I think a quick adjustment of the carb rod and throttle control plunger and I'll see how it runs tomorrow, check governor operation running. Time permitting will get out the tach/dwell and set idle and WOT RPMs. Maybe check dist advance too with a timing light

I need it running for Monday, snow predicted I'll need to plow.......

Thanks to all for the help and suggestions.
 
I did the last two adjustments and ran the tractor. Idle is good and governor working (high gear with brakes on, lever moves when clutch let out.) Seems OK at WOT too. I need to run it with a load and adjust carb and check idle and WOT with a tach dwell.
 
I did some posts on this tractor on another thread as I was adjusting the governor and that thread was on that topic.

From that thread:

"I did a little more work on my TO-30. After fixing the carb/gov linkage I'm still not getting good WOT. Does not seem to be limited by the governor, throttle valve is WOT.

I hooked up my analyzer/tach/dwell. Not sure if it's not working right? Dwell was stable and reasonable, and points checked out O.K. But tach was giving crazy readings for idle and WOT.

I rechecked the points (Blue Streaks) and found the gap was good , but they were not making good contact all the way across the contacts, one was ~ 1/3 miss allinged with the other. Faces were parallel just points were off. No way to bend things to get correct. I cleaned up the faces and reset the gap, dwell was about the same after this. Static timed to 6 degrees.

Still not getting good WOT and tach readings still crazy. Tried adjusting main jet on carb that did not seem to effect things at WOT.

I ordered a new set of Blue Streaks and will fix that before I play with more things.

Will use my tach/dwell on another point system to see if it has gone wacky........"

So anyway, was not getting full WOT and tach/dwell RPM scale was off. I rechecked the carb rebuild I did, to be sure venturi was not in backwards (all was OK, not sure how it would have ran installed wrong?) and rechecked the nuts on the new manifold I'd also recently installed, those were good. No signs of leaks.

As was WOT problem I checked intake/air filter for gunk and it was OK but I changed the filter oil. This bought me back to ignition/distributor.

I got the new points in the mail but wanted to check over the distributor better before getting to those. I pulled a plug wire off a cap tower and the wire came out without the connector, it was still stuck inside the cap. The wires were copper core and looked pretty new as was the copper connector(s). The contacts in the cap were aluminum and showed some corrosion which is why the connector pulled out. Was going to clean those out.....

I pulled the wire connector out of the cap with some needle nose pliers and reinstalled it in the wire. Ohm meter showed wire was OK, those looked to have been replaced not too long ago? This happened on the next wire also. On the third plug wire's tower, when I pulled the wire it also lost the connector, but the distributor caps tower was badly cracked. Probably why my tach/dwell was giving strange rpm readings.

The cap was what came on the tractor when I got it, and it looked OK without any visible cracks or carbon tracks. I had cleaned the inside well and the contacts for the rotor, button was OK too. Never would have seen the damage without pulling the wires.

So tomorrow will put the new points in and static time it, probably take off the breaker plate to have a look at the advance weights/springs. The advance seems free and functional but I think a cleanup and lubrication would be time well spent. I ordered a new Standard Ign cap and it will get here Monday. Hopefully this gets the engine running correct.

One question. These distributors have an oil reservoir. Do you pull the distributor and hold it level to fill plug, to fill it? Or just fill it while still on the tractor?
 
Weather was crap yesterday so I pulled the distributor to work on it inside.

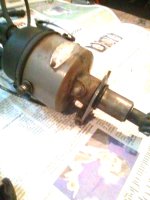
Some more "Franken-Fergy" finds. Distributor is from a TO-20 per ser#. Has anyone run/swapped distributors from a TO-20 to TO-30, or vice versa?

Manuals say advance curves are very similar to correct TO-30 distributor. That is static timing, total advance, and advance curve at various RPMs. Will check advance/curve when I have distributor sorted out, reinstalled, and hopefully not making my tach/dwell crazy on RPM scale.

The Oil fill plug seems to have been replaced with a grease fitting? Is grease rather than oil an acceptable substitute? Or was this just done to replace a lost fill plug? I'll see what is inside it when I get it cleaned up and apart.

Also noticed a 2nd condenser (oldie) that is mounted on the coil? Prior owner(s) must have done this with the 12V conversion. Maybe from a donated automotive coil? Inside looks like new condenser, might be blue streak/standard? Will look for markings.

I plan on taking the coil off and cleaning that off to to see if there are any makings as to manufacture. 12V Conversion does not have a resistor inline to hot wire to coil so I assume coil has internal resistance. Will check out coil with multimeter. I do have a good 12V coil from a 60s Dodge/Chrysler that I know takes a resistor which I salvaged from a 69 Dart.

Will not have dist back in tractor for a few days, new cap gets here Monday, and will report back.
 
Update. I've been out of commission as I poked my eye real well pruning the orchard. Hospital only gave me 1/2 day pain meds so I ended up drinking my hard cider for a week.............took a few days for the eyes to heal and to come back from that fog.

I have the new Standard dist cap and a set of blue streak points.

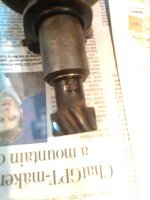
I removed and cleaned up the dist exterior real well and noticed a problem with the drive gear. The pin that held it fit loose in both the shaft and the gear. It was peened on both ends to hold it in place. This allowed the gear to turn a bit in the shaft and also move up and down on the shaft. The shop manual calls for < 0.010" end play on the shaft and that was out of spec partially due to the pin problem. How well does to OEM pin fit?

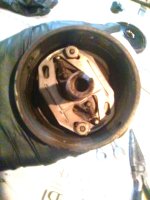
Before dealing with the pin I took out the breaker plate and inspected and cleaned up the advance mech. It was pretty clean under the breaker plate and the advance worked fine. I put I few drops of oil on the pivot points before I reinstalled the breaker plate later on. I did not pull the breaker cam off the shaft. IPL shows some sort of tiny nut and washer that holds that in place, looks to be a PITA to remove. The felt wick got a couple drops of oil.

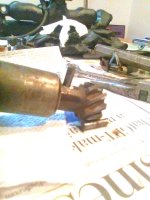
I had to grind the end off one side of the pin to get the drive gear free. I forget the exact measurement but the hole seemed to be 3/16". I lucked out and local hardware store had 3/16" roll pin (I think) that fit the gear and shaft snug and perfect.

The IPL shows the shims to adjust end play being 0.005 and 0.010". There was one 0.010" shim in the assy. The shims are just over 1/2" inner and ~ 13/16" outer.

Test fit showed end play was still out of spec ~ 0.022" with the new gear pin in place. I tried to locate some shims but no luck. The shaft is just under 1/2", 0.490". No place had 1/2" shims, and I tried Fastenal who list stainless and steel shims 1/2 X 3/4", but none in stock or in any whare houses. I decided to live with the excess end play to get it together. End play was better than when I took it apart with the loose drive gear, and gear did not rotate on the shaft anymore. The shaft had no play in the dist bushings.

The oil reservoir fill plug had a 3/8 hex grease fitting in it's place. Would have been a PITA to get the plug out with the dist on the tractor. Could not get a box end or socket on it, but could use an open end if worked from the dist drive end. There was still some oil in the reservoir, not grease. That got rinsed out and changed.

I'll post some pictures of the above and putting it back in the tractor. Just for fun I'll static time it using a rolling paper (with pictures) and see how close that gets when checked with a light.

Hopefully this gets me to the point where I can get idle and WOT adjusted using my tach/dwell and governor checks out OK.
 
A few pictures for the above.

The dist showing grease fitting fill plug. Note it's a PITA to get a wrench on when installed, box or sockets don't fit. Easy with open end from below. Was original plug a pipe thread plug with a flat head screwdriver head?
TO-20 dist oil fill.jpg

The drive gear with original pin. Note it's peened in place but loose in shaft/gear. 0.010" shim is between gear/housing
TO-20 dist drive original pin.jpg

The drive gear with old pin removed, one end ground off, and new roll pin going in. 0.010" shim is between gear/housing
TO-20 dist drive.jpg

The advance mech and breaker cam before cleanup
TO-20 dist advance.jpg
 
I cant offer any advise but you don't seem to need any, M-F!
I just wanted to say I really enjoyed reading through this thread. All the problem solving!

All the best,
R.
 
More work completed. After dist R + R I flushed and refilled the dist oil. As mentioned it's a PITA to get at the zerk filler plug (non original?) with dist on the tractor, easy when dist off 7/16" open. A screw with a flat screw driver slot and pipe threaded would be better, then could remove/install easy on tractor.
TO-30 dist oil plug.jpg

I oiled the drive gear/shaft and got the distributor back in, and and set initial static timing with a rolling paper (picture for reference) , this was OK when tested with an ohm meter later. Put on flywheel on static timing mark, turn dist until paper just slips, just like with an ohm meter when the continuity opens. You need new/smooth points to use the paper method.
TO-30 timing with r paper.jpg

I took the plug wires off the old cap and found trouble, the plug wire terminals were corroded inside the old cap. Couldn't see this without pulling the wires and one cap tower also had a crack in it. I had to crack the rest of the tower to even get the wire/connector out. New Std cap is all brass terminals.
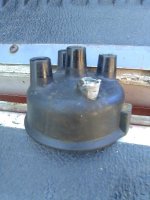
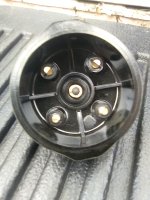
TO-30 bad cap.jpg TO-30 std dist cap.jpg

I decided to replace the wires (7mm copper wire core) even though they "looked" OK, besides the corroded dist end terminals. New dist terminal wire ends are easy to replace and cheap ~$0.50-1.00. With an ohm meter, two wires showed some resistance from the bare wire at dist end, to the spark plug terminals. Most likely inside at the plug terminals as the freshly cut and stripped dist wire ends looked fine. Didn't want to spin my wheels with the old wires........

I found a universal Standard set #804W that is 7mm and has tinned copper wires, youn cut to length/install dist terminal/boot. This was for an 8-cylinder set. Made up 4-plug wires and a coil wire.
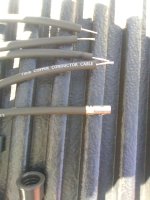
TO-30 plug wires 2.jpg

The 4 shortest wires in the set were more than long enough to use , so I have an extra set of 4 wires that are quite long/uncut with terminals/boots. When cut to length the wire cutoffs were still long enough to make another full 4-wire set if I ever need to replace a wire or to have for fixing other engines. As a side note, a similar universal Standard wire set for 4-cylinder engines was $2 more and has 4 less plug wires?!

The old wires (center), 4 leftovers/cutoffs from making the set (left), and 4 new/uncut longest wires.
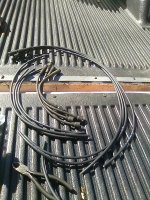
TO-30 plug wires leftovers.jpg

The new wire set installed. Picture shows 2nd condensor that came hooked up on the tractor mounted on the coil mounting bolt. I disconnected that to see if that was making my tach/dwell crazy on RPMs, no luck there.
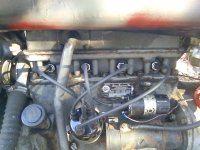
TO-30 plug wires.jpg

I started up tractor, fired right up. Still have the problem with my tach/dwell not reading RPMs right? Dwell was 34 degrees.

Next is the engine oil/filter and flush out. Oil looked clean/new when I got the tractor, had been sitting years. Must have been a lot of condensation inside, as has gotten cloudier and looked uglier with little use. When I drained it was cloudy, and a mess inside the filter. I should have changed the "new looking" oil once I first got it started. Trying to save cost me.

Plan is to flush oil pan though oil filler neck with some diesel to clean the pan, and clean out filter housing well. I'm wondering if I should pull the rocker cover and clean that too? I was getting some water drips from oil breather pipe when hot.

I would need get/order a rocker cover gasket. Check valve lash then too. And I just put more gas in the gas tank!!!, that I'd have to drain......
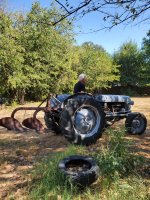
 
Thanks for progress report. You can take pan off in a few minutes.

I found the oil pan had seen some rocks/logs in the past but no leaks.....

I flushed the oil pan with some diesel after I let the warm oil drain overnight. Pointed tractor rear slightly downhill a bit so drain plug at rear of pan lower, put plug back in and added about a quart of diesel in oil filler. Let it sit a while, drained again and added another pint of diesel with the plug out. This washed right through bottom of the pan out the drain and came out clean, let fully drain until no more drips.

Inside of filter canister was a mess. Some emulsified goop not really fully liquid. I pulled filter and wiped out inside with p-towels best I could.

I got a 16oz Zep spray bottle with diesel I use for cleaning oily messes, can adjust from mist to a jet spray, it works great and diesel is cheap. The diesel cut the goop well and I worked around with more paper towels and diesel until the towels came out clean.

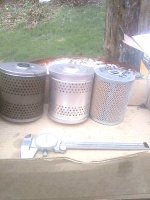
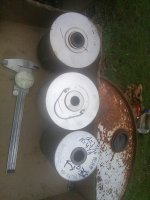
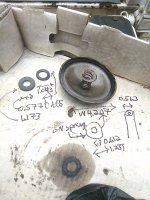
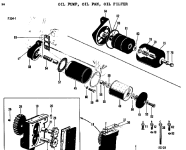
My first time inside the TO-30 oil canister so I took some pictures with measurements of what was inside. Interesting comparing 3 different oil filters, and how they seal up (used Bosch , Wix, and Fil Filter ML 124). Bosch seals at ends and pipe. Fil Filter needs the rubber sealing washers (#s 50 and 83 1 750 587 M1 per IPL), smaller , and it's a sloppy fit on the center tube (dia 0.56"), Wix seals at the tube but will seal at ends too with the rubber center tube washers.

Left to right Bosch Wix Fil Filter

Tractor oil filters.jpgTractor oil filters 2.jpg

I don't have any other brands handy, but will expand the table when I do.

Oil Cannister filters

BrandCannister
dia “
Sealing surface height “Center tube hole inner dia/seal dia”Sealing

Pipe, End, End and pipe/both
Bosch 72127WS
(used)
3.714.400.52 (seal)both
Wix
51010
3.804.440.54 (seal)pipe
Fil Filter
ML 124 (Ferguson part# 835817M91)
3.384.270.748 (hole)end

Seems to be two rubber sealing washers for top and bottom of filter, IPL shows both the same #s 50 and and 83 (one is thicker rubber on my parts and different size inner hole dia), besides the flat washer on a spring and washer at bottom of center tube. I think I'll replace the rubber washers with new thicker ones like OEM.

TO-30 oil cannister parts.jpgTO-30 oil filter.png

Raining here ~ 2 days now, and I'm waiting on a valve cover gasket now. Going to check there for condensation goop just in case, and need to check the tappets anyway.
 
Last edited:
Valve cover gasket got here. Needed to check valve lash anyways, but turned into a project.

As suspected condensation goop and a little rust in the valve train/head/rocker cover. Valve lash on #1 was way off, took apart at TDC #1.

TO-30 valve cover dirty.jpg
TO-30 valve train dirty.jpg


Pulled the rocker assy and push rods, started clean up on those. Have to take shaft apart to check rockers/shaft they don't feel right. Pluged oil drain/pushrod holes in the head,and cleaned head valves/springs with some diesel. Someone did a "valve job" in the past and two of the valves are different without rotators (ex #1 ex #3)

TO-30 head:valves 1st clean up.jpg


TO-30 rocker assy.png


With head/valves clean would it hurt to rinse with some diesel into the pan with drain plug out? There is more goop in lifter galley. Maybe use a small pump sprayer.

If I didn't need the tractor some soon I'd consider pulling the head and doing a whole valve job. Hopefully I won't be looking for a good rocker shaft assy
 
Valve cover gasket got here. Needed to check valve lash anyways, but turned into a project.

As suspected condensation goop and a little rust in the valve train/head/rocker cover. Valve lash on #1 was way off, took apart at TDC #1.

View attachment 68094View attachment 68095

Pulled the rocker assy and push rods, started clean up on those. Have to take shaft apart to check rockers/shaft they don't feel right. Pluged oil drain/pushrod holes in the head,and cleaned head valves/springs with some diesel. Someone did a "valve job" in the past and two of the valves are different without rotators (ex #1 ex #3)

View attachment 68148

View attachment 68150

With head/valves clean would it hurt to rinse with some diesel into the pan with drain plug out? There is more goop in lifter galley. Maybe use a small pump sprayer.

If I didn't need the tractor some soon I'd consider pulling the head and doing a whole valve job. Hopefully I won't be looking for a good rocker shaft assy
You might find things of interest in this thread: https://forums.yesterdaystractors.com/threads/z-134-rocker-arm-lubrication.1696607/

Modern replacement valves do not use caps.

The pan is easy to remove, cleaning inside with diesel is a fine idea.
 

We sell tractor parts! We have the parts you need to repair your tractor - the right parts. Our low prices and years of research make us your best choice when you need parts. Shop Online Today.

Back
Top