Let's fix this DB 885

Hi,

I just checked 1210 manual. The hydro control looks esentially same as 885.
I think you are referring the turning dial "D" in the picture (page 32 in 1210 Manual), correct? At what option the lift hitch works? Left/Depth; Middle/Height; or Right/TCU?

View attachment 62687View attachment 62688
In original design (at least according to the OEM manual), it controls how the internal lift hitch hydro operate (toggle among height, depth, TCU). But I realized the tractor I am dealing with has been modified. The original panel besides the hand lever has been changed, with 2 fittings that go to the front end loader. (red circled). You can see the difference. Does your 1210 come with similar setting?
View attachment 62689View attachment 62690


1210 Manual:
A gold mine:
Center raises the tph and I think my loader is loader is plumbed as you show circled...
 
UPDATE:
Unscrewed the valve screw with HF bit socket and impact screwdriver.
But after quite a while with engine running, there is still no fluid or bubble coming out. Suspect there is something wrong in the hydro and hydro control.
I noticed the switch dial #13 on this DB can be turned anong left/mid/right 3 position no matter the hand lever is in the rearmost selection position or not. In contrast, the manual says you should first pull the lever all the way back, then turn the switch dial. Is it normal on your DBs?

Btw, the switch dial knob on this DB is damaged. The wing on #13 is gone, left a bare stud. I turned it with pliers. Not sure if it's another redneck modification. Because the remaining of #13 looks very heavy duty, should not be easily damaged, and damaged in that clean cut manner.
WeChat截图_20240316164922.jpg
 
You already got it off, but just wanted to show you what I have had success with......

That is a Craftsman 9/16" drag link socket. It is 1/2" drive and will adapt to my impact driver, and it has loosened the capscrews on the valve chests of all David Browns that I own.

I do not know the answer to your other questions. Several of my DBs also have the wing missing off of the selector dial pointer. And, like you said, some of my tractors, the selector dial can easily be turned to other positions (like "TCU" , "height" or "depth") without bringing the quadrant lever to the rearmost position (like the manual states). I do not know the explanation for this.

I do not own any 885's but I have several 990's, a 1210 and a 1200 (which, truth be told, are probably identical to your 885 in respect to the problem at hand). Richard Martin is an expert in David Browns and I am hoping he sees this post. Thanks
 

Attachments

  • image000002.jpg
    image000002.jpg
    238.4 KB · Views: 15
You already got it off, but just wanted to show you what I have had success with......

That is a Craftsman 9/16" drag link socket. It is 1/2" drive and will adapt to my impact driver, and it has loosened the capscrews on the valve chests of all David Browns that I own.

I do not know the answer to your other questions. Several of my DBs also have the wing missing off of the selector dial pointer. And, like you said, some of my tractors, the selector dial can easily be turned to other positions (like "TCU" , "height" or "depth") without bringing the quadrant lever to the rearmost position (like the manual states). I do not know the explanation for this.

I do not own any 885's but I have several 990's, a 1210 and a 1200 (which, truth be told, are probably identical to your 885 in respect to the problem at hand). Richard Martin is an expert in David Browns and I am hoping he sees this post. Thanks
Thank you for the autopsy picture. I probably gonna have some questions about the control valve. I think 885's control valve should be essentially same as 990.

Correction to last post: The dial switch should be okay. When the lever is not fully pulled back, the switch can be turned from left or middle to the right, but not able to be turned back from right. So the dial switch linkage should be okay.

More UPDATE:

I run it at 1/3-1/2 thorottle for pretty long time, one hour or so. The valve bled. Should the bleeding that slow? How long did you bleed it? Please share your bleeding experience. In the beginning, there is little oil came out. Later more oil seeps out, with some tiny bubble and hissing sound. And the right hand screw is more active than the left one, correct?
In the end I thought that was too long to be normal, I tightened up both screws. IT LIFTS! And the lossen bleeding screw on the ram cylinder pis*ed a lot of oil.

However the happiness didn't last too long, until I realized a new problem. The control lever and switch knob doesn't work as it should be. Once engine started, the system keeps giving more pressure to the ram cylinder, no matter how I move the lever or turn the switch to right/TCU, the lift hitch won't go lower, and hydro pressure keeps build up, so that leaks from some weak spots on the loader hose. Looks like the pressure relief valve doesn't functional at that point.

Does such symptoms look familiar to you guys? Does anyone have similar experience with such symptoms? Because the control valve was not fully bled?

It's KNOWN:
1. I didn't fully raise the lift hitch to the 'disengaged position' as manual instructed. Because the 'stow latch' mechanism on this tractor is incomplete, and the stow latch pin (#8) is probably stuck. I cannot pull the pin out, so that prevent the lift hitch shaft from fully lifting up, and the ram cylinder from fully extending.
2. The hydro fluid is milky. The moisture content is unkonwn. But some DBers said milky is normal.
WeChat截图_20240316200851.jpg
 
Last edited:
UPDATE 03/17/24

Found the lever doesn't move the spool valve. When I moved the quadrant lever from one end to another, and observe through the inspection window, the tip of spool valve didn't move at all. Might be something wrong with the lever control rod or the linkage mechanism.

According to manual, when spool valve seat at the bottom, it feeds pressure to the ram cylinder (which is my case). When push the lever forward, the control rod will push the spool valve upward to the middle/hold and upper/bypass position, the ram cylinder will stay and lower. So it should be the issue.


WeChat截图_20240317115120.jpg
WeChat截图_20240317115203.jpg
WeChat截图_20240317120220.jpg
WeChat截图_20240317115517.jpg
 
Your spool valve is frozen, probably from some trash in that milky hydraulic fluid.

Take a brass drift and gently tap on the top of the spool valve. Do this while the selector dial is in the "depth" position (as pictured) and a friend is holding the quadrant lever all the way to the rear against the spring. Spray some penetrant (WD-40, Kroil, PB Blaster) on the top of the spool valve before tapping.

You will have to use a smaller diameter brass drift than the one I have pictured. You will also have to be a contortionist in order to perform the tapping, since the spool valve lies askew to the kidney shaped opening in the case. It might be beneficial to remove the seat in order to open up the work area and allow yourself to angle the brass drift through the kidney shaped opening and to be able to tap on the end of the drift.

It is important to have the selector dial in the "depth" position and to have a friend hold the quadrant lever back against the spring. By doing this, you are moving the "hammer" away from the bottom of the spool valve, such that when you tap with the brass drift, the spool valve can move. Otherwise, you would be tapping against a hard resistance (solid steel).

I am recommending that you TAP. Do not POUND on the brass drift. You do not want to bend anything or damage threads.

I have freed up a couple of spool valves using this approach.

Having said all this, I still have one DB990 here that has been refractory to all attempts to free up its spool valve. I will have to remove the valve chest and approach the problem on "the bench".

I hope you can free yours up "in situ".

image000000.jpg
image000001.jpg
image000002.jpg
image000003.jpg
 
Your spool valve is frozen, probably from some trash in that milky hydraulic fluid.

Take a brass drift and gently tap on the top of the spool valve. Do this while the selector dial is in the "depth" position (as pictured) and a friend is holding the quadrant lever all the way to the rear against the spring. Spray some penetrant (WD-40, Kroil, PB Blaster) on the top of the spool valve before tapping.

You will have to use a smaller diameter brass drift than the one I have pictured. You will also have to be a contortionist in order to perform the tapping, since the spool valve lies askew to the kidney shaped opening in the case. It might be beneficial to remove the seat in order to open up the work area and allow yourself to angle the brass drift through the kidney shaped opening and to be able to tap on the end of the drift.

It is important to have the selector dial in the "depth" position and to have a friend hold the quadrant lever back against the spring. By doing this, you are moving the "hammer" away from the bottom of the spool valve, such that when you tap with the brass drift, the spool valve can move. Otherwise, you would be tapping against a hard resistance (solid steel).

I am recommending that you TAP. Do not POUND on the brass drift. You do not want to bend anything or damage threads.

I have freed up a couple of spool valves using this approach.

Having said all this, I still have one DB990 here that has been refractory to all attempts to free up its spool valve. I will have to remove the valve chest and approach the problem on "the bench".

I hope you can free yours up "in situ".

View attachment 62987View attachment 62988View attachment 62989View attachment 62990

Super informative!

I am thinking about these 2 options, removed the valve; or work in place. There are too many unknown things about its prior history. I really concern about if tap the top of the valve in place, is it possible to damage the rocker lever and abutement block beneath the spool valve (the red arrow in your last picture), if there is no such a gap. These parts are hard to find in 2024.

I will keep thinking about it. Anyway, the autopsy pictures are super helpful. Thank you sir!

One more question:
If remove the valve body from the bracket, are step ONE and TWO able to be done without that special tool?
WeChat截图_20240317185706.jpg
 
Last edited:
Per manual, the 'thermostart' is in the fuel pump, a butterfly valve, and it's optional feature. On this tractor, the buttlerfly knob is gone (or never existed). Since it fires up every time eventually as long as the battery is strong enough, I have not digged into the thermostart yet before solved more critical issues (lift hitch, sinking loader, milky oil, frozen brakes, rusty links).

The hydraulic system on this tractor has been modified in pretty redneck way. They cut off the top of "connector plate" (part#K917127), and welded 2 fittings that lead to loader control valves. Homemade quality welding. According to the diagram, in this way the pump feeds pressure to the loader directly.

Manual says the pump is driven by PTO shaft. So you should be right, in theory the pump should stop when PTO shaft stops. I didn't notice that yet. Too many things to worry about (vague shift, stiff clutch, throttle don't stay, loader keeps sinking) As a newbie, every time sitting on the tractor is as scary as rodeo for me.
wechat%E6%88%AA%E5%9B%BE_20240315081043-jpg.62689
wechat%E6%88%AA%E5%9B%BE_20240315081125-jpg.62690
View attachment 62740
Does the redneck way the "the pump feeds pressure to the loader directly" mean that the pump can only work the loader and never the 3pt hitch?
 
Does the redneck way the "the pump feeds pressure to the loader directly" mean that the pump can only work the loader and never the 3pt hitch?
They cut the connection plate in right hand that with a pressure test port, the test port was cut off and welded 2 fittings to feed the loader. So that the loader and 3pt hitch are in series. Pump feed the loader directly which is the upstream, the return oil from loader feeds into the 3pt hitch control valve and ram cylinder.
 
UPDATE:
Yesterday I removed the valve chest. As expected, the spool valve is fully stuck. Next step is to remove every valve, clean and reassemble.
The entire process was smothier than original plan. I watched this YT video multiple times
Because of this video, I even got the engine hoist out from deepist spot of my garage, to deal with the ram shaft. But in the end I didn't use the hoist, I managed to lift and land the ram shaft on a tire on my own (885's is lighter than 990).
Several other issues found and to be fixed:
The stow hitch was installed in wrong direction. The quadrant lever is bent. And lot of cleaning jobs to do.
 
Your spool valve is frozen, probably from some trash in that milky hydraulic fluid.

Take a brass drift and gently tap on the top of the spool valve. Do this while the selector dial is in the "depth" position (as pictured) and a friend is holding the quadrant lever all the way to the rear against the spring. Spray some penetrant (WD-40, Kroil, PB Blaster) on the top of the spool valve before tapping.

You will have to use a smaller diameter brass drift than the one I have pictured. You will also have to be a contortionist in order to perform the tapping, since the spool valve lies askew to the kidney shaped opening in the case. It might be beneficial to remove the seat in order to open up the work area and allow yourself to angle the brass drift through the kidney shaped opening and to be able to tap on the end of the drift.

It is important to have the selector dial in the "depth" position and to have a friend hold the quadrant lever back against the spring. By doing this, you are moving the "hammer" away from the bottom of the spool valve, such that when you tap with the brass drift, the spool valve can move. Otherwise, you would be tapping against a hard resistance (solid steel).

I am recommending that you TAP. Do not POUND on the brass drift. You do not want to bend anything or damage threads.

I have freed up a couple of spool valves using this approach.

Having said all this, I still have one DB990 here that has been refractory to all attempts to free up its spool valve. I will have to remove the valve chest and approach the problem on "the bench".

I hope you can free yours up "in situ".

View attachment 62987View attachment 62988View attachment 62989View attachment 62990

HELP!
Today I started to dissemble every valve from the valve chest according to the sequence on the manual.
All valves were removed, except the "Rate of lowering valve". I removed the cover. The plunger/spool stuck inside. I tried many times with pliers, no luck.

Any idea? Many Thanks
WeChat截图_20240322174510.jpg
WeChat截图_20240322174652.jpg
 
Hello There.
I got this David Brown/CASE 855 from local auction (for $1250+125 auction premium+ 120 hiring trailer), unkown model year. I don't know if it's a good deal or not.
It's my first real tractor, in hope to do some yard work with it, moving gravel dirt and clear dense blackberry high grass with PTO attachment.
I know pretty much about car repair (my hobby) and with lot of car tools, and repaired riding lawn mower before. But no experience on real tractor. After initial assessment, I think the biggest enemies to deal with are: 1, old rust, 2, heavy part to be removed such as big wheel, final reduction, 3, antique parts. I am surprised that the tractor parts (no matter new or old models) are so expensive compared to ebay auto parts. As early ground work, I have found the operator manual, service manual, bulletins, part number manual.

I plan to fix the issues I found and gonna find, to bring it back to work, with mad max/fallout style cheap redneck methods as much as possible. Sounds good? I hope to borrow some priceless knolewledge from you guys on such antique machine, please give me some guidance and advise. Any idea would be great.

Issues, todo list (I will update):
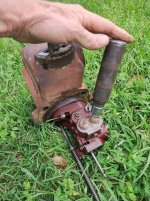
1. Hydraulic
the loader moves but slowly. Had not figured out how to make lift hitch moving because I just managed to get it back home for 2 days.
I found the hydro fluid is milky color on dipstick. The shifter boots are teared pretty bad. It's said water can go into from there. The hydraulic fluid and filter needs to be changed for sure.
For shifter boots, I can simply put another layer of used rubber glove on the outside, to make it waterproof. A simple fix.
For such tear on the boots, how bad the hydro fliud could be? Could it be the culprit of slow moving? It looks like has been sitting outdoor without much use for pretty long time.

2. Brake
Both sides dry brake are stuck. The camshaft needs heavy hammer to move little by little between open and close positions. I think the camshaft is stuck by old rust. Proved my guess that not used for long time.

3. Throttle lever friction disc
The lever doesn't stay. The big holding nut is rusted on the lever shaft.

4. Lubricate every moving link, make grease fitting when needed. The pedals and levers feels stiff due to rusty links. The homemade style front end loader's links are rusty worse. I didn't find grease fitting on some critical links. Need to drill and put on fittings.

5. Instrument panel, wiring
Because of possible wrong wiring, the alternator area got on fire due to short when I putting on the new battery. The wire from alternator to starter solenoid shorted.
All warning lights are gone (plan to fix). Light related switchs are gone (leave it as is).


View attachment 62519View attachment 62520View attachment 62521View attachment 62522View attachment 62523View attachment 62524View attachment 62525View attachment 62526View attachment 62527View attachment 62528
I do have a original service manual and parts manual for sale for your 885 and a few odd parts if you make a list of what you might need. my e mail is [email protected]
 
HELP!
Today I started to dissemble every valve from the valve chest according to the sequence on the manual.
All valves were removed, except the "Rate of lowering valve". I removed the cover. The plunger/spool stuck inside. I tried many times with pliers, no luck.

Any idea? Many Thanks
View attachment 63885View attachment 63886
Aho! 5/16 deep socket bolt extractor works.
The teeth bited the nipple, twisted it, pulled it...
 

We sell tractor parts! We have the parts you need to repair your tractor - the right parts. Our low prices and years of research make us your best choice when you need parts. Shop Online Today.

Back
Top