
| Submitted Article |
1952 Ford 8N
by Don Stewart
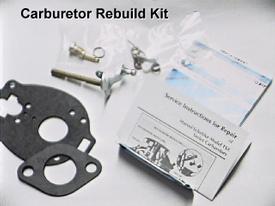 |
The carburetor kit for the TSX-241A/B/C carburetor is being supplied in only one flavor nowadays. It includes a replacement throttle shaft, new butterfly valve screws, fuel inlet filter, new float needle and seat, new float pin and gaskets. The rebuild kits are manufactured by TISCO (BK45V) and are available from tractor parts companies. They are also manufactured by Sorenson and carried on special order by AutoZone and the like. |
|
How you remove the carburetor from your tractor will depend on your particular model/year. There are two linkage shafts that connect to the carburetor, one to the governor and one to the choke control on the dash. Each of these shafts terminate in a spring loaded socket that will release the ball on the carburetor throttle shaft or choke shaft when the endcap is pulled against the spring. A rigid steel fuel line connects to the carburetor fuel strainer elbow. Be sure the fuel shutoff valve in in the closed position, and use a flare nut wrench to remove the flare fitting at the elbow without damaging it. Note the position of the elbow for reassembly, later. Loosen the clamps that hold the air hose onto the carburetor air inlet horn and work the hose loose. Remove the two nuts that retain the carburetor to the intake manifold on the engine. Work the carburetor down and away from the manifold until the studs are clear and the carburetor is free from the air inlet hose. |
 |
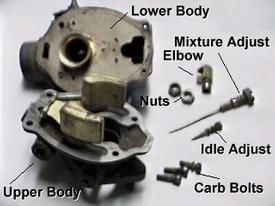 |
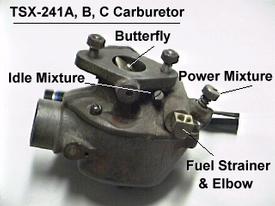
Remove the idle mixture screw/needle, spring and gasket, the power mixture screw/needle, spring and gaskets, and the fuel strainer/elbow. Carefully scrape off any gasket material on the manifold and its mating surface on the carburetor. Any gasket material left on either the manifold or carburetor will cause an air leak after reassembly. Remove the 4 machine screws that hold the upper and lower carburetor bodies together. Gently separate the bodies taking care not to damage or bend the brass float inside the upper body. |
|
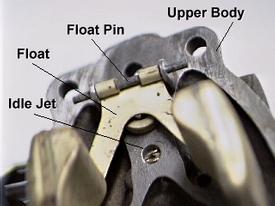
A steel pin holds the float in the upper body. Slide the pin out of its ears to release the float. Shake the float and listen for any liquid inside the floats. If there is liquid inside either float, replace the float and set in a safe place. |
 |
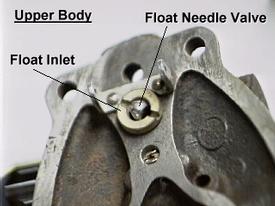 |
Underneath the float and held in by the float tang is the float needle. Pull it out and compare it to the new one in the rebuild kit. The needle will either be made entirely of steel or will have a rubber tip. Either version will work fine. |
|
Once the float needle is out, use a large, wide straight slot screwdriver to remove the float seat. This can be kinda tricky since the screwdriver bearing surface is so very small. Secure the upper body carefully in a soft-jaw vice for firm support and apply constant level pressure to the screwdriver to keep the blade from slipping. The seat is brass and is soft, but the threads will give in before the screwdrive slot gives way, as long as the screwdrive doesn't slip. |
 |
 |
Next to the float seat is the idle jet seat. This is the jet into which the idle screw/needle fits when the carburetor is running on your tractor. Removing this tiny jet is also tricky since its bearing surface is even smaller than the float seat. Use the widest straightslot screwdriver that will fit the casting hole and fit into the idle jet slot. Same as before, keep the screwdrive from slipping and the jet will come out. |
|
While it is a lot of work to get these parts out with destroying them, it is crucial to the rebuild that the boilout chemical be able to get into the passages behind these seats. The rebuild kit provides you with a new float needle and seat, but not a new idle jet. If you damage the jet (ie. the seat is all galled such that the idle screw/needle won't fit into it) you will have to purchase a replacement. Annoying, but not expensive. An you will have learned why the screwdriver shouldn't be allowed to slip. |
 |
 |
Assuming that your rebuild kit has the replacements, discard the old float needle, seat and gasket, and the old steel float retaining pin. Retain the idle jet (seat) and the float, and, of course, the upper carburetor body. Purchase a sealed gallon of carburetor parts cleaner from your local automotive parts store. AutoZone/Checker/PepBoys/Kragen ... sell these one gallon cans, including a small parts basket inside for around $12-$15. Make sure it comes with a parts basket inside, you don't want to be getting this stuff on your fingers. When working with carburetor cleaner use appropriate safety glasses and gloves. This stuff is caustic and if you get a few drops under you ring against your finger, it will burn until you can flush it with water. |
|
Drop the upper carburetor body, idle jet (seat), the power mixyure screw/spring and idle mixture screw/spring into the parts basket and lower it into the cleaner. Make sure it is completely covered. Watch out for splashes! While the upper body is in the soup, let's work on the lower body. On the bottom of the lower body are, variously, one or two plugs. One (the float bowl plug) takes a wrench to remove, the other (power circuit plug) takes a straightslot screwdriver. Again select the largest scredriver that will fit the slot in the plug and don't let the screwdriver slip. |
 |
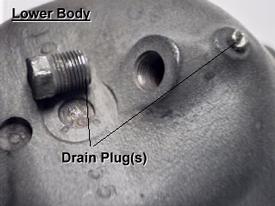 |
The float bowl plug is out. |
|
And the power circuit sand plug is out without too much trouble. |
 |
 |
As you can see in this rebuild, the hand made cardboard gasket stayed with the lower body. For you information, this won't usually be the case. A manufactured gasket, similar to the one that comes in your rebuild kit, will be retained under the float in the upper body because of the way it is cut. Remove and discard the gasket after checking that the one in the rebuild kit will fit your carburetor. |
|
Once any gasket is out of the way, remover the venturi. It is NOT symmetrical, so remember which way it fit into the lower body. If it is in really good shape, there is only one way that it will fit into the casting, but if it is the least bit beat up, you may have trouble figuring it out. Place a little dot on one end of the venturi with an indelible marker to keep track of which end installs in the lower body. |
 |
 |
With the venturi out, remove the Main Nozzle. Use a nutdriver or deep socket to get the nozzle out. Make sure that you don't cock the nutdriver or socket to one side or you will bend the nozzle spout which will keep it from breathing properly when reassembled. |
|
Not just any socket will fit in the space around the Main Nozzle. I've had good luck with a 1/4" drive deep socket. It seems to have a pretty thin wall. |
 |
 |
Set the discharge Main Nozzle aside. Discard the little round gasket, after checking that its replacement in the rebuild kit is the correct size. In the cavity next to the Main Nozzle is the main jet burried way down in there. It's another one of those straightslot screwdriver jobs again. Pick the widest screwdrive that will fit the slot, secure the lower body casting from moving around and apply constant even pressure on the screwdrive to keep it from slipping and out it will come. If you should gall it up, buy a replacement. Again, annoying, but not too expensive. You want to check the upper body mating surface for flatness by moving a steel rule all around the mating surface. If there is more than 1/2 of a gasket's thickness difference between the center and outside edges, plan on reassembling the carburetor with two gaskets. |
|
By now the Upper body has cooked enough in the carburetor cleaner. Pull the parts basket out of the soup and let it drain (you've got your safety glasses on and protecting your hands, right?). The carb cleaner is, in fact, water soluable but it is nasty stuff. I use spray brake cleaner instead of water to clean all that nasty stuff off of the clean carburetor parts. But the real necessity is compressed air. If you do not have compressed air, you will be lucky to get a satisfactory rebuild. The hidden passages in the carb is where all the varnish build-up is hiding, and while the parts cleaner will soften that stuff, it is the compressed air that forces the gooey mess out of the passages where the brake cleaner can dissolve it. Hit it with brake cleaner then hit all the passages with air. Repeat until that casting is Spic 'n Span clean, then set it aside on a nice clean cloth. (Anybody actually remember Spic 'n Span?) Place the lower body, main jet, and discharge nozzle into the parts basket and lower it into the carburetor cleaner soup. |
 |
 |
After the upper body is thoroughly clean and dry, it is time to replace the throttle shaft. 99% of old carburetors leak air around the throttle shaft and that upsets the air-fuel mixture something terrible. The throttle shaft is made of brass and is the part that wears, the throttle body bore is usually unaffected. To get the shaft out of the throttle body, you have to remove the butterfly valve. It is retained by (you guessed it) 2 brass straightslot screws. Secure the shaft so it won't move and keep the screwdrive from slipping, and they, too, will come out. |
|
Note the stampings on the butterfly valve so that you can reinstall it exactly as it came out of the throttle body. Make sure that the rebuilt kit has replacement screws, and throw the old ones away. |
 |
 |
Look around the throttle shaft to see if there are any really pronounced burrs in the brass. You are about to pull the shaft out through the bore and don't need any junk scoring the bore. |
|
If the shaft is reasonably clean, grasp the linkage end of the shaft and pull it out of the bore. It should slid out freely with a twisting motion with some friction. Check this old shaft assembly against the new one in the rebuild kit. The linkage end should be very similar. Remove the idle speed screw and its spring. Clean any crud off of the idle speed screw and replace it on the new shaft. Insert the shaft in the throttle body bore. Correctly position the butterfly valve, aligning it with the screw holes in the shaft. Reinstall the new retaining screws and tighten securely. |
 |
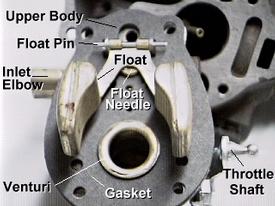 |
Reinstall the float seat with its round gasket and float needle in the upper body. Install the new body gasket and seat the venturi (note the dot you placed on the venturi to face the LOWER body). Reinstall the fuel inlet elbow/strainer with a new gasket and filter. Place the float over the float needle and insert the steel float pin through the ears in the casting to retain the float. On the lower body, reinstall two drain plugs, the main discharge nozzle and the main jet. |
|
Check the float level by holding the upper body with its manifold studs down so that the float tang rests on the float inlet needle and measuring the distance from the gasket to the closest part of the float. Adjust the tang by bending to get 1/4" clearance. |
 |
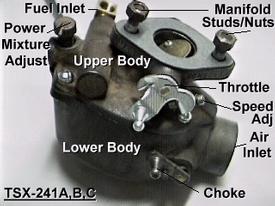 |
Reassemble the upper and lower housings making sure the gasket is not crooked and that the venturi seats properly with the lower body. Install the 4 body screws and tighten. Reinstall the power mixture needle/screw and its new gaskets, and reinstall the idle mixture needle/screw and its new gasket. Screw the two mixture screws closed then back off 1-1/2 turns. Back out the idle speed screw on the throttle shaft until the butterfly fully seats closed. Look around: Do you have any extra parts? If not then reinstall the carb on the intake manifold with a new gasket (you did clean the manifold gasket surface didn't you?), and tighten the manifold nuts. Reattach the air inlet hose and tighten the clamps. Reinstall the steel fuel line flared fitting to the fuel inlet elbow/strainer and tighten with a flare wrench. Reattach the carburetor linkage, one between the throttle linkage and the governor, and one between the choke linkage and the dash mounted choke control. |
|
Turn on the fuel valve feeding the carburetor and check for leaks, tighten as necessary. Put the engine throttle at idle and start the tractor. This may require more than one set of hands: adjust the idle mixture screw out until the idle starts to stumble, then turn the idle mixture screw in 1/2 turn. Set the idle speed screw to 400 rpm. Run the engine throttle up to max rpm and back out the power mixture screw until the engine just starts to lose power, then screw back in 1/2 turn. |
We sell tractor parts! We have the parts you need to repair your tractor - the right parts. Our low prices and years of research make us your best choice when you need parts. Shop Online Today.
Copyright © 1997-2025 Yesterday's Tractor Co.
All Rights Reserved. Reproduction of any part of this website, including design and content, without written permission is strictly prohibited. Trade Marks and Trade Names contained and used in this Website are those of others, and are used in this Website in a descriptive sense to refer to the products of others. Use of this Web site constitutes acceptance of our User Agreement and Privacy Policy TRADEMARK DISCLAIMER: Tradenames and Trademarks referred to within Yesterday's Tractor Co. products and within the Yesterday's Tractor Co. websites are the property of their respective trademark holders. None of these trademark holders are affiliated with Yesterday's Tractor Co., our products, or our website nor are we sponsored by them. John Deere and its logos are the registered trademarks of the John Deere Corporation. Agco, Agco Allis, White, Massey Ferguson and their logos are the registered trademarks of AGCO Corporation. Case, Case-IH, Farmall, International Harvester, New Holland and their logos are registered trademarks of CNH Global N.V.
Yesterday's Tractors - Antique Tractor Headquarters
Website Accessibility Policy